WebStore by Amazon Merchant Manual Beta Version 3.5.
INTRODUCTION TO WEBSTORE BY AMAZON 1 Overview 1 WebStore by Amazon and Your Products on Amazon.
About Category Manager 12 Uploading Your Product Information 12 Using Category Manager 12 Managing products within categories 15 Locating products 15 Using Excel to manage products 21 Managing the Display of Your WebStore 23 About Themes 23 About Template Manager 23 Setting Site Properties 25 Setting Page Properties 25 Working with Widgets 25 Editing existing content 29 Adding new pages 29 Publishing Your WebStore 30 Marketing your WebStore 31 Advanced Customizations: Tips an
Introduction to WebStore by Amazon Overview WebStore by Amazon lets you create an independent WebStore to sell products using pre-existing inventory information from Amazon.com. Your WebStore becomes your storefront on the Internet. Your storefront, branded with your logo and colors, displays just the products you sell. Customers can add products to their shopping cart as easily as they do on Amazon.com. At checkout, payment transactions are handled by Amazon.com as well.
Once you accept the WebStore by Amazon Terms and Conditions and provide the required information, you can create your storefront and begin selling on the Internet and taking your first orders within minutes. What is a Storefront? Your Storefront is the public Web site that consumers visit through your domain name or URL. Your storefront holds your product catalog, provides shoppers the ability to search and browse merchandise, and allows shoppers to purchase your products online.
Setting Up Your WebStore Overview WebStore by Amazon provides a suite of tools to setup and maintain your WebStore. Access these tools through Seller Central (https://sellercentral.amazon.com/gp/homepage.html). Tools that manage your WebStore by Amazon site are available only if you have selected one of your storefronts in the storefront drop-down box.
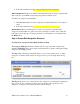
a. If you’re new to WebStore, you see the WebStore Agreement when you first sign-in. Read the agreement and accept its terms to proceed to the Store Creation page. b. If you’re a returning user, click the Store Design tab and then click the Create a New Store button. 2. In the 1-Click Store Setup section on the left, select a set of templates to use for your store from the Theme menu. (For specific information on each Theme, see About Themes later in this document. 3.
Step 2: Setting Up Your Catalog The Category Manager section of the wizard automatically detects how many products you currently have and then allows you to determine how to set up your WebStore category structure. Consider this step carefully, if you change your mind later, you will lose the category structure that was created.
2. Follow the instructions in Step 3: Review/Edit Navigation Structure. Auto Categorize: WebStore by Amazon automatically creates a category structure that mirrors the way your ASINs are currently categorized on Amazon.com. To build your categories automatically: 1. Click the Radio button for Auto Categorize, and then click Next. You’re taken to step 3. 2.
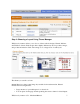
Step 4: Choosing a Layout Using Theme Manager WebStore by Amazon allows you to choose of three website designs, Natural, Modern, and WebStore Classic. Each design offers slightly different layouts for products, images, and product information. Click on the image to see a larger view of each layout. The themes you can choose from: Natural: Based on a large center image layout with a horizontal menu bar, Natural includes the following features: • • Large amounts of open whitespace for a clean look.
• • For pages with sub-categories, a menu bar can also appear in the left column. A search field appears in the header. Modern: Based on a three-column layout with vertical and horizontal menu bars, Modern includes the following features: • • • • You can customize the background color and graphic. You can place a homepage element spanning the center column for visual impact. The menu bar appears in the left column. A search field appears in the header.
Customizable areas of the Home page in Template Manager Step 6: Publish Your WebStore WebStore by Amazon allows you to publish the site you have just created. Publishing copies your WebStore to your domain server. You must configure your Domain before the store becomes available to customers. Configuring your Domain About Domain Names An internet domain name is a unique text name that points to a Web site.
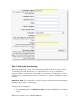
Configuring your Domain To configure your domain name, you need to complete two tasks: • • Change your domain name in Amazon Services Seller Central Customize settings with your domain registrar To Change Your Domain Name on Seller Central: 1. On the Seller Central WebStore Management page, click the Manage button next to the storefront you want to change. The Store Management page opens. 2. Click the Change Domain Name link. The Change Domain Name page opens. 3.
Once you create the appropriate records, they must propagate across the Web before your WebStore is visible at your domain name. The propagation period varies from a couple of minutes to up to 48 hours for changes to Address and CNAME records. General Instructions If your registrar is GoDaddy.com, Enom, or Network Solutions, follow the detailed instructions in Step 2: Customize Settings with Your Domain Registrar of Configuring Your Domain Name in Seller Central Help.
Managing Your WebStore Managing your storefronts encompasses a number of tasks: • • • • • • Managing your catalog Managing the display of your WebStore Driving traffic to your WebStore Updating your company’s contact information Publishing your WebStore after updates Updating your domain when needed Managing your categories About Category Manager CategoryManager lets you create and manage your own category structure, as well as organize products within categories.
To add your first category: 1. Click the Add New Category button. The Add New Category window opens. 2. In the Category Name text box, type your category name. 3. Click the Add Category button. Your new category appears in the category tree. Since this is your first category, it appears below the My WebStore category. To add additional categories: 1. 2. 3. 4. Click the category under which you would like to create a new category. Click the Add New Category button. The Add Category window opens.
If you selected the Auto-Categorize option on the first screen of Category Manager, duplicate categories may have been created in your category structure that you want to delete. Occasionally, you may want to delete a category rather than move it to another location in your category structure. Use the delete category feature carefully; deleting a category also deletes any subcategories under that category. Note: Deleting a category deletes all subcategories contained in it. 1.
To arrange categories: • You can also move categories up or down clicking the up arrow or down arrow next to the category name. To sort your categories: You can alphabetically sort categories and subcategories using the sort feature. Sorting is useful if you have a large number of subcategories and would like to organize them for easier viewing. 1. 2. 3. 4. Click the category that contains the subcategories you want to sort. Right-click the category. A right-click menu appears.
• • • • Unassigned Products generates a list of any products not currently assigned to a category. Category displays all products assigned to the selected category. Search lets you find specific products using search parameters. Excel Upload lets you use Microsoft Excel to manage products. Products are displayed on tabs. On each product tab, you can view the SKU, ASIN, product name, and the category(s) each product is associated with, if any.
To Change the number of products displayed per tab: Click the Show [10] Products per page drop-down box to select the number of products to display on the tab. You can select 10, 25, or 50 products to display. To scroll through product pages: Use the ">", "<", ">>", or "<<" buttons to scroll through all of the product pages within a tab. To view category associations: The column titled Category displays a link to the category. Click the link to view the products in the category.
listed as 'Multiple'. Mouse over the Multiple link. A list of categories is displayed. Click on a category to view the products associated with that category. To view products in a category: 1. 2. Click the Category tab. The products in the selected category appear. If the product is associated with a category, a link appears in Category column. Mouse-over the link to view the categories the product is currently assigned to. Click one of the categories to view all products in it.
To add products to a category: After you have created your category structure in Step 1, you are ready to add products. Category Manager automatically searches for and displays all the products you have uploaded to Seller Central. Products must be assigned to categories so your customers can view them on your WebStore. 1. Click the checkbox next to the product(s). 2. Click the Add to Category button. The Add to Category window opens. 3. Click a category to select it.
To remove products from a category: 1. Click the checkbox next to the product(s). 2. Click the Remove from Category button. The Remove from Category window opens. 3. Click the Apply button to remove the products from the category. Note: Products are not removed from your inventory, just from the category. WebStore by Amazon 3.5.
To add a product name: Product names are displayed under the Product Name column on each tab. If a product name is blank, you have not uploaded any name information for the product. To upload a product name, please see Add a Product in Seller Central Help. Using Excel to manage products If you're experienced with Microsoft Excel, you can use it to edit your product categorization. The All Products, Unassigned Products, Category, and Search tabs include an Export to Excel link. WebStore by Amazon 3.5.
Clicking this link creates an Excel spreadsheet of the tab's contents, and then downloads it to your hard drive for editing. When you've finished editing the file, you can upload it using the Excel Upload tab. To edit downloaded Excel files: 1. Open the downloaded file. 2. Specify whether a product should be assigned or unassigned by entering either "A" for assign, or "U" for unassign in the Action column. 3. Edit the Category column as necessary. To indicate a parent/child relationship, use the ">" sign.
Managing the Display of Your WebStore WebStore creates your storefront using themes, a collection of page templates. After creating your WebStore, you can customize its look-and-feel using Template Manager. About Themes WebStore by Amazon offers different themes, or site templates, that you can use to build your store. Each theme contains a collection of site pages, such as product and category pages, used to create your store.
Note: In order to optimize your pages for search engines, you must enter Custom Page Titles in the General tab of page properties. Search engines use this field to rank your Web site. This text also appears as the title of your page in search results and at the top bar of Web browsers. The template list shows the templates you have available. Selecting a template will display that template in the template window. It will also display the page attributes of that template in the page attributes window.
Setting Site Properties Site properties affect all pages in your WebStore. You can specify site properties as follows: 1. Choose Site Wide Properties from the Settings menu. 2. On the General tab, choose a Text Font Schema, and then enter your color preferences. 3. Text Font Schema specifies the font to use for WebStore. In general, common fonts such as Arial, Verdana, and Times New Roman work best. 4. Site Color Schema specifies the color used in your store's CSS (cascading style sheet).
Site Widgets, denoted by a red frame, create content for frames that appear on all pages of the site. Page Widgets, denoted by a black frame, create content that appears only on pages based on the template. A given widget can be either a site widget or a page widget, depending on the frame it's used in. Not all frames can contain all widgets. The widgets available for a given frame appear in the Widget Configuration window that opens when you click the frame.
1. 2. 3. In Template Manager, select the page template you want to work with. Click the frame where you want to add HTML. When the Widget Configuration window appears, select HTML from the Choose Widget menu. If HTML doesn't appear as a choice, you cannot add HTML content to the frame. Select another frame. 4. Choose the editor to work with: • WYSIWYG works much like popular word processing software. You see the content and its formatting in the editor as you enter it.
To use the Category widget: The Category Widget lets you create a link to one or more categories. For each specified category, the widget frame displays a random product from that category, and can include the product image, description, and a customized label. When a visitor clicks the frame, they're taken to the category page. 1. In Template Manager, select the page template you want to work with. 2. Click the frame where you want to add a category widget. 3.
5. Choose the number of Columns to split the frame into, and the alignment of text within columns. 6. In the Featured Product Widget - Properties section, check the product properties you want to include. Some properties, such as Product Image require you to make additional choices. 7. Choose the means of locating products using the Product Definition menu: • • • • Best Seller identifies the best selling products based on the Amazon sales rank.
4. Click the Add Page button. WebStore by Amazon adds the page to the location selected in Step 3. 5. After adding the page, you must link it to your menu bars for it to be accessible to customers. Publishing Your WebStore When you are ready for the public to access your site, you will publish your site. Publishing your site makes all of the changes site setup, or last publish, available to the public.
Marketing your WebStore Congratulations! You now have a live Web site. The next question you are no doubt wondering: how do I get visitors to my site? WebStore by Amazon has the answers. Froogle Froogle is a shopping directly by Google. It's free to upload products to Froogle, and WebStore by Amazon customers have reported great success in driving traffic to their site through Froogle. WebStore by Amazon will automatically create a Froogle file that you can upload to Froogle.
Once you enter a file name, enter that same file name in WebStore by Amazon. For more information on Google Sitemap and how it works, please see the Google help topic. WebStore by Amazon 3.5.
Advanced Customizations: Tips and Tricks Using Tips and Tricks You can use the tips and tricks below to get started developing an interesting and unique WebStore. We provide these tips and tricks to get you started, but you can experiment and invent your own methods to develop a site that suits the needs of your business. Change the Layout of Your WebStore WebStore by Amazon offers several out-of-the-box themes for the layout of your WebStore, but you can also create your own layout.
background-color:#ffe7c5; } a.topNav:hover {background-color:#fcd297; color:#666;} This changes the site’s default font to Trebuchet MS and updates the top navigation bar. The top navigation will now have borders and background colors, and a colored rollover effect similar to a tabbed menu. Please Note: The previous example assumes that you are using the “Natural” theme. Add a Background Image to Your Site Another example of how to customize the CSS is to add a background image to your site.
- Publish your site and view the flash on your live storefront. Embedding your Flash this way allows your customers to avoid confusing warnings in Internet Explorer. Add an Advanced Search A technique to add some additional functionality to your WebStore is to create a custom search widget.