AmbiCom WL250N-USB Wireless-N USB Adapter (This manual is useful for user installs with Ralink WIFI configuration option) User Manual Version 1.0 November 18, 2008 COPYRIGHT Copyright ©2008/2009 by this company. All rights reserved.
Federal Communication Commission Interference Statement FCC Part 15 This equipment has been tested and found to comply with the limits for a Class B digital device, pursuant to Part 15 of FCC Rules. These limits are designed to provide reasonable protection against harmful interference in a residential installation. This equipment generates, uses, and can radiate radio frequency energy and, if not installed and used in accordance with the instructions, may cause harmful interference to radio communications.
CHAPTER I: PRODUCT INFORMATION 1-1 Introduction And Safety Information 1-2 Safety Information 1-3 System Requirements 1-4 Package Contents 1-5 Familiar With Your New Wireless Network Dongle CHAPTER II: DRIVER INSTALLATION AND CONFIGURATION 2-1 Network Dongle Installation – With Ralink Configuration Tools 2-2 Connect To Wireless Access Point 2-2-1 Using Ralink Utility 2-2-1-1 Scan For Other Wireless Devices 2-2-1-2 Connect To An Access Point 2-2-1-3 Add An Access Point To Profile 2-2-2 Using Windows Zero Con
CHAPTER I: PRODUCT INFORMATION 1-1 Introduction And Safety Information Thank you for purchasing this high-speed 802.11b/g/n wireless network dongle! Except common wireless standards 802.11b/g, this wireless network dongle is also 802.11 Draft N v2.0 compatible - data receiving rate is up to 150Mbps, and that’s faster than 802.11g wireless network! 802.11n also provides wider wireless coverage, so you do not have to worry if your computer is far from your wireless access point.
1-5 Familiar With Your New Wireless Network Dongle LED Name Light Status Description Link/ On/Flashing Linked to a wireless access point / Activity Transferring data Off No wireless activity / No Link CHAPTER II: DRIVER INSTALLATION AND CONFIGURATION 2-1 Network Dongle Installation – With Ralink Configuration Tools Please follow the following instructions to install your new wireless network dongle: 1. Insert the Setup CD into your optical drive of your computer.
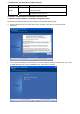
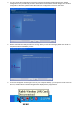
3. You can choose the configuration tool used to configure the wireless network dongle here. ‘Ralink Configuration Tool’ provides fully access to all functions of this wireless network dongle, such as WPS configuration. Otherwise, please select ‘Microsoft Zero Configuration Tool’ then click ‘Next’. 4. Please wait while the install procedure is running. When you see this message, please click ‘Finish’ to complete the driver installation process. 5.
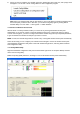
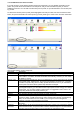
6. When you want to configure your wireless connection, please right click on this icon, and a popup menu will appear. You can click ‘Launch Config Utilities’ to start configuration program. Note: that if you stopped config utility by ‘Exit’ function, you’ll not be able to maintain the wireless link to the access point you wish to use. In this case, you can start config utility again by clicking ‘Ralink Wireless Utility’ icon from ‘Start’ -> ‘All Programs’ -> ‘Ralink Wireless’.
2-2-1-1 Scan For Other Wireless Devices Configuration utility will scan for all wireless access points automatically. Please check if the wireless access point with the SSID (the name of wireless access point) you preferred is shown here. If the wireless access point you wish to connect does not show here, please click ‘Rescan’ to try again, until the one you preferred is displayed. You may have to click ‘Rescan’ for more than two times before you can see the access point you wish to use here sometimes.
If the wireless access point does not have SSID, you’ll be prompted to input it now. Please ask the owner of wireless access point for the exact SSID and input it here, then click ‘OK’ when ready. If the SSID you provided here is wrong, you’ll not be able to connect to this access point. If the wireless access point uses encryption, you will be prompted to input its WEP key or WPA preshared key.
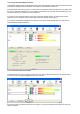
2-2-1-3 Add An Access Point To Profile If you will connect to some specific wireless access point frequently, you can add their information to the profile. The profile saves all information of access points, and you can recall them anytime you wish to establish connection. You can add a found access point to profile, or input all information of an access point by yourself.
To set authentication / encryption information for the access point. Please click ‘Auth. \ Encry.’ tab: Here are descriptions of every setup item: Item Name Description Authentication Select the authentication type of the wireless access point or wireless device you wish to connect. When you’re adding a profile from an existing access point or wireless device, authentication type will be selected automatically, and please do not change it.
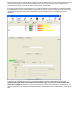
To set 802.1x authentication for the access point. Please click ‘802.1X’ tab: Here are descriptions of every setup item: Item Name Description EAP Method Select 802.1x EAP method from dropdown menu. Please ask the administrator of the access point you wish to connect to select a correct EAP method. Tunnel Select 802.1x tunnel authentication type from dropdown menu. Please ask the Authentication administrator of the access point you wish to connect to select a correct tunnel authentication method.
2-2-2 Using Windows Zero Configuration Windows XP and Vista has a built-in wireless network configuration utility, called as ‘Windows Zero Configuration’ (WZC). You can also use WZC to configure your wireless network parameter: Right-click Ralink configuration utility icon and select ‘Use Zero Configuration as Configuration utility’. Then Right click Windows Zero Configuration icon and select ‘View Available Wireless Networks’. All wireless access points in proximity will be displayed here.
2-3 Connection Profile Management If you need to connect to different wireless access points at different time, like of access point of your home, office, cybercafe, or public wireless service, you can store the connection parameters (encryption, passphrase, security etc, etc.) as a profile for every access point, so you don’t have to input these parameters every time when you want to connect to a specific wireless access point.
2-3-1 Add A profile If you want to click new profile, click ‘Profile’ menu, then click ‘Add’ button. You’ll be prompted to input detailed information of access point, as described in Section 2-2-1-3. 2-3-2 Edit An Existing Profile If you have added a profile before, and you wish to change the content of the profile, you can use this function. Please select a profile from the list first, then click ‘Edit’ button. You’ll be provided with the contents of selected profile, and you can edit them.
2-3-3 Delete An Existing Profile If you no longer need a profile, you can delete it. Select the profile you wish to delete from the list, and click ‘Delete’ button to delete it. 2-3-4 Activate A Profile When you want to connect to a specific wireless device in the profile list, you can select it and click ‘Activate’ button, to establish connection with it.
2-4 Advanced Settings This wireless network dongle provides several advanced settings for experienced wireless users. You can change these settings to increase data transfer performance, or change operation mode. Right-click the Ralink configuration utility icon located at lower-right corner of computer desktop and then click ‘Launch Config Utility’.
2-5 View Network Statistics The configuration utility provides information about network statistics and link status. If you want to know how your wireless network dongle works, you can use these functions to get detailed information about the wireless connection you’re using. Right-click the Ralink configuration utility icon located at lower-right corner of computer desktop and then click ‘Launch Config Utility’.
WMM - Power Save Enable Direct Link Setup Enable Check this box to enable WMM power saving mode to save energy, and let your computer’s battery live longer.
WPS-enabled wireless access point, then click ‘Connect’ to establish connection to selected access point, if there are more than one WPS-enabled access point found. You can also click ‘Rotate’ button, and next access point on the list will be selected to establish connection. If you want to delete a found access point from the list, select it and click ‘Delete’ button.
CHAPTER III: Soft-AP Function This wireless dongle can act as a wireless service provider to others. You can switch this wireless dongle’s operating mode to ‘AP’ mode to simulate the function of a real wireless access point by software, and all other computers and wireless devices can connect to your computer wirelessly, even share the internet connection you have! 3-1 Switch To AP Mode And Basic Configuration The operating mode of the wireless dongle is ‘Station Mode’ by default.
Here are descriptions of every setup item: Item Name Description SSID Please input the SSID (the name used to identify this wireless access point) here. Up to 32 numerical characters can be accepted here, excepting space. Channel Please select the wireless channel you wish to use. The number of channels available here will vary depends on the setting of ‘Country Region Code’. Wireless Mode Select the operation mode of the access point here.
Item Name Authentication Type Encryption Type WPA Pre-shared Key Group Rekey Interval Wep Key Description Please select a wireless authentication type you wish to use. Available options are ‘Open’, ‘Shared’, WPA-PSK’, ‘WPA2-PSK’, and ‘WPA-PSK / WPA2-PSK’. If you want to disable wireless data encryption, you must select ‘Open’. Please select an encryption mode. The available options in this setting item will vary depending on the authentication type you select.
Here are descriptions of every setup item: Item Name Description Access Policy Select the policy type of your access rule. Disable: Allow any wireless client with proper authentication settings to connect to this access point. Allow All: Only allow wireless clients with MAC address listed here to connect to this access point. Reject All: Reject wireless clients with MAC address listed here to be connected to this access point.
3-5 Event Log This software access point will log all wireless-related activities as a log. Click ‘Event Log’ tab, and the event log will be displayed. You can click ‘Clear’ to remove all entries in the log.
3-6 Statistics If you want to know detailed information about how your software access point works, click ‘Statistics’ tab, and the event log will be displayed. You can click ‘RESET COUNTERS’ button to reset all counters to zero. 3-7 About The ‘About’ tab provides you the information about version number of the configuration utility, driver, and other important information about your wireless access point. CHAPTER IV: Appendix 4-1 Specification Standards: IEEE 802.11b/g Interface: USB 2.0 (USB 1.
4-2 Troubleshooting Scenario I can’t find any wireless access point / wireless device in ‘Site Survey’ function. Nothing happens when I click ‘Launch Config Utility’ I can not establish connection with a certain Solution 1. Click ‘Rescan’ for few more times and see if you can find any wireless access point or wireless device. 2. Please move closer to any known wireless access point. 3. ‘Ad hoc’ function must be enabled for the wireless device you wish to establish a direct wireless link. 4.
What is BSS ID? A specific Ad hoc LAN is called a Basic Service Set (BSS). Computers in a BSS must be configured with the same BSS ID. What is WEP? WEP is Wired Equivalent Privacy, a data privacy mechanism based on a 40 bit shared key algorithm, as described in the IEEE 802 .11 standard. What is TKIP? TKIP is a quick-fix method to quickly overcome the inherent weaknesses in WEP security, especially the reuse of encryption keys. TKIP is involved in the IEEE 802.
What is GI? GI stands for Guard Interval. It’s a measure to protect wireless devices from cross- interference. If there are two wireless devices using the same or near channel, and they are close enough, radio interference will occur and reduce the radio resource usability. What is STBC? STBC stands for Space-Time Block Coding, which is a technique used to transfer multiple copies of data by multiple antenna, to improve data transfer performance.