
User's Manual
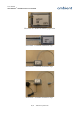


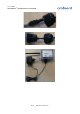


Table Of Contents
- 1 Preface
- 2 Introduction
- 3 Product Overview
- 4 Ambient Network
- 5 Installation
- 6 Configuration
- 7 Deployment
- 8 Example Deployments
- 9 Firmware Upgrades
- 10 Troubleshooting
- 11 Appendices

User Manual
3000 SERIES 3
rd
GENERATION ACTIVE RFID
5.4.2 MicroRouter MR3000
When installing an MR, first make sure that you have the right device, it should state MR3000 on the
label, followed by a hardware version ID (see Illustration 8).
The MR3000 is installed in a few steps that are listed below;
1. Screw on the SMA antenna on the SMA connector (see Illustration 9)
NOTE: Do not turn on the MR3000 when the SMA antenna is not connected, it could
damage the device!
2. Remove the cap from the DC gland (see Illustration 10).
3. Push the DC jack of the adapter through the cap (see Illustration 11).
4. Push the DC jack through the DC gland until it fits tightly in its socket (see Illustration 12).
NOTE: The AC/DC gland opening may be a bit rigid when used for the first time, you can
carefully widen it to make jack go through easier.
NOTE: If you do not push the jack fully in the socket, it might not be connected correctly!
NOTE: Make sure the rubber ring on the inside of the gland stays in place, if it is not in
its right position it may result in the connector not being water tight!
NOTE: If you decide to use a different AC/DC adapter for the GW3000, it needs to be of
class 2-II with a cable length less than 3 meter, and with the correct specifications (DC
voltage & amperage, polarity and plug-size).
5. Screw the cap back on the gland (see Illustration 13).
NOTE: If you do not tightly screw on the cap of the gland, it may result in the connector
not being water tight!
6. Place the DC adapter in a mains socket.
Mounting the MR3000 is described in the deployment section of this user manual.
22/73 Ambient Systems B.V.