WS-9029U 915 MHz WIRELESS WEATHER STATION INSTRUCTION MANUAL
CONTENTS 03 03 04 05 06 06 08 09 10 10 10 introduction features quick set up guide detailed set up guide function keys operations mounting troubleshooting maintenance and care specifications warranty information 2
This product offers: INSTANT TRANSMISSION is the state-of-the-art new wireless transmission technology, exclusively designed and developed by LA CROSSE TECHNOLOGY.
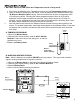
• Wall Hanging or Free Standing. Remote Temperature Sensor LCD Temperature Display Optional Probe w/ 6 Foot Wire FIGURE 2 Wall-Mounting Bracket ADDITIONAL EQUIPMENT (not included) 1. Two fresh AA 1.5V alkaline batteries for the wireless weather station. 2. Two fresh AAA 1.5V alkaline batteries for the remote temperature sensor. 3. One, Philips screwdriver for mounting. QUICK SETUP Hint: Use good quality Alkaline Batteries; avoid rechargeable batteries. 1.
DETAILED SETUP GUIDE I. BATTERY INSTALLATION (When one Temperature sensor is being used) 1. First, insert the batteries to the Temperature sensor (see “A. Temperature sensor” below). 2. Within 2 minutes of powering up the sensor, insert the batteries to the Weather Station (see “B. Wireless Weather station” below). Once the batteries are in place, all segments of the LCD will light up briefly. Following the indoor temperature and the time as 12:00 will be displayed, and the signal reception icon will flash.
* When the signal is successfully received by the Weather Station, the icon will be switched on. (If not successful, the icon will not be shown in LCD) So the user can easily see whether the last reception was successful (icon on) or not (icon off). On the other hand, the short blinking of the icon shows that a reception is being done now. FUNCTION KEYS The simple design of this product features 2 keys. SET/CH: • Press and hold for 5 seconds to enter set-up mode.
To view minimum and maximum temperatures: press the min/max/+ button once. “MIN” appears in the bottom left of the LCD. The indoor and outdoor temperatures displayed when “MIN” appears are the minimum recorded values. The minimum records will display for 30 seconds before returning to the normal display mode. Press the min/max/+ button again (once while “MIN” is still displayed, twice otherwise). “MAX” appears in the bottom right of the LCD.
NOTE: You must insert the batteries into the second sensor within 30 seconds of reception of the first sensor. 7. The outdoor temperature from the second sensor and the "channel 3" icon should then be displayed on the Weather station. If this does not happen after 2 minute, the batteries will need to be removed from all the units and reset from step 1.
THE WIRELESS WEATHER STATION The wireless weather station can be mounted in 2 ways: • with the table stand or, • on the wall with the use of a wall hanging screw (not included). A. USING THE TABLE STAND The wireless weather station comes with the table stand attached. If you wish to use the table-stand all that is required is to pull out the table stand on the back of the receiver and place the receiver on a flat surface. B. WALL MOUNTING 1.
MAINTENANCE AND CARE INSTRUCTIONS 9 Extreme temperatures, vibration, and shock should be avoided to prevent damage to the units. 9 Clean displays and units with a soft, damp cloth. Do not use solvents or scouring agents; they may mark the displays and casings. 9 Do not submerge in water. 9 Immediately remove all low powered batteries to avoid leakage and damage. 9 Opening the casings invalidates t he warranty. Do not try to repair the unit. Contact La Crosse Technology for repairs.
surface; (4) damage resulting from failure to follow instructions contained in y our owner’s manual; (5) damage resulting from t he performance of repairs or alterations by someone other than an authoriz ed La Crosse T echnology, Ltd authorized service center; (6) units used for other than home use (7) app lications and uses that this product was not intended or (8) the products inability to receive a signal due to any source of interference..