User Guide
Contents Contents Welcome to the amBIENT XC..................................................................... 2 Basics......................................................................................................... 3 Getting Started........................................................................................... 4 Touchscreen Features................................................................................. 4 The HOME Screen .............................................
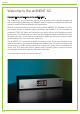
Welcome Welcome to the amBIENT XC Congratulations and welcome to the amBIENT XC. The amBIENT XC is a revolutionary lighting control system which radically changes the way in which lighting and space are designed and how lighting combines with video and sound to create immersive entertainment experiences. Electrify and enhance the mood of your venue with the amBIENT XC.
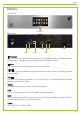
Basics Basics Front Panel Touchscreen hsc Back Panel RS232 Video In Ethernet Audio In DMX Power USB Touchscreen Easy to use touchscreen interface allows you to navigate through pre-installed ambient lighting effects, change the daily schedule and alter the light settings. Ethernet For network connectivity and connection to other devices. Video In Allows LED lighting installation to be synchronised to video content, producing dynamic lighting effects.
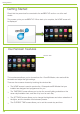
Getting Started Getting Started Check that the power lead is connected to the amBIENT XC and turn on at the wall socket. This powers up the your amBIENT XC. When start up is complete, the HOME screen will be displayed. Touchscreen Features Window Tabs The touchscreen allows you to choose from the 12 amBX Modes, view and edit the timetable and adjust the light settings.
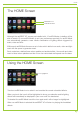
Home The HOME Screen amBX Mode Icon amBX Mode Name Although the amBIENT XC comes pre-installed with 12 amBX Modes, installers will be able to create 12 new amBX Modes to suit your preferences precisely. An amBX Mode can automatically generate a near infinite combination of lighting effects triggered by audio, video and time. Within each amBX Mode there are a set of rules which define how audio, video and light react with the space to generate mood.
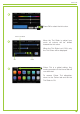
Colour Tint Adjusting Colour Tint ? The Colour Tint feature gives complete freedom to change the colour of your lights by tinting the colours in the modes from a light tint to a full block colour. Unlike BRIGHTNESS or SATURATION, tint mixes a colour of your choice with the selected mode. For example: Running a predominantly white mode and setting a blue tint to 50% would result in a light blue mode. Setting tint to 100% (Solid Colour) will result in the selected tint colour being displayed at all times.
Colour Tint 4 Press OK to select the tint colour. Colour Tint Slider Move the Tint Slider to adjust how much all colours will be shifted towards the tint colour. 5 When the Tint Slider is at 100%, only the Tint Colour will be displayed. 0% 6 100% Colour Tint is a global setting. Any mode you select on the Home tab will now be tinted.
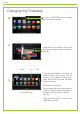
Timetable Changing the Timetable Touch the TIMETABLE tab to display the week view schedule. 1 2 Select the day of the week to enter the 24 hour view and alter the effects schedule for that day. Previous Next Back To set the daily schedule, first select the amBX Mode of your choice, then by touching the ‘Schedule Setting Bar’, select the hour that you want the amBX Mode to be used. 3 Press again to clear a slot.
Settings The SETTINGS Screen SETTINGS Tab Brightness Slider Saturation Slider Transition Slider The SETTINGS screen allows you to adjust the brightness, saturation and transition speed. These settings change the overall properties of the effects The ‘Brightness slider’ adjusts the intensity of the lights you have installed. The ‘Saturation slider’ adjusts the vividness of the colours. The ‘Transition slider’ adjusts the speed at which one preset changes to the next amBX Mode at the end of each hour.
Current Time The CURRENT TIME Screen Previous SET Next The DAY/TIME screen allows you to alter the current day and time. The time is used by the amBIENT XC for the 7-day scheduler and daily systems check. The options can be easily navigated through by using the ‘Previous’ and ‘Next’ buttons. Changing the Day and Time CURRENT TIME Tab Touch the CURRENT TIME tab to display the current time window Use the arrows to adjust the day, hour and minutes display.
Troubleshooting/Specification Troubleshooting If you are experiencing difficulties please verify that the amBIENT XC has power and is correctly connected by following the instructions in the Quick Start Guide or this User Guide. If the amBIENT XC still does not operate as expected please contact your installer.
Safety Safety Instructions To reduce the risk of electric shock, do not remove cover. There are no user serviceable parts inside. Refer servicing to your installer or a qualified personnel. Read Instructions All the safety and operating instructions should be read before appliance is operated. Retain Instructions The safety and operating instructions should be retained for future reference. Heed Warnings All warnings on the appliance and in the operating instructions should be adhered to.
Safety Non-use periods The power cable should be unplugged from the outlet when left unused for a long period of time. Foreign objects Care must be taken so that objects do not fall into the appliance, and that liquids are not spilled into the enclosure through openings.
Other Information Other Information Disclaimer All amBIENT XC software remains sole property of amBX UK Limited and its suppliers. Any attempt to alter or replicate the contents of the amBIENT XC is prohibited. Any attempt to copy or alter the software will render any warranties void. amBX UK Limited will initiate legal proceedings against anyone attempting to copy or replicate the software. Do not open the amBIENT XC case, to do so will void your warranty.
amBX UK Ltd 2-8 Gloucester Road, Redhill, Surrey, RH1 1FH, United Kingdom www.ambx.