
User Guide


AmbirScan User Guide
UG-AS-6.2 © 2019 Ambir Technology, Inc. Page 19 of 22
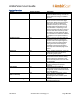
Name
Default (On/Off)
Description
File Naming
On – see description
Options for naming your files once
scans are completed.
• None: Each scan with the
same prefix will be over-
written by the subsequent
scan. Users must change the
file name prefix if they wish to
preserve new scans.
• Date (Default on): Adds a date
stamp after the file name you
choose.
• Numeric: Adds sequential
numbers after the file name.
Note: sequential numbers are
specific to the prefix
(examples: Scan1, Scan2,
Scan3, Scan 4, etc. Test1,
Test2, Test3, Test4, etc.)
Select Scanner
NA
Displays the scanner that is in use on
your PC. The scanner should be
automatically detected on startup.
Note: If the correct scanner is not
displayed, click the drop down and
select the appropriate scanner.
Select a File Path
On*
The default folder location for saved
scans.
*Default location:
C:\Users\Public\Documents\AmbirScan
File Format
NA
Select between Searchable PDF (sPDF),
Word, Excel, PDF, and TIFF.
Scan Size
On – Auto
Default setting is Auto. Other options
available depending on your needs.
Scan Type
On – Color
Color, Grayscale and Black & White
scanning.
DPI (dots per inch)
On
Default is 300. Note that decreasing or
increasing the DPI of an image may
lead to image quality deterioration
and/or effect speed of scanning.
Scan Mode
See Description
If a single-sided scanner is in use, this
field will display ‘Simplex’ and will be
greyed out.
For double-sided (duplex) scanners,
the drop-down menu will allow for
either Simplex or Duplex scans.
Scan Profile
On – Color F1
Displays the current profile selected
for scanning. The default profile for
scanning on installation is Color F1.