
Operation Manual


- 55 -
C141501700.fm
User's manual
GB
Important
Always replace and repair the parts in
compliance with the Manufacturer’s
instructions, otherwise contact the As-
sistance Service if these operations
are not described in the manual.
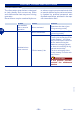
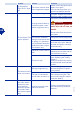
The led (D) of the
power supply unit
does not turn on.
There is no power volta-
ge
Check that the position of the
cursor (B) matches with the
power voltage and that the
push button (A) is on "ON".
Check that the power supply
unit is correctly connected to
the power socket.
Blown fuse
Get the fuse replaced by the
nearest authorized Assistan-
ce centre.
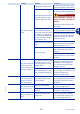
The led (C) (green)
of the transmitter
is on.
Interrupted perimeter
wire
Stop the robot in safety condi-
tions (see "Robot safety
stop").
Press the button (A) of the
power supply unit on OFF.
Carry out the joint of the peri-
meter wire.
The led (C) (oran-
ge) of the transmit-
ter turns on
repeatedly with
consecutive
flashes (less than
4).
Perimeter wire too long.
Install the signal amplification
kit.
Perimeter wire damaged
or oxidized.
Check any joints. if necessary,
replace the wire.
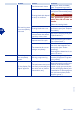
The led (C) (red) of
the transmitter is
on.
Connections not perfor-
med correctly.
Get the check carried out by
the nearest authorized Assi-
stance centre.
Problem Causes Solutions
B
A
D
C
PARTS REPLACEMENTS
PARTS REPLACEMENT REMINDERS