AMC TR1a WiFi Wireless Transmitter with Video On Demand and Broadcasting IA
CAUTIONS AND FEATURE LIST FEATURES OF THE AMCTM MODEL TR1a * with Video on Demand and Broadcasting features. * Wireless IEEE 802.11a 5 GHz WiFi configuration. * Internal NTSC / PAL or SECAM / PAL dual band TV Tuner. * Multiple audio and video inputs supported. * Three external Video Inputs : S VIDEO input: one S connector AV1 input: Composite Video (three RCA Connectors - Video, L & R) AV2 input: Composite Video (one 3.
REAR & FRONT SIDE PANELS / FRONT PANEL REAR & FRONT SIDE PANELS 10 1. 2. 3. 4. 5. 6. 7. 8. 9. 10. 1 2 3 5 4 6 7 8 9 "RJ-45" "DC 12V" power input connector RCA connector (Red) "OFF/ON" Power Switch "S VIDEO" input connector 3.5mm mini connector(Video, L, R) "AV1" Composite Video inpu RCA connector (Yellow) "AV1" Audio L input RCA connector (White) "AV1" Audio R input RCA connector (Red) "AV2" Composite Video input 3.
FRONT PANEL 1 2 3 4 1. 2. 3. 4.
FREAR SIDE PANEL 1. RJ-45 The RJ45 is for updating firmware of TR1a or hooking TR1a to Ethernet Network for linking TR1a to all other equipment with IP addresses linked to the Ethernet Network. 8. " AV 2 " C o m p o s i t e V i d e o i n p u t 3.5mm mini connector (Video, L, R) This is a 3.5mm mini connector with Video, L, R for Composite Video "AV2" input for hooking to Composite Sources. 9. "TV Tuner" input connector This is a connector for hooking to TV Antenna or Cable TV's. 2.
FRONT SIDE PANEL 1. Connector for IR Blaster The 3.5mm mini connector is for IR Blaster Output. IR Blasters can be hooked up to the connector. connecting to external Stereo Audio systems and the latency between the P r e - O u t a n d Vi d e o w i l l h a v e t o b e adjusted by time delay module. So, the Pre-Out is an option and will be installed for special designed projects and according to special orders only. 2. Connector for Stereo Audio Pre-Out (Option) The 3.
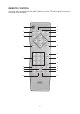
REMOTE CONTROL (for using with receiving units like AMC i-M15a to control TR1a through IR receiver on receiving units and WiFi) 3 1 4 2 5 6 8 7 9 10 12 11 13 14 15 18 16 17 19 22 20 21 7
Function of each button on Remote Control Handset: 1. Power On/Off 2. Rescan for receiver to re-scan and locate all available TR1a select one preferable TR1a. 3. Video Select AV1, AV2 or S VIDEO input of the TR1a selected 4. TV Select Cable/Broadcast TV input of the TR1a selected 5. Audio STEREO, SAP, MONO 6. Screen Select Display aspect ratio 16:10 or 4:3 7. Menu function up Menu function down Menu function display Menu function forward Menu function backward Menu and can 8.
19. TV Scan Auto-detect channels with TV programs 20. Wireless Wireless channel selection 21. Bitrate Low, Mid, High 22.
SETUP AND INSTALLATION Installing the TR1a For the best reception of the wireless signal to all areas of your house, it is best to install the TR1a near the center of your house.
1. Connect the Cable TV or Broadcast TV Antenna to the "TV Tuner" connector on rear side panel of TR1a 2. Connect source devices to "S VIDEO", "AV1" and "AV2" input connectors on rear side panel of TR1a S VIDEO AV1 (DVD-1) AV2 (Mini AV) DVD-2 Use S-Video cable included in TR1a to connect your source device with S-Video output to the S Video input connector of TR1a.
INSTALLING THE CORRESPONDING RECEIVERS LIKE i-M15a (here we use i-M15a for the installing procedures ) 1. Turn on TR1a power LED will be lighted 2. Turn i-M15a (or other corresponding receivers) battery power ON by pressing the POWER (Battery Power) button on top of i-M15a for 5 seconds. Once i-M15a battery power turning ON i-M15a will be under Standby mode. (If you have power adaptor plugged into i-M15a, the i-M15a will be under Standby mode all the time. 3.
b. Press TV SCAN button on the remote and choose your local TV system by pressing "TV SCAN" button in sequence. c. After choosing your TV system, press ENTER on the remote, the TV Tuner in TR1a will automatically scan and save all available channels. d. Now you can enjoy TV programs on your i-M15a by using the remote handset similar to normal TV set. 11. Selecting AV1, AV2 and S VIDEO Press VIDEO button on remote, you will be able to select AV1 or AV2 or S VIDEO input source.
Video On Demand and Broadcasting 14
SPECIFICATIONS Wireless . . . . . . . . . . . . . . . . . . . . . . . . . . . . . . . . . . . . . . . . . . . . . IEEE 802.11a 5 GHz Video Encoder . . . . . . . . . . . . . . . . . . . . . . . . . . . . . . MPEG2 video chip, DVD Quality Video Scaler . . . . . . . . . . . . . . . . . . . . . . . . . . . . . . . . . . . . . . . . . 3D video image chip with Video on Demand and Broadcasting features Wireless IEEE 802.
SAFETY INSTRUCTION 1. READ INSTRUCTIONS 16. DAMAGE REQUIRING SERVICE All the safety and operating instructions should be read before the appliance is operated. 2. RETAIN INSTRUCTIONS The safety and operating instructions should be retained for future reference. 3. HEED WARNINGS All warnings on the appliance and in the operating instructions should be adhered to. 4. FOLLOW INSTRUCTIONS All operating and use instructions should be followed.
WELTRONICS CORP. LONDON/L.A. AMC Web: http://www.amchome.