
Operation Manual


11
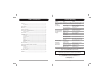
Specifications
PLM Models Range
Cooling Capacity 10,000 - 14,000btu / hour
Heating Function Included on EH Models
Cooling Power Consumption 790W/7.4A – 1100W/9.8A
Moisture Removal 60 - 80 pints / day
Window Kit Material Plastic
Thermostat 64º ~ 90°'F
Control LCD with remote
Power Supply 115 V / 60Hz / 1 Phase
Max Room Size 300 - 400 sq.ft.
Timer 0 ~ 24 hours
Fan Speeds 3
Compressor Rotary
Refrigerant / Load R22 / 15.5 oz.
Exhaust Pipe Max Length 5 ft.
Exhaust Pipe Diameter 5 in.
Window Kit Length 48" Maximum
PRoduct Dimension 19.5"L x 17"W x 32.5"H
Package Dimension 24.5"L x 21.5"W x 36.5"H
Net Weight 73 - 75 lbs.
Gross Weight 78 - 90 lbs.
REMARKS:
The cooling capacity of the unit may be affected by the height of
the ceiling, quality of insulation, number of windows, etc.
2
Emptying the Internal Water Container
NOTE: A proper balance between temperature and humidity is critical to maintain a comfortable
living environment. If humidity is high, it will be necessary to empty the Internal water container
frequently, until the ideal humidity is reached.
When the internal water container is full, the back light on the LCD display
flashes. The unit will shut off automatically, beep 15 times, and must be
drained before it will restart.
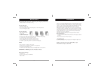
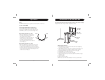
To Drain the Unit:
• Switch off the unit and remove the plug from the wall socket.
• DO NOT MOVE THE UNIT. Doing this can result in water
leakage, damaging your floor or carpet.
• Place the drain pan on the floor under the drain cap.
• Remove the drain cap and the rubber stopper from the
drain, and let the water run out. Partially fill the drain pan,
replace the rubber stopper, and empty the drain pan.
This procedure must be repeated until the unit is empty.
• Replace the rubber stopper and drain cap.
Put plug into the wall socket, and switch the unit on.
The warning signal should be off.
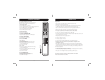
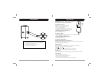
For Continuous Drainage:
• Switch off the unit and remove the plug from the electrical outlet.
• Remove the Drain Cap and Rubber Stopper. Drain if necessary.
• Connect a Drain Tube (not included) (20mm / 3/4" inner dimension) on to the water outlet.
• Place the other end in a drain. Make sure the tube is free from twists and bends.
The tube must decline over its entire length.
NOTE: When restarting the unit it may take up to 3 minutes for the compressor to turn on.