Wi-Fi NVR Quick Start Guide Version 1.0.
Contents Hardware Setup ............................................................................................................................... 4 NVR Initialization .............................................................................................................................. 6 Main Menu Overview ....................................................................................................................... 9 Motion Detection, and Recording Setup ...............................
Welcome Thank you for purchasing an Amcrest Wi-Fi NVR. This document provides a brief overview of your Amcrest Wi-Fi NVR, setup, and its features. For access to a full user manual or further information regarding your device please visit: http://amcrest.com/support Important Safeguards and Warnings All installation and operation of the device should conform to your local electrical safety codes.
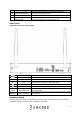
Icon NET PWR HDD Name Network Abnormality Power indicator HDD abnormal indicator light Function When a network error occurs or there is no network connection, this light turns red. When the NVR is on, this light remains on. When an HDD error occurs, or the HDD capacity is below the specified threshold value, this light turns red. Rear Panel Applicable for A3 Series Wi-Fi NVRs HDMI VGA MIC IN MIC Out USB 2.
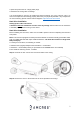
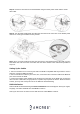
A power strip with room for 4 large power plugs A hard drive for storing video recordings. It is recommended to connect all components before mounting any of the cameras. This is to ensure all components are working properly before they are physically installed. If any components are not functioning, please contact Amcrest Support: https://amcrest.com/contact Hard drive installation Setting up the cable connections A hard drive must be installed to record or save any footage.
Step 3: Connect a hard drive to the motherboard using the SATA power cable and the SATA data cable. Step 4: Turn the NVR upside down and align the hard drive to the four holes on the bottom panel and secure it using the included security screws. Note: Once you have finished securing the hard drive to the bottom panel of the NVR, turn the NVR back over and secure the cover back onto the device similar to the instructions provided in step one. Setting Up the Cables 1.
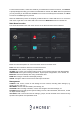
Enter Password Create a new admin password for your NVR. The password for your device should be between 8 and 32 characters. A combination of letters, numbers, and symbols are recommended when setting up your password. Note: Please do not use special symbols like ‘ ‘ ; : & Once you have entered a new password for your device, confirm the password in the next field. A hint for the password is optional but is recommended in case you forget the password. Click Next.
Password Protection Additional means of password protection and retrieval can be set up in this menu. If you would like to reset your password using your email, make sure the email address checkbox is enabled and enter a valid email address in the Email Address field. The email address will be retained in the system. If you do not want to use an email address you can disable the email address option. As a secondary means of recovering your password, you can apply security questions to your NVR.
To format the hard drive, select the hard drive you would like to format from the list, click Format. A prompt will appear letting you know that all data will be cleared, click Save. Enter the password you set previously on the NVR and click Save. Once it has successfully been formatted, click Save to continue and Save again to proceed. When the initialization process is complete you will be taken to a video wall screen.
Adding Cameras The NVR can add Wi-Fi cameras wirelessly or cameras that are registered over your network. Wireless cameras can be paired to the device using wireless pairing. Please note, the Wi-Fi camera does not need to be connected to your network initially to pair it to the NVR. For more information on how to pair a Wi-Fi camera to the Wi-Fi NVR, please refer to the information provided below.
The following setup processes will be shown using the NVR’s local interface. However, these same steps can be done through the web interface on a computer. For more information on how to access your device from a web browser, please refer to section, “Computer Access Setup”. Despite the difference in appearance, the setting pages have similar organizational structures. Enabling Recording Options This menu should be verified to ensure that all recording protocols are enabled.
To choose a channel (or camera) for which to configure, click the number next to Channel, then select either a single channel or All if you would like the schedule to apply to all channels currently connected to your NVR. By default, the NVR will have the schedule for each recording type to record 24/7. Also note, that the NVR uses military time from 00:00 to 24:00 hours instead of 12 a.m. to 12 a.m. To edit a recording schedule, select a recording type from the colored boxes.
Another way to configure recording schedules is by manually setting time periods. Click the “gear‟ icon to the far right of any day to open the Period page: Here, the periods (Periods 1 - 6) will be in displayed in chronological order. You can set either Regular, MD, or Alarm, checkboxes. You can also copy the period settings over to other days by checking them individually or checking All. Make sure to click Save when finished.
In the Copy window, you can select individual channels for any cameras you have added to the NVR or select All: Click Save. When finished, click Apply to save your changes. Setting Up Motion Alerts This will allow video or snapshots of motion detection events to be recorded and retained in the system. For more information on configuring motion detection, please refer to the information below. 1. On the Main Menu, click on Alarm. 2. Select Video Detection to access the Motion Detection menu.
Note: If the camera supports human detection and would like this feature enabled, click the Human Detection toggle switch to enable this feature. Adjusting Region Settings You can set up “regions‟ for motion detection using the region grid on your NVR. By default, the entire area of view for your cameras will be highlighted with red blocks indicating that all areas of the live view screen will have active motion detection.
You will be able to click individual blocks or click-and-drag an area with the new selected color to highlight portions of the screen. Each new region (or color) has its own unique sensitivity and threshold settings. The different regions/colors can also overlap one another. To exit the regions setting screen, right click your mouse on the interface. Adjusting Motion Detection Schedules Motion detection schedules work the same as the schedules outlined in section: “Setting Up Recording Schedules.
Accessing Playback Recordings can be accessed in the Search option on the main menu. A hard drive must be installed to access and view recordings from this menu. To access the playback interface, click on the Playback option located in the main menu. To view recordings from the search menu, select the camera you wish to view from the Camera Name section by clicking on a checkbox next to the device. A timeline of the recordings will appear in the interface.
To select specific days/months or years, use the navigation arrows provided in the calendar. A file list of recordings can also be shown by clicking on the File List icon ( ) located in the interface. Once clicked, a list of recordings will be shown based on the time the events were recorded. Note: In the File List menu, “R” stands for regular/continuous recordings, “M” stands for Motion Detection recordings. To play a recording from the file list menu, double click on the file you want to view.
You must use a compatible web browser such as Internet Explorer (recommended), Firefox (49.0.2) or Safari 11. The NVR can be accessed using Chrome and other browsers; however, some features may be compromised. Note: If you prefer not to use a web browser plugin to access your NVR you can use our free Amcrest Surveillance Pro software to access your device on a computer.
Enter Password Like accessing the NVR directly, if you are accessing the NVR for the first time you will need to enter a password for the device. Enter a password. Click Next to continue. Next, it is recommended to secure your NVR with an Email address and security questions. The Email address entered can be used for password recovery purposes in case a password is forgotten or needs to be reset. Enter a valid email address and then select and answer the security questions provided in the dropdown menu.
Audio: This tab allows you to configure audio announcements and import audio files into your system. These audio announcements can be used as voice prompts within the system. Amcrest View Pro App Setup The Amcrest View Pro app allows instant access to all live camera streams from any location. The app supports a multitude of features and includes both a plug-and-play setup as well as a manual network setup.
5. Tap “P2P Connection”. Note: IP/Domain/DDNS can be used to establish a connection using an IP address. 6. Scan the QR code. The QR code can be found on the serial tag along with a scannable barcode. 7. Create a name for the device and enter a 8. Update the default password for the device username and password. The default username and tap “Start Live View” to view the device. and password will be admin. Tap “Start Live View”.
for your device. For more information regarding the Amcrest View Pro app, please visit: https://amcrest.com/support FCC Statement 1. This device complies with Part 15 of the FCC Rules. Operation is subject to the following two conditions: (1) this device may not cause harmful interference, and (2) this device must accept any interference received, including interference that may cause undesired operation. 2.
References & Contact Information To view setup videos for many of the steps outlined in this guide, go to http://amcrest.com/videos For more supplemental information, a full user manual, or to view articles related to your device visit http://amcrest.com/support For contact information please visit us at https://amcrest.com/contact or reach out to us directly at 1-888-212-7538 This quick start guide is for reference only. Slight differences may be found in the user interface.