
Quick Start Guide


10
Adding Cameras
The NVR can add Wi-Fi cameras wirelessly or cameras that are registered over your network.
Wireless cameras can be paired to the device using wireless pairing. Please note, the Wi-Fi
camera does not need to be connected to your network initially to pair it to the NVR. For more
information on how to pair a Wi-Fi camera to the Wi-Fi NVR, please refer to the information
provided below.
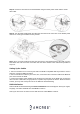
Pairing a Wi-Fi Camera
To pair a Wi-Fi camera, make sure the Wi-Fi camera is within ten feet of the NVR and is powered
on. Please note, if the Wi-Fi camera’s password is set to admin, it may automatically register with
the NVR, however, to pair the camera manually, right click your mouse on the video wall screen
and select Wireless Pairing from the list.
A wireless pairing interface will be displayed and will list all Wi-Fi cameras detected by the system.
A countdown will begin, once the countdown is complete, the Wi-Fi cameras detected by the
system will be paired. If the feed is not being displayed, please make sure the correct password
for the camera is entered in the Camera Registration menu.
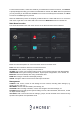
Camera Registration
The Camera Registration menu allows you to configure cameras to the NVR, check the status of
the camera, as well as add other devices that may be associated with your network. Please make
sure the NVR and the cameras are on the same network segment during registration.
To access the camera registration menu, go to the main menu and click on the Camera option
located under Management and access the Remote Device menu.
Paired Wi-Fi cameras
If a camera has been paired to the NVR and the status is registered as with a red dot (offline)
please make sure to check that the password for the camera is registered properly in the system.
To update the password, click Edit (pencil icon), enter the correct password for the camera into
the interface and click Save. If the password has been entered correctly the Status indicator will
turn green indicating the camera has been properly registered.
Adding a PoE Camera
Other devices such as PoE cameras that are connected on your network can be added in this
menu. Ensure the NVR and the cameras are on the same network segment and click Device
Search to allow the NVR to scan for connected devices. A list of applicable connected devices will
be displayed. Select the device you want to add then click the Add button. The device will be
added into the Added Device menu.
If the camera’s status is registered as with a red dot (offline) please make sure to check the
password of the camera is registered properly in the system. To update the password, click on
Edit (pencil icon), enter the correct password for the camera into the interface and click Save.
Click Refresh to refresh the interface, if the password has been entered correctly the Status
indicator will turn green indicating the camera has been properly registered.
Motion Detection, and Recording Setup
This section will cover how to set up a recording schedule for your NVR. A recording schedule
allows you to set specific times in which the device will record and detect events. This is applicable
to regular (24/7 recordings), motion detection, and alarms.
This is a baseline model NVR which does not include the ability to email snapshots or
record to an FTP server. For more information on recording schedules or other useful
information, please visit amcrest.com/support