
Quick Start Guide


6
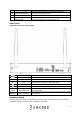
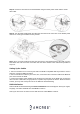
Step 3: Connect a hard drive to the motherboard using the SATA power cable and the SATA
data cable.
Step 4: Turn the NVR upside down and align the hard drive to the four holes on the bottom panel
and secure it using the included security screws.
Note: Once you have finished securing the hard drive to the bottom panel of the NVR, turn the
NVR back over and secure the cover back onto the device similar to the instructions provided in
step one.
Setting Up the Cables
1. Connect a monitor or TV screen to your NVR. The NVR is compatible with any monitor or screen
that uses a VGA or HDMI connection.
2. Connect an Ethernet cable to your router, then, connect the other end of the cable to the Ethernet
port on the back of the NVR.
3. Connect the NVR’s power adapter to the power port on the back of the NVR, then connect the
other end into a wall outlet, surge protector, or power strip to power the device. Allow the device
to boot, you may hear a beep noise once the NVR has finished booting.
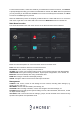
NVR Initialization
After the NVR has finished booting the Device Initialization screen will appear. Select your region,
language, and video standard then click Next to continue.
Select your time zone as well as current date and time. Click Next to continue.