
Quick Start Guide


8
Password Protection
Additional means of password protection and retrieval can be set up in this menu. If you would like
to reset your password using your email, make sure the email address checkbox is enabled and
enter a valid email address in the Email Address field. The email address will be retained in the
system.
If you do not want to use an email address you can disable the email address option. As a
secondary means of recovering your password, you can apply security questions to your NVR. To
add a question, select a question from the drop-down menus for Question 1, Question 2, and
Question 3 and enter the answers to those questions in the Answer fields. Once this section is
complete, click on the Save button to save your information to the device.
IP Setting
The IP address for the NVR will be the address used to access your NVR’s web user interface in
a web browser. It is highly recommended to make sure the IP is set as static. To set the NVR to
a static IP address, click on the DHCP toggle switch to disable DCHP. Click the Test button see if
the IP is available. Click Next.
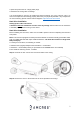
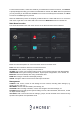
P2P
The next screen that appears is the P2P screen. This screen allows you to connect your NVR to
your mobile device using the Amcrest View Pro app which is available in the App Store or Google
Play store. Ensure the P2P toggle switch is enabled, and the P2P status reads “Online”. When
using the app, use the Device SN QR Code for quick access to the serial number for your NVR.
Click Next.
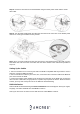
HDD Manager
The next screen will be the hard drive manager screen. This screen allows the user to verify the
hard drive is being read properly by the NVR as well as provides an option to format. It is highly
recommended to format the hard drive before proceeding.