
Quick Start Guide


9
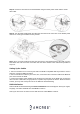
To format the hard drive, select the hard drive you would like to format from the list, click Format.
A prompt will appear letting you know that all data will be cleared, click Save. Enter the password
you set previously on the NVR and click Save. Once it has successfully been formatted, click Save
to continue and Save again to proceed.
When the initialization process is complete you will be taken to a video wall screen. To access the
main menu, right click on the video wall screen and select Main Menu from the shortcut list.
Main Menu Overview
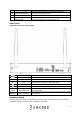
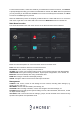
The screenshot below is the main menu screen for the Amcrest NVR console interface:
Below are short descriptions for each of the menu items on the main menu:
LIVE: View and control live feeds from connected devices.
PLAYBACK: View, search, and play recorded videos.
ALARM: View, search, and configure alarm events such as motion detection and abnormalities.
OPERATION: View system and log information, import export configurations, set to default, etc.
BACKUP: Search and backup files using a USB flash drive.
DISPLAY: Configure resolution and display settings.
AUDIO: Configure audio announcements and import audio files.
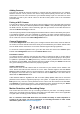
Management
CAMERA: Add, search, review or edit settings for each camera, including video settings (e.g.
quality, bit rate, color, etc.).
NETWORK: Review and edit TCP/IP, port settings, etc.
STORAGE: Edit recording schedules, review, and configure hard drive settings, etc.
SYSTEM: Review and edit general system settings such as, video standards, date & time, as well
as adjust firewall settings.
ACCOUNT: Add or remove shared user settings, groups, as well as ONVIF users. Reset security
questions and update reset password email.