Walkie Talkie Model: ATR-22 THANK YOU! We are grateful for your choice of our transceiver. We believe that this easy-to-use transceiver will provide dependable and cost-effective communications for you. Our professional two-way radios incorporate the latest in advanced technology and craft. So you will be pleased with the quality and features of our products. Please read this manual carefully to ensure you know how to properly operate the radio before use.
PRECAUTIONS 1. Refer service to qualified technicians only. 2. Do not disassemble or modify the transceiver for any reason. 3. Do not expose the transceiver under direct sunlight long time or to extremely hot condition. 4. Do not place the transceiver on the unstable surface. 5. Keep the transceiver out of dust, moisture, and water. 6.Do not operate the transceiver or charge the battery pack under explosive conditions.
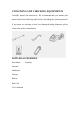
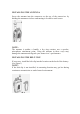
UNPACKING AND CHECKING EQUIPMENTS Carefully unpack the transceiver. We recommend that you identify the items listed in the following table before discarding the packing material. If any items are missing or have been damaged during shipment, please contact the dealers immediately.
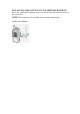
CHARGING THE LI-ION BATTERY PACK Please charge the new battery pack before using it. The new or stored (more than two months) battery pack, which can not reach its full capacity for the first charging. After 2 or 3 times charging and discharging, it can reach full charge. Just see the following instructions: 1. Plug the adapter into an electric socket. 2. Insert the transceiver or battery into the drop-in charging tray. 3.
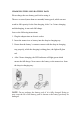
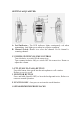
INSTALLING/REMOVING THE BATTERY PACK The usage time of JL-11 Battery Pack is about 8 hours, which is based upon 5% transmit/5% receive/90% standby (standard duty cycle). See following images: CAUTION: 1.Do not short-circuit the terminals of the battery or throw the battery into the fire. 2.Do not disassemble the battery pack yourself.
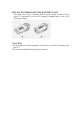
INSTALLING THE ANTENNA Screw the antenna into the connector on the top of the transceiver by holding the antenna at its base and turning it clockwise until secure. NOTE: The antenna is neither a handle, a key ring retainer, nor a speaker, microphone attachment point. Using the antenna in these ways may damage the antenna and degrade your transceiver’s performance. INSTALLING THE BELT CLIP If necessary, install the belt clip into the location on the back of the battery.
INSTALLING THE (OPTIONAL) SPEAKER/MICROPHONE Insert the speaker/microphone plugs into the speaker/microphone jacks of the transceiver. NOTE: The transceiver is not fully water resistant when using speaker/microphone.
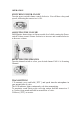
GETTING ACQUAINTED A. Led Indicator-- The LED indicator lights continuously red when transmitting. And lights green when in reception condition. B. Channel Switch—Rotate it to select the channel. No.16 channel is scanning channel. C. POWER SWITCH/VOLUME CONTROL Turn clockwise to switch ON the transceiver. Turn counterclockwise fully to switch OFF the transceiver. Rotate to adjust the volume. D. PTT (PUSH-TO-TALK) BUTTON Press this button, then speak into the microphone to call a station.
OPERATION SWITCHING POWER ON/OFF Turn the power switch/volume control clockwise. You will hear a beep and speech, indicating the transceiver is ON. ADJUSTING THE VOLUME Hold Monitor button down to listen to audio level while rotating the Power switch/Volume control. Rotate clockwise to increase and counterclockwise to decrease volume. SELECTING THE CHANNEL Turn the channel switch to select your desired channel. NO.16 is Scanning Channel. TRANSMITTING 1.
ADDITIONAL FUNCTIONS: SQUELCH LEVEL The purpose of Squelch is to mute the speaker when no signals are present (Squelch OFF). With the squelch level correctly set, you will hear sound only while actually receiving signals (Squelch ON). The squelch level can be adjusted via program software. TIME-OUT TIMER (TOT) The purpose of the Time-out Timer is to prevent any caller from using a channel for an extended period of time which will cause thermal damage.
have begun speaking into the microphone. When you operate the VOX function, you must use an optional headset with microphone. 1.When operating the VOX function, be sure to set the VOX Gain level which allows the transceiver to recognize the sound levels. 2.If the microphone is too sensitive, the transceiver will begin transmitting when there is noise in the background. 3.If it is not sensitive enough, it will not pick up your voice when you begin speaking.
BUSY CHANNEL LOCK-OUT (BCL) Busy Channel Lock-out function can be turned ON/OFF with program software on every channel. When activated, BCL prevents you from interfering with other parties who may be using the same channel that you selected. Pressing the PTT switch while the channel is in use will cause your transceiver to emit an alert tone and transmission will be inhibited (you cannot transmit). Release the PTT switch to stop the tone and return to receive mode.
SPECIFICATIONS: Frequency Range:406.1-470MHz RF Rated Power:≦5W Channel Spacing: 12.5kHz and 6.25kHz Channel Capacity:16s Operated Voltage: 3.7V Dimensions:115mm×60mm×33mm Weight: 180g NOTE All specifications are subject to change without notice. TROUBLESHOOTING GUIDE No Power ·Check battery installation and/or replace batteries. Voltage Capacity Quickly Go Out. The battery life is over, replace new one. Couldn't I communicate with other group members.
Hear the voice from other groups. Please change your CTCSS for the channel. At the same time, you also need to the CTCSS for all the radios in your group. If you don't like this, you may apply another channel frequency. Why can I hear the voices clearly from other group, sometimes, my voice is intermittent. Please check whether the MIC is blocked by something. If so, Please return the radio to your authorized dealer for maintenance. Sometimes, your frequency is same as the frequency of other groups.
WARRANTY CARD Model: Serial NO.: Dealer: User name: Address: Purchase Date: Tel. NO.: Fax NO.: Zip Code: Warranty Remarks: 1. The consumer keeps the warranty card as the proof for repairing. 2. The card is of validity with the stamp and date. 3. The card mustn’t be altered. Please confirm that the card NO. and the machine NO. must be same, or else it is not valid. 4. The accessories, such as charger, battery, earphone, antenna, and program cable are not covered.
SAFETY TRAINING INFORMATION Your Amcrest radio generates RF electromagnetic en-ergy during transmit mode. This radio is designed for and classified as “Occupational Use Only”, meaning it must be used only during the course of employment by individuals aware of the hazards, Warning and the ways to minimize such hazards. This radio is not intended for use by the “General Population” in an uncontrolled environment.
this radio by the manufacturer or an antenna specifically authorized by the manufacturer for use with this radio. • DO NOT transmit for more than 50% of total radio use time (“50% duty cycle”). Transmitting more than 50% of the time can cause FCC RF exposure compliance requirements to be exceeded. The radio is transmitting when the “TX indicator” lights red. You can cause the radio to transmit by pressing the “PTT” switch.