
Quick Setup Guide

Online Quick Start Guide
amcrest.com/batterycamsetup
Need help?
support@amcrest.com
1-888-212-7538
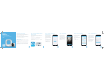
How can we help?
We are dedicated to
providing the highest
quality support to our
customers and are
available 7 days a week.
Create a custom name for your
Amcrest Smart Hub. After you
have named your device, tap
Save to continue.
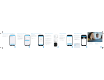
Step 6: Name Your Amcrest Smart Hub
You have successfully setup the
Amcrest Smart Hub. Now let's
begin pairing your battery
cameras to your Amcrest Smart
Hub.
Tap “Next” to continue.
Step 8: Amcrest Smart Hub Setup
is Complete!
Additional cameras can also be
added later in the process as
well from the Smart Hub menu.
To add another camera, select
your Amcrest Smart Hub device
from the Devices menu.
Tap “+ Pair IPC” to continue,
then repeat the pairing process.
Adding Another Camera
Note: Each Amcrest
Smart Hub can
support a maximum of
6 battery cameras.
The camera has now been
successfully paired to the
Amcrest Smart Hub.
If you would like to add
addtional cameras, tap “Add
another camera” and repeat
the pairing process.
If you are done pairing
cameras, tap “Finish”.
Pairing is Complete!
1 Press the Sync button on the
front of your Amcrest Smart Hub.
The LED indicator light will begin
WRǤDVK
2 Press the Sync button on the
back of the camera. A green LED
indicator light on the front of the
FDPHUDZLOOEHJLQWRǤDVK
indicating the camera is pairing to
the Amcrest Smart Hub.
When pairing is successful, the
LED indicator lights on the camera
and Amcrest Smart Hub will turn
VROLGDQGWKHQWXUQRǢ
Tap “Next” to continue.
Step 9: Pairing Cameras
Set your desired time zone in the
“Time Zone”ǣHOGDQGHQDEOHRU
disable Daylight Savings Time by
using the “DST” toggle.
To save your time zone settings
for future devices, simply switch
on the "Save as Default" toggle.
Tap “Next” to continue.
Step 7: Set Your Time Zone
7
8
9
10
11
12 13