Digital Video Recorder Quick Start Guide Version 1.0.1.
1. Front/Back Panel Diagrams & Descriptions................................................................................. 3 Front Panel ................................................................................................................................... 3 2. Front/Back Panel Diagrams & Descriptions................................................................................. 4 Rear Panel .....................................................................................................
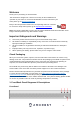
Welcome Thank you for purchasing an Amcrest DVR! This document is designed as a reference tool only for the installation and operation of your DVR. To access and download the full user manual for your DVR, please go to amcrest.com/support. Many of the setup sections below have corresponding videos on YouTube To access the setup videos, please go to http://amcrest.com/videos Note: This guide is applicable to all 4, 8, and 16 channel H5/XVR model Amcrest DVRs.
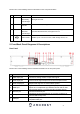
Please refer to the following chart for information on the front panel buttons. SN Icon Name Function 1 NET Network abnormality indicator light When a network error occurs or there is no network connection, this light turns red. 2 PWR Power indicator When DVR is on, this light remains on. 4 HDD HDD abnormal indicator light When an HDD error occurs, or the HDD capacity is below the specified threshold value, this light turns red. USB 2.0 Port USB 2.
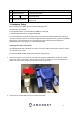
8 Port Name Function Power input port Inputs DC 12V power. 9 10 Ground terminal. Power cable fastener Use a clamp to secure the power cable on the DVR to avoid signal error. 3. Hardware Setup Before setting up the DVR, you will need the following items. The items are not included: ● A computer monitor or TV with either an HDMI or VGA input ● A power strip with room for 4 large power plugs It is recommended to connect all components of the system as shown below before mounting any of the cameras.
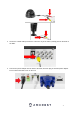
3. Connect an Ethernet cable to your router. Then, connect the other end of the Ethernet cable to the DVR. 4. Secure the coaxial extension cable to the camera’s video cable port. Then, connect a power adapter to the camera’s power adapter port and plug the power adapter into a wall socket or power source.
5. Secure the coaxial cable port from the camera to any of the video (coaxial) ports on the back of the DVR. 6. Connect the power adapter into the back of the DVR, and then plug in the DVR power adapter into an electrical socket to turn on the unit.
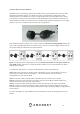
Using an Amcrest 4-in-1 Camera Quadbrid or 4-in-1 technology, allows for a flexible means of providing HD-CVI, HD-TVI, AHD, and Analog formatted video to your DVR. The signal is transmitted uncompressed, which eliminates latency and allows for real-time, highly reliable video security without loss or delay. The cameras connect point-to-point directly to the DVR (BNC) which provides a highly secure, closed network, as well as a painless and non-complex plug-and-play setup process.
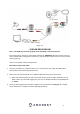
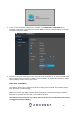
Figure 1-1 - PLEASE READ BELOWNote: Your DVR may not work properly if the following is not accounted for. Every DVR comes preset to a video output resolution of 1280x1024. What this means is that any time an HDMI cable is plugged into an HDTV, it may result with a blank screen even if the DVR is working properly. If this occurs, please follow the steps below. Procedure using a VGA cable: 1.
5. Then, on the new window, change your resolution from 1280x1024 to 1920x1080. Once complete, scroll down to the bottom and click on Save to save your display settings. Your DVR will reset to effect the change. 6. Disconnect the VGA cable and connect your DVR to an HD monitor or TV using an HDMI cable. Don’t forget to change the input to HDMI on your TV/monitor. The DVR will load and you will be able to properly use the unit on your screen.
To install your hard drive, the following is needed: ● ● ● A medium sized (regular) Phillips-head screwdriver - not included A hard drive - not included (unless you purchased a ‘kit’ that does have one included) Four hard drive fastening screws - included Note: Before installing the hard drive, make sure the DVR is powered off and completely disconnected from power.
Once the hard drive is installed, turn on the DVR. If the hard drive for your DVR was not setup properly you may hear a beeping noise. This indicates the DVR does not have the proper connection with your hard drive. If you need further assistance with installing your hard drive, feel free to contact us any time at support@amcrest.com or you can give us a call at 888-212-7538. 4. Console Setup 1.
2. Unlock Pattern This is an optional security measure for your device. You can also assign an unlock pattern for your admin account. To set an unlock pattern, using your mouse, draw a design which you will remember to access your device. If you do not wish to assign an unlock pattern, you can click “Skip” to skip this process. If you have assigned an unlock pattern, you will need to draw the pattern again to confirm the validity of your assigned unlock pattern. 3.
Once this section is complete, click on the Save button to save your information to the device. Startup Wizard Walkthrough The first page of the Startup Wizard will appear: If you do not want to use the Startup Wizard, or you have already gone through it and do not want it to keep appearing, unmark the checkbox next to Startup and click Cancel. Note: Every page from the Startup Wizard that follows can be accessed and modified at any time through the Main Menu. To login to the system, click Next.
General Settings The next screen that comes up is the GENERAL settings screen. Once you are satisfied with the settings on this screen, click the Next button at the bottom of the screen. The next screen that appears will be the Date & Time settings screen. This is where you can set the date and time for your specific location. If you wish to utilize daylight savings time, toggle the DST toggle switch to the on position.
Note: Make sure to toggle the NTP toggle switch to the off position to avoid syncing your device to the NTP server. The next screen that will appear is the Network settings screen. In this screen you can configure the network settings. If you want to set your device up to have a static IP, toggle the DHCP toggle switch to the off position. Note: To test the connectivity of the device to your network, click on the Test button. The device will return a network status.
The next screen that appears is the P2P settings screen. This will be enabled by default. It is highly recommended to keep this enabled if you want to use you’re the Amcrest View Pro mobile app or AmcrestView.com to view your cameras remotely. After enabling the P2P toggle switch, click the Next button to continue. The next screen that appears is the ENCODE settings screen. This is where you can adjust the video quality settings for your DVR/cameras, including the compression and frame rate.
After adjusting the encode settings for your device, click on the Next button to continue. The next screen that will appear will be the Snapshot settings screen. This is where you can adjust the settings for your snapshots. This includes, the image size, quality, as well as interval in which the snapshot is retained. Once set, click on the Next button to continue. The next screen that will appear will be labeled Basic.
The next screen you see is the Record settings screen. Your DVR is configured, by default, to record everything on all channels 24/7 (this will only actually happen provided you have a hard drive installed). You can also use this screen to set up motion detection and alarm schedules.
Once you are satisfied with the settings on this screen, click the Next button at the bottom of the screen. Next you will be able to configure your snapshot settings for your scheduled recordings. You can also use this screen to set up motion detection and alarm schedules for snapshot events. Once you have scheduled your events, click on the Finished button to continue.
Main Menu overview The screenshot below is the main menu screen for the Amcrest DVR console interface: Below are short descriptions for each of the menu items on the main menu: VIDEO: Search and playback recorded video that is stored on the hard drive. ALARM: View and configure live alarm information and notifications sent by the device. BACKUP: Search and backup video data via an external USB or flash drive. DISPLAY: Configure resolution and display output settings.
2. Click on Channel Type and select the IP Camera option. (This is dependent on how many channels your specific model DVR can handle.) 3. Click on Apply and allow the DVR to reset. 4. Navigate back to the Camera menu and click on Registration. 5. Click on Device Search to search for the IP camera you want to add and click on the enable checkbox. . 6. Click on the Add button to add the IP Camera to the DVR.
Once purchased separately, for hard drive installation instructions, please refer to part 3 of this guide. The following setup processes will be shown using the DVR console’s built-in interface. However, these same steps can also be done through the web interface on a computer. Despite the difference in appearance, the settings pages have the exact same organizational structure. Setting up recording schedules 1. Log into your DVR with your username and password: 2.
4. To choose a channel (or camera) for which to configure the recording schedules, click the number next to Channel, then select either a single channel or All: 5. By default, the DVR will have the schedule configured to record regularly 24/7. Notice the green bars going across each day of the week. Also note that the DVR uses military time, that is, from 0 to 24 instead of from 12 a.m. to 12 a.m.
Click the eraser icon to the right of any day to clear the entire row of all green blocks. 6. To add or remove motion detection blocks to the grid, mark the checkbox next to MD, then click individual cells or click-and-drag for multiple blocks: 7. To the left of each day, there are small boxes which can be marked to “link” different days together. This is useful if you want to save time by instantly making changes to multiple days simultaneously.
In the below example, Sunday and Monday are linked, so any blocks that are added or removed for Sunday will automatically and immediately reflect the same for Monday and vice versa: 8. Another way to configure recording schedules is by using setting the time periods. Click the ‘gear’ icon to the far right of any day to open the Period page: Here, the periods (Periods 1 - 6) must be in specified in chronological order. You can set either General, MD, or both with the checkboxes to the right.
In the Copy window, you can select individual channels for any cameras you have added to the DVR or select All: Click OK when finished. 10. When finished on this screen, click Apply to save your changes. Setting Up Motion Detection and Email Alerts Your DVR will save motion detection recordings, in addition to scheduled ‘regular’ recordings and distinguish between the two in the playback menu. 1.
2. Open the MAIN MENU, and click the ALARM tab. 3. In the alarm menu, click on VIDEO DETECT.
Change your channel (or camera) by clicking Channel and selecting from any cameras currently added to the DVR. You can also select All. Make sure the Enable toggle switch is activated. Then, click Setting to Region to configure the motion detection areas. 4. You can set up ‘regions’ for motion detection using the region grid on your DVR. By default, the entire area of view for your cameras will be highlighted with red blocks.
In plain English: Sensitivity is the difference between a squirrel running up a tree, versus a big dog running up to and barking at that tree. A squirrel would trigger motion detection at a higher sensitivity because it takes less change or movement to qualify as motion. But the dog would trigger motion detection at a lower sensitivity because it takes more change or movement to qualify as motion.
The Period Settings page works very similarly to the recording schedule page featured in the previous section in part 5 of this guide. 7. Next, if you want to receive email alerts with snapshots from your motion detection events, check the boxes for Send Email and Snapshot: 8. Once you have set up your settings for one channel, you can copy them to another channel.
9. Click Apply to save all the settings made on this page. 10. Next, go back to the main menu and click the NETWORK tab on the bottom row. In the Network menu, click on EMAIL from the left navigation panel: The recommended method for this step is to create a new Gmail account that is dedicated to sending you email alert snapshots for motion detection. This is useful because, then, you don’t have to change any of your own personal email’s settings.
In the Username field, enter your new Gmail account’s address. For example: “amcrestemailsme@gmail.com”. Then, enter the password for this account in the Password field. In the Email Address field, enter your own personal email account’s address. For example: “amcrestemailsme@gmail.com”. In the Sender field, enter your email address again. Make sure the toggle switch for the Attachment is toggled to the on position. Then, make sure the Authentication field is set to “SSL”.
6. Computer Access Setup There are 2 ways to access your DVR from a computer (laptop or desktop) which are: locally or remotely. Local Access: Logging into your DVR’s web interface from a computer or laptop device connected to the same network as your DVR (home, office, etc.). Remote Access: Logging into your DVR’s web interface from a computer or laptop device connected to a network outside of your home or business network (coffee shop, work computer, etc.
software that allows your computer to understand the language that the DVR speaks in a way that a computer can understand. That’s what the browser plugin is for. There are 2 ways to access the DVR’s web interface: Amcrest IP Config Software method and the built-in interface method. Amcrest IP Config Software Method Amcrest IP Config Software can be installed for free onto your computer from Amcrest’s official website. The IP Config Software is available for both Windows and Mac operating systems.
5. You will be asked to allow this program to make changes to your computer with a pop-up window, click Yes. 6. Once you see the first page of the installer wizard, click Next to continue. 7. On the next page, check the box next to “I agree”, then click Install.
8. After the progress bar completes, if you see a Windows Security Alert popup, click Allow access. 9. This brings you to the main screen of Amcrest IP Config Software. Your DVR will automatically be found on your network and appear in the list (if properly connected with an Ethernet cable to your router). You will also see the IP address associated with your DVR. The “e” icon to the right allows you to launch directly into your web browser from this screen.
“default” web browser to access and log into your DVR. If your default browser is not Internet Explorer, you can write down the IP address from the Amcrest IP Config Software (IP address located above), open Internet Explorer yourself, and type that into the search bar to get to the login screen.
5. Write it down. It will look something like “192.168.1.74”, although it may vary depending on your network, router, or service provider. Note: It does not matter what your IP address looks like. If your DVR is connected to your router with an Ethernet cable, and the DHCP checkbox is checked on the TCP/IP page, the IP address you write down will be correct.
Click Run, then go through the prompts of the install wizard. 3. Once you see the notification along the bottom row. Click the small arrow to the right of the Allow button and select Allow for all websites. 4. If you see a popup window asking you to allow the plugin, mark the checkbox next to “Do not show me the warning for this program again”, then click Allow.
To find your login credentials, please refer to part 3 of this guide: Console Setup > Logging in. Otherwise, if this is your first-time logging into the DVR and you have skipped Step 3, you will be able to login with the following username and password: Username: admin Password: admin Note: After logging in for the first time, you will be prompted to change your password. To find the DVR’s IP address, please refer to the Amcrest IP Config Software method and the builtin interface method sections above.
Before performing this setup process, it is recommended that you are familiar with or have completed the steps in both part 3 ‘Console Setup’ and part 5 of this guide: Computer Access Setup > Setting up DVR Local Access. Below is a step-by-step walkthrough that details how to setup the DVR for remote web access using UPnP and DDNS: 1.
4. Once rebooted, login to your DVR again, open the MAIN MENU, then click NETWORK from the management section of the menu again. 5. Click CONNECTION from the left navigation panel again and ensure that the HTTP port has changed. 6. Next, click DDNS from the left navigation panel, and make sure the toggle switch for Enable is toggled to the on position. 7. Create and write down the domain name for your device in the Domain Name field. Then, click Apply. 8.
9. In the PORT INFO window that appears, click into the number field next Ext. Port to change it to the same port number that was chosen in step 2 above (e.g. 12345). Then click OK. 10. Now, click Apply, and ensure it says ‘Searching’ in the field next to UPnP Status. 11. Exit this menu to go back to the main menu, then re-enter the UPnP menu, and ensure the UPnP Status says ‘Success’. Note: If this does not say ‘Success’, try resetting the DVR, then your router.
forward to gain remote access. Please read step 5: Check for UPnP below, in the troubleshooting steps that follow this guide for more information on what to do next. 12. Open a web browser and enter in the DDNS domain name address from step 7, enter in a colon “:” (without quotes), then type the port number from step 2 onto the end. a. For example, if the DDNS domain name is http://mydvrtest.amcrestddns.com and your HTTP Port is 12345, the URL would be http://mydvrtest.amcrestddns.com:12345 13.
that, make sure that you are using a colon “:” and not a semicolon “;”. Your final URL should look something like this: “http://192.168.2.149:12345/” (without quotes). Keep in mind that the IP address and port number will be different depending on your setup. 5. Select WAN button: The LAN radio button will be selected by default. You must click and select WAN in order for this remote connection to work. 6.
Live – Allows you to access real-time video and camera options. You can also control PTZ and image settings, as well as view cameras in full screen. Video – Allows you to view, search and playback recorded videos retained in the system’s hard drive. Alarm – Allows you to view and search live alarm information and notifications. You can also configure alarm event actions in this menu. BACKUP: Allows you to search and backup video data via an external USB or flash drive.
2. Open the MAIN MENU by left-clicking the DVR’s home preview screen. Then, click NETWORK in the bottom MANAGEMENT section located in this menu. 3. Select P2P from the left navigation panel’s list of options. Make sure the checkbox next to Enable is checked. If it is not, check it, then click Apply and Save. 4. Exit out of the main menu, then come back to the P2P page and confirm that the Status is ‘Online’.
4. Tap on DVR/NVR. 6. Scan the QR code for your device. This code can be found on or near the device's serial number tag. If the QR code does not scan or you are unable to access it, the application provides you a means of entering your serial number manually. Tap on "Enter S/N Manually" to enter the information. 5. Next, we will need to select a connection type. Since we will be setting up a basic P2P connection with the device, tap on "P2P Connection" to continue. 7.
8. The app will prompt you to change the password. Enter a password between 8 and 32 characters and confirm the password. Press OK to continue. 9. Your device is now set up and ready for use on the app. For setup without establishing a P2P connection in the app you will need to use IP Doman/DDNS setup. For more details on this setup visit, amcrest/com/support App setup not working? (troubleshooting steps) 1.
If you have tried all the above troubleshooting steps, try rebooting your DVR. Then, restart your phone and try the P2P Setup on your app again. Contact support if you are still unable to gain access. To view a video on how to setup the Amcrest DVR for remote access on a smartphone or tablet, go to http://amcrest.com/videos and view the video titled “How to Setup Amcrest HDCVI DVR for Remote Access on Smartphone/Tablet”.
8. Amcrest View Web Portal Setup You can access your DVR through a computer using the P2P web portal AmcrestView.com for quick plug-and-play access. It uses the same technology as the Amcrest View mobile app and is an easy, non-technical setup method. There are 2 methods of accessing your DVR using AmcrestView.com: the user method (registering an account for login), and the device method (instant direct access using the serial number).
4. You will be prompted by the browser to install the plugin. Click Run: 5. You may be prompted to verify this download. This software is not harmful to your computer and will not make any unwanted changes. To verify, start by clicking View Downloads: 6. In the View Downloads page, right click the plugin, then click Run Anyway. 7. The plugin will close your browser sessions to install.
8. On the next prompt, it will say the install was successful and ask you to restart your browser. Click OK: 9. You will be taken back to the login page and see another notification from your browser asking you to allow this plugin on this web page. Click the small arrow next to Allow, then click Allow for all websites: 10. Another popup will appear asking you to allow this plugin.
Now the plugin has been installed successfully and you can continue to register for an account for DVR access through AmcrestView.com User method The user method requires that you first install the Amcrest browser plugin for AmcrestView.com. Then, you can register for an account to set up your DVR. 1. On the main login screen, www.amcrestview.com, click the Register Now button: 2. You will be taken to the registration form.
3. You will see the Registration Successful message and a confirmation email will be sent to you: Check your email, and click the confirmation email from AmcrestView.com: 4.
5. You will be taken back to AmcrestView.com and shown confirmation that your account has been activated. Click Go to Login: 6. You will be taken back to the login screen. Enter your new AmcrestView.com username and password, then click Login: 7. A popup will appear from your Windows firewall. Click Allow access.
8. You will be taken to the main screen of your account. From here, click the Add Device button: 9. Now you can enter your DVR’s information. Enter a Device Name (this can be anything). Then, fill in the S/N (serial number) this can be found on the sticker attached to the bottom of your DVR or through the web interface. Enter your username and password for the DVR, not the username and password you just created for AmcrestView.com.
10. You will then see your DVR added to the device list on the main screen. Click the ‘eye’ icon to view the live feed: 11. Your browser will give you a notification asking you to allow popups from AmcrestView.com. Click Options for this site, then click Always allow: 12. You will be taken to the live view page and given a notification to allow the plugin to pull the video feed through here.
13. A final popup will appear asking you to confirm that you allow this plugin on your browser. Mark the checkbox next to Do not show me the warning for this program again, then click Allow: 14. Now you can enable any of your added cameras to see their live feeds. In the top-right panel, there is a channel list.
Click the “S” to change it to an “M” which stands for “Main Stream” and will give you a full HD quality video stream. To go back to “Sub Stream”, for lower quality video (that works better on slower internet connections), click the “M” and change it to an “S” again. Device method To login to your DVR quickly, without having to register, you can use the device method.
To find your DVR’s login credentials, please refer to part 4 of this guide: Console Setup (Login & Startup Wizard) > Logging in. 3. This will take you straight to the live view screen. You will see a notification from your browser asking you to allow the plugin. Click the small arrow to the right of Allow, then click Allow for all websites: 4. You will see a popup asking you to confirm that you allow this plugin.
5. Now you can enable any of your added cameras to see their live feeds. In the top-right panel, there is a channel list. Click the small square icon to enable your feed for an added camera to see the video feed: Click the “S” to change it to an “M” which stands for “Main Stream” and will give you a full HD quality video stream. To go back to “Sub Stream”, for lower quality video (that works better on slower internet connections), click the “M” and change it to an “S” again.
AmcrestView Web Interface Overview There are two main sections inside of the AmcrestView web interface: the main device list section (for anyone logged in with a registered account) and the live view section (can be accessed by both registered users and those accessing their DVRs using the device method covered above. Device list section The device list section has 3 main tabs.
The last tab for the device list section is the CHANGE PASSWORD tab: Here, you can change your password. Live view section The live view section is where you can see the live camera feeds and playback footage for any cameras added to your DVR.
Here, you can enable the live feeds for any connected cameras, control Chall, take snapshots, use 2-way audio, view them in full screen, and more. The next tab is the Playback tab. Here, on the right panel, there is a calendar for you to choose which day you’d like to see footage from, and you can choose a channel to select which camera you want to see footage from. The timeline on the bottom allows you to play, stop, forward, etc.
for compliance could void the user's authority to operate the equipment. In cases where the manual is provided only in a form other than paper, such as on a computer disk or over the Internet, the information required by this section may be included in the manual in that alternative form, provided the user can reasonably be expected to have the capability to access information in that form. 3.