
User Manual


4
7. Accessories
Be sure to use only the accessories recommended by the manufacturer. Before installation, please open the
package and check to make sure that all the components are present. Contact the retailer that you purchased from
or Amcrest directly if anything is broken or missing in the package.
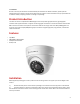
Product Introduction
This series of camera is adopted with CMOS image sensors that provide high performance, high megapixel
resolution that supports 4K video. It supports monitoring signals and audio via a coaxial transmission and standard
BNC connection and built in microphone. Transmission distances can range more than 700m (2296ft) @ 4K. This
series can also support CVI/TVI/AHD/Analog output as well as recognize high speed, long distance, and real time
video transmissions.
Features
• 1/3 CMOS
• 4MP (2688 x 1520) @30fps
• 2D NR, Smart IR Control
• DC12V, 2.0A
Installation
Before physically installing your camera, make sure the mounting surface can support up to 3x the weight of the
camera.
1) Remove the base portion of the camera by twisting it and remove it from the top portion of the bracket.
2) Locate the position in which you would like to place your camera and using the base of the camera, mark
the installation holes with a marker on the mounting surface. These holes will be used to drill the holes needed to
mount your camera.