
User Guide


8
Using an Amcrest 4-in-1 Camera
Quadbrid or 4-in-1 technology, allows for a flexible means of providing HD-CVI, HD-TVI, AHD,
and Analog formatted video to your DVR. The signal is transmitted uncompressed, which
eliminates latency and allows for real-time, highly reliable video security without loss or delay.
The cameras connect point-to-point directly to the DVR (BNC) which provides a highly secure,
closed network, as well as a painless and non-complex plug-and-play setup process. The toggle
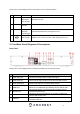
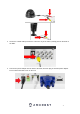
switch for your 4-in-1 camera is represented in the image below:
Most Amcrest DVRs will require you to set the camera to HD-CVI or Analog (960H) settings and
may not be compatible with HD-TVI or AHD. Ensure your 4-in-1 camera's toggle switch is set to
the proper setting as indicated in the diagram below.
Note: If the proper mode configuration is not set, you will not be able to view your camera on
your DVR. Please make sure you have the proper settings on your camera before you begin
setting up or installing.
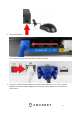
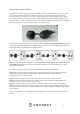
To install your Amcrest 4-in-1 camera, please follow the steps provided below:
Note: Make sure you have the proper mode configuration on your camera before running or
connecting any cables. Refer to the Figure 1-1 for more details on how to set mode
configurations for your specific DVR.
Step 1: Connect a BNC (coaxial) cable to the video out connection of your camera.
Step 2: Connect the male end of the DC power connector of the BNC (coaxial) cable to the
female end of the power connector of the camera.
Step 3: Connect the BNC (coaxial) cable to a video out channel on the back of your DVR.
Step 4: Connect the male end of the DC power connector of the power adapter to the female
end of the power connector of the BNC (coaxial) cable. Plug in the power adapter to apply power
to the camera.
For more information on the installation process described, refer to the image below for more
details.