
User Guide

15
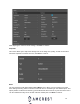
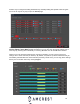
Below are short descriptions for each of the menu items on the main menu:
SEARCH: View general, motion, and AI event recordings.
ALARM: View and configure live alarm information and notifications.
AI: View, modify, configure, and search for AI events.
MAINTAIN: View system information, updates, configuration import/export settings, etc.
BACKUP: Search and backup video data via an external USB or flash drive.
DISPLAY: Configure resolution and display output settings.
AUDIO: Schedule, manage, and import audio announcements and files.
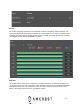
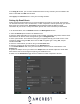
Management
CAMERA: Review or edit settings for each camera, including video settings (e.g. quality, bit rate,
color, etc.).
NETWORK: Review or edit network settings for the DVR (e.g. email, DDNS, UPnP, etc.)
STORAGE: Review or edit storage parameters and settings. (e.g. motion detection, alarm, etc.). Set
HDD detection as well as setup FTP settings.
SYSTEM: Review or edit system parameters or configuration, including system maintenance, factory
resets and firmware upgrades.
ACCOUNT: Review admin accounts and add new users to device. (e.g. ONVIF users).
IVS, Motion Detection, and Recording Setup
This section will cover how to set up a recording schedule for your DVR. This is applicable to regular
(24/7 recordings), motion detection, and IVS recordings. IVS stands for intelligent video system
analytics and is the basis for all AI rules associated with your device. This section will also cover how
to set up a recording schedule, email alerts with snapshots, etc.
Note: The DVR can only be set up to save recordings or IVS information if a hard drive has
already been installed. However, email alerts with snapshots can still work without a hard
drive installed.
The following setup processes will be shown using the DVR’s local interface. However, these same
steps can also be done through the web interface on a computer. For more information on how to
access your device from a web browser, please refer to section, “Computer Access Setup”. Despite
the difference in appearance, the settings pages have similar organizational structures.
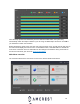
Enabling Recording Options
This menu should be verified to ensure that all recording protocols are enabled. This menu details,
per channel, which streams are enabled or disabled in the DVR. To access this menu, please refer
to the information provided below.
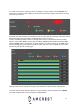
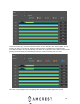
1. On the main menu, click on Storage.
2. Click on Record Mode. The Record menu displays all active channels and streams being used for
recording. If using snapshots, ensure the Snapshot radio button is enabled on each stream. To
apply the settings to all channels, click on the All radio button.