
User Guide

6
If you need further assistance with installing your hard drive, feel free to contact us at
amcrest.com/contacts
Hardware Setup
Before setting up the DVR, you will need the following items which are not included.
A computer monitor or TV with either an HDMI or VGA input
A power strip or surge protector with enough room to power your devices.
A Phillips Head screwdriver to install a hard drive (HDDs may be sold separately).
It is recommended to connect all components of the system as described below before mounting any
cameras. This is to ensure all components are working before any physical installation takes place. If
any components are not functioning, please contact Amcrest by visiting amcrest.com/contacts
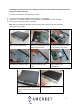
Setting up the cable connections
The following instructions will show you how to set up the cables for the DVR, cameras, as well as a
monitor or TV screen.
To set up the DVR’s cable connections, there are 6 major steps:
1. Connect a monitor or TV screen to your DVR. For purposes of this guide, we will use a VGA
connection. Take a VGA cable, and connect one end to the VGA port on your monitor/screen and
the other end to the VGA port on the back panel of your DVR.
Note: If you are using an HDMI connection, the system may prompt you to automatically change
output resolutions after the device has been initialized.
2. Connect the included USB mouse to a USB port on the DVR.
3. Connect an Ethernet cable to your router. Then, connect the other end of the Ethernet cable to
the Ethernet port on the back of the DVR.
4. Secure the coaxial extension cable to the camera’s cable port. Then, connect a power adapter to
the camera’s power adapter port and plug the power adapter into a wall socket or power source.
5. Secure the coaxial cable port from the camera to any of the video (coaxial) ports on the back of
the DVR.
6. Connect the power adapter into the back of the DVR, and then plug in the DVR power adapter
into an electrical socket to turn on the unit.
For more information on the installation process please visit amcrest.com/support
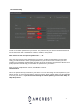
Console Setup
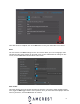
After applying power to the DVR, the system will turn on. Allow the DVR to finish loading. The
Device Initialization screen will appear. Select your location, language, and video standard then
click Next to continue.
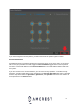
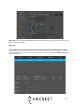
Select your time zone as well as current date and time. Click Next to continue.