
User Manual


22
This is to back up the video on current channel to the USB device. The system cannot backup the video of
multiple channels at the same time.
Click the button and the system begins recording. Click it again and the system stops recording.
You can find the recorded file on the USB device.
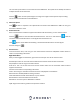
4) Manual Snapshot
Click to take 1-5 snapshots. The snapshot files are saved on the USB device or HDD. You can go to
the Search interface to view.
5) Bidirectional talk
If the connected front-end device supports the bidirectional talk function, you can click this button.
Click the button to start the bidirectional talk function. The icon is now shown as . Now the
rest of the bidirectional talk buttons on the digital channels become null.
Click again to cancel bidirectional talking. The bidirectional talk buttons of other digital
channels change to .
6) Remote device
From the shortcut menu, click it to go to the remote device interface to add/delete remote devices or
view its corresponding information.
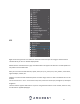
Right Click Menu
After you have logged into the device, right mouse click and you can see the shortcut menu.
Window split mode: You can select the window amount and then select the desired channels.
Pan/Tilt/Zoom: Click this to go to the PTZ interface.
Auto focus: This is to set the auto focus function. Please make sure the connected network camera
supports this function.
Camera: Set the videos corresponding information.
Search: Click it to go to the Search interface to search and playback a recorded file.
Manual Control: Enable/disable recording a channel.
Smart Add: Detect and add remote devices on your network.
Remote Device: Search and add a remote device.
Main Menu: Go to the system’s Main Menu interface.
Tips: Right mouse click to go back to the previous interface.