
User Manual


38
Press the Refresh button to refresh the interface. To confirm settings, click the OK button.
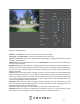
Connecting an IP Camera
To connect an IP camera to your DVR, please follow the steps provided below:
Note: The number of IP cameras added to the DVR is dependent on how many channels your specific
model can handle. An added IP camera will replace one active channel in the DVR.
1. Click on the Camera option located in the Management section of the Main Menu.
2. Click on Channel Type and select the IP Camera option. (This is dependent on how many channels your
specific model DVR can handle.)
3. Click on OK and allow the DVR to reset. Please note, AI functions will be disabled after the IP channel is
enabled. Click OK to continue.
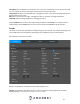
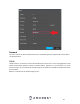
4. Navigate back to the Camera menu and click on Camera List.
5. Click on Search Device to search for the IP camera you want to add and click on the enable checkbox.
6. Click on the Add button to add the IP Camera to the DVR. If the camera has an inactive status (red dot)
the password may need to be updated
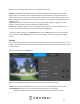
Updating the Password (IP Camera)
1. Click on the Modify button.
2. Ensure your camera settings are properly set and enter the password for your newly added IP Camera. If
this is your first time using your camera the username and password will be admin. Click OK.