
User Manual

7
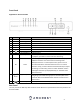
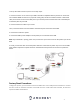
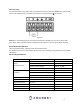
To set up the cable connections, there are 5 major steps:
1. Connect a monitor or TV screen to your DVR. The DVR is compatible with any monitor or screen that
uses a VGA or HDMI connection. For purposes of this guide, we will use a VGA connection. Take a VGA
cable, and connect one end to the VGA port on your monitor/screen and the other end to the VGA port
on the back panel of your DVR.
2. Connect an Ethernet cable to your router.
Then, connect the other end of the cable to the Ethernet port on the back of the DVR.
3. Connect the cameras to power.
4. Connect the DVR’s power adapter into the power port on the back of the DVR.
Note: If your DVR has a 3-prong power cord, connect the input of the cord into the power input of the
DVR.
5. Finally, connect the other end of the power cable into a wall outlet or power strip to turn on the DVR.
Some models may feature a power switch on the back which may need to be turned on to power the
device.
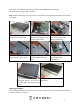
Factory Reset Procedures
To begin the process, you will need to remove the DVR cover. Use a Phillips head screwdriver to remove
the four screws on the back and sides of the DVR. Once the screws have been removed, lift the lid to
expose the DVR's motherboard.