
User`s guide


36
For an up-to-date listing of CrossFire™ certified motherboards, see
ati.amd.com/products/certification
For an up-to-date listing of certified power supplies, see:
ati.amd.com/certifiedpsu
Install CrossFire™ cards
1 Make sure the computer, monitor, and other peripheral devices are
off.
2 Unplug the computer power cord and disconnect cables from the back
of the computer.
Caution! To avoid possible damage to the motherboard, wait
approximately 20 seconds after unplugging the power cord before
disconnecting a peripheral or removing a component from the
motherboard
3 Remove the computer cover.
If necessary, consult the computer manual for help removing the
cover.
Caution! Remember to discharge your body’s static electricity by
touching the power supply case or the metal surface of the computer
chassis.
4 Remove any existing graphics cards from the computer.
Warning! Some graphics cards can get hot while
operating. Wait about five minutes after turning off the
computer before touching the card.
5 Locate the PCIe™ slots on the motherboard. If necessary, remove the
metal backplate cover next to the PCIe™ slot from the computer case.
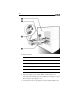
6 Align the new graphics card in the secondary PCIe™ slot next to the
existing graphics card and press firmly until the card is fully seated.
7 Install the CrossFire™ bridge interconnects.
Caution! Always handle the CrossFire™ bridge interconnects by the
connector only. Do not push or pull on the flexible cable.