User Manual
This Manual applies to the following VGAs: HD3870XTG4 (PCI Express) HD3850PG3 (PCI Express) XHD3870XTG4 (PCI Express) XHD3870XTG3 (PCI Express) XHD3850PG3 (PCI Express) HD385P3 (PCI Express) HD383P3 (PCI Express) XHD3870X2 (PCI Express) XHD3850X2 (PCI Express) HD3870X2 (PCI Express) HD385XT3 (PCI Express) RX385PA3 (AGP Bus) HD 3800 Series (CrossFire Edition)
Table of Contents CHAPTER 1.1 1.2 1.3 1.4 1 INTRODUCTION.............................................1 System Requirements ................................................. 3 Performance............................................................... 5 Software Compatibility............................................... 5 Monitor Compatibility................................................ 6 CHAPTER 2.1 2.2 2.3 2.4 2 HARDWARE INSTALLATION...........................7 What’s Included in the Package ......
3.7 Display Options....................................................... 48 3.8 Using the CRT/TV Features ...................................... 51 3.8.1 How to use TV-out cables correctly ................. 51 3.8.2 How to change the TV settings ........................ 52 3.8.3 TV Properties........................................................54 3.8.4 TV Adjustments....................................................55 3.8.5 To select your TV format by country..................56 3.8.
Chapter 1: Introduction CHAPTER 1 INTRODUCTION The ATI Radeon™ HD 3800 Series of GPUs allow you to experience the power of HD with graphics processing designed for how you work and play. Advance to the next generation of HD game performance and lifelike realism thanks to DirectX® 10.1 capabilities and plug-and-play ATI CrossFireX™ multi-GPU upgradeability. Watch the latest Blu-ray and HD-DVD videos in full 1080p HD – and upscale beyond - without placing huge demands on your CPU.
ATI Radeon™ HD 3800 Series User Manual • • • • • ATI PowerPlay™ energy conserving technology Dynamic geometry acceleration Game physics processing capability OpenGL 2.0 support Native HDCP (High-bandwidth Digital Content Protection) DVI-to-HDMI dongle (optional) Flex cable for ATI Radeon™ HD 3800 Series (optional) ATI Avivo™ HD Video and Display Platform • Dedicated unified video decoder (UVD) for H.
Chapter 1: Introduction 1.1 System Requirements Hardware Operating System Monitor ATI CrossFire™ Requirements • Intel® Pentium® 4 or AMD Athlon®. • 1GB of system memory • Optical drive for installation software (CD-ROM or DVD-ROM drive). • A 500 watt or better power supply with 750 Watt 6-pin PCIe power connector. • Windows® XP with Service Pack 2 (SP2). • Windows® XP Professional x64 Edition. • Windows® Vista Ready.
ATI Radeon™ HD 3800 Series User Manual Connections The following illustrates the connections on the ATI Radeon™ HD 3800 Series graphics card. ATI Radeon™ HD 3800 Series Connections 1. DVI-I Dual Link 2. S-Video Connection 3.
Chapter 1: Introduction 1.2 Performance The ATI Radeon™ HD 3800 series is a graphics accelerator card. Computer functions like disk access and numerical calculation are not accelerated by the ATI Radeon™ HD 3800 series. It is not unusual to obtain an overall system speed increase of 2 times for graphics-heavy applications after installing the ATI Radeon™ HD 3800 series. The speed of pure graphics operations, like dragging objects with a mouse, scrolling, and resizing, will be remarkably improved. 1.
ATI Radeon™ HD 3800 Series User Manual 1.4 Monitor Compatibility The ATI Radeon™ HD 3800 series will work with any VGA, Super VGA or Multisync monitor. Super VGA monitors can support IBM® standard VGA plus the 800x600 extended mode used by most VGA cards, and the 1024x768 interlaced mode used by most VGA cards and the IBM® 8514A. Multisync monitors are more expensive and will work at all Super VGA resolutions plus additional higher resolutions or refresh rates.
Chapter 2: Hardware Installation CHAPTER 2 HARDWARE INSTALLATION 2.1 What’s Included in the Package The VGA card package includes the following: 1. VGA Card 2. Software CD which contains the necessary files 3. This User manual 2.2 Installing the Card 1. Unplug the computer and remove the cover. Shut down the computer, then turn off the power supply and any attached equipment (such as a monitor or printer). Unplug the power cord. Remove the cover. 2. Remove the current graphics card.
ATI Radeon™ HD 3800 Series User Manual Note: If the computer has a graphics chip soldered down on the motherboard, refer to the manual for the system or motherboard for information on how to disable it. 3. Insert the Graphics Accelerator card. Locate the empty PCI Express socket on the motherboard and use the following instructions to insert the ATI Radeon™ HD 3800 Graphics Accelerator card into that socket: Grasp the ATI Radeon™ HD 3800 Graphics Accelerator card by its edges.
Chapter 2: Hardware Installation 2.3 Board Layout HD3870XTG4 Note: • Specialized PCI Express® 500 watt or greater power supply recommended. • A 550 watt or greater power supply is required for CrossFire™. • Use power supply 6-pin cable (note, power supply cable is 6wire, not 3-wire).
ATI Radeon™ HD 3800 Series User Manual HD3850PG3 Note: • Specialized PCI Express® 500 watt or greater power supply recommended. • A 550 watt or greater power supply is required for CrossFire™. • Use power supply 6-pin cable (note, power supply cable is 6wire, not 3-wire).
Chapter 2: Hardware Installation XHD3870XTG4 Note: • Specialized PCI Express® 500 watt or greater power supply recommended. • A 550 watt or greater power supply is required for CrossFire™. • Use power supply 6-pin cable (note, power supply cable is 6wire, not 3-wire).
ATI Radeon™ HD 3800 Series User Manual XHD3870XTG3 Note: • Specialized PCI Express® 500 watt or greater power supply recommended. • A 550 watt or greater power supply is required for CrossFire™. • Use power supply 6-pin cable (note, power supply cable is 6wire, not 3-wire).
Chapter 2: Hardware Installation XHD3850PG3 Note: • Specialized PCI Express® 500 watt or greater power supply recommended. • A 550 watt or greater power supply is required for CrossFire™. • Use power supply 6-pin cable (note, power supply cable is 6wire, not 3-wire).
ATI Radeon™ HD 3800 Series User Manual HD385P3 Note: • Specialized PCI Express® 500 watt or greater power supply recommended. • A 550 watt or greater power supply is required for CrossFire™. • Use power supply 6-pin cable (note, power supply cable is 6wire, not 3-wire).
Chapter 2: Hardware Installation HD383P3 Note: • Specialized PCI Express® 500 watt or greater power supply recommended. • A 550 watt or greater power supply is required for CrossFire™. • Use power supply 6-pin cable (note, power supply cable is 6wire, not 3-wire).
ATI Radeon™ HD 3800 Series User Manual XHD3870X2 System Requirements CrossFire™ technology works on AMD 790FX, AMD 790X, Intel 975X, P965, P35 and X38 motherboard. Note: • • • • • • Specialized PCI Express® 550 watt or greater power supply recommended. A 1000 watt or greater power supply is required for CrossFire™. Only DVI 1 and DVI 3 can boot up system. Power connector 1 and 2 connected to power supply unit simultaneously is recommended.
Chapter 2: Hardware Installation XHD3850X2 System Requirements CrossFire™ technology works on AMD 790FX, AMD 790X, Intel 975X, P965, P35 and X38 motherboard. Note: • • • • • • Specialized PCI Express® 550 watt or greater power supply recommended. A 1000 watt or greater power supply is required for CrossFire™. Only DVI 1 and DVI 3 can boot up system. Power connector 1 and 2 connected to power supply unit simultaneously is recommended.
ATI Radeon™ HD 3800 Series User Manual 18
Chapter 2: Hardware Installation Using a module type power supply to run crossfire mode with two HD3850X2/HD3870X2 graphic card, it requires 4PCS PCI-E 6-pin power cable connections. Please be informed that the 4PCS PCI-E 6-pin power cable connections must be provided by two separated power source of the power supply.
ATI Radeon™ HD 3800 Series User Manual HD3870X2 System Requirements CrossFire™ technology works on AMD 790FX, AMD 790X, Intel 975X, P965, P35 and X38 motherboard. Note: • Specialized PCI Express® 550 watt or greater power supply recommended. • Power connector 1 and 2 connected to power supply unit simultaneously is recommended. Only power connector 1 or 2 connected to power supply unit can boot up the system but system will shut down randomly.
Chapter 2: Hardware Installation HD387XT3 Note: • Specialized PCI Express® 500 watt or greater power supply recommended. • A 550 watt or greater power supply is required for CrossFire™. • Use power supply 6-pin cable (note, power supply cable is 6wire, not 3-wire).
ATI Radeon™ HD 3800 Series User Manual RX385PA3 Note: • Specialized PCI Express® 500 watt or greater power supply recommended. • Use power supply 6-pin cable (note, power supply cable is 6wire, not 3-wire).
Chapter 2: Hardware Installation Power Supply Requirements 2.4 Power supplies with 500-Watt capacity and 30A current on 12V rail is recommended for single ATI Radeon™ HD 3800 series product. ATI Radeon™ HD 3800 CrossFire configurations (dual graphics card system) requires 550-Watt capacity power supply, with 38A on 12V rail. Please consult your power supply vendor specifications to ensure your system meets the recommended functionality.
ATI Radeon™ HD 3800 Series User Manual 2. 3. 4. 5. 6. 7. 8. Remove the power cable from the hard drive Connect p of the power extension cable to the graphics card power connector as shown. Connect s to the power supply connector After locating the PCI Express (or AGP) slot, and if necessary, removing the metal cover: Align your ATI Graphics Accelerator card with the PCI Express (or AGP) slot Press it in firmly until the card is fully seated.
Chapter 2: Hardware Installation HDTV uses YPbPr connector to receive input. YPbPr stands for the following: • • • Y= Green Pb= Blue Pr=Red ATI HDTV Cable (Optional) n ATI HDTV Video Output Cable o Backplate of the ATI Graphics Card p Male RCA Patch Cable – available from consumer electronics dealer q Typical HDTV Video Input Connections Note: Input and output cables lengths should not exceed 50 feet (15m).
ATI Radeon™ HD 3800 Series User Manual Connecting your DVI-to-HDMI dongle (optional) 26
Chapter 2: Hardware Installation 2.5 Multiple Monitors Your ATI Radeon™ HD 3800 series provides dual display functionality and TV Out from a single video card. This new technology changes the way you view your PC, TV, and video graphics. The ATI Radeon™ HD 3800 series uses HydraVision™ software to create a seamless multiple display desktop. Multiple monitor display works as one large work area. A single application can span all monitors, or many applications can occupy their own specific monitor.
ATI Radeon™ HD 3800 Series User Manual 28
Chapter 2: Hardware Installation 2.6 ATI Radeon™ HD 3800 Display Configurations The following table lists the different ways you can connect displays to your card. Display Configuration Connector(s) Used Comments Single CRT display Single DFP display Single TV DVI-I connector with DVII-to-VGA adapter DVI-I connector S-Video out Single HDTV display Single HDTV HDMI™ display S-Video out to HDTV (YPrPb) cable DVI-to-HDMI™ connector and HDMI cable CRT-Cathode ray tube analog display.
ATI Radeon™ HD 3800 Series User Manual CHAPTER 3 SOFTWARE INSTALLATION The ATI Radeon™ HD 3800 series is 100% VGA compatible and as such needs no special display drivers to run application software correctly at standard VGA resolutions and color depths. However, enhanced display drivers are supplied with the VGA card because they provide accelerated performance, higher color depths and higher resolutions for software applications.
Chapter 3: Software Installation 3.1 Uninstall Old Graphics Drivers To ensure successful installation of the graphics card driver, you must uninstall the graphic drivers for the existing graphics card before removing it from the computer. Windows® XP: Uninstall old graphics drivers 1. With your current graphics card still in your computer, close all open applications. 2. Click Start > Settings > Control Panel, then select Add/Remove Programs. 3. Select your current graphic drivers, then click Add/Remove.
ATI Radeon™ HD 3800 Series User Manual 3.2 Installing on Windows XP Caution: The Catalyst® Control Center requires that Microsoft's .NET Framework Version 2.0 be installed. Without .NET Version 2.0 installed the Catalyst® Control Center will not launch properly, and the user will see an error message as a result. http://msdn2.microsoft.com/en-us/netframework/default.aspx z 1. 2. 3. 4. 5. Microsoft .NET Framework Version 2.0 Redistributable Package Start Windows.
Chapter 3: Software Installation 8. The License Agreement dialog box appears. Click on “Yes” button. 9. The Select Components dialog box appears. Click on “Express” button. 10. When the Windows SETUP has completed copying the files to the computer, Windows will prompt you to restart. Click the “Yes” option and then click the “Finish” button.
ATI Radeon™ HD 3800 Series User Manual 3.3 Installing on Windows VISTA 1. Install the VGA card drivers from the ATI Installation CD-ROM by doing one of the following: • Start > Run > X:\VISTA\SETUP.EXE (where X is the drive letter of your CD-ROM drive). 2. When executing the CIM from the setup.exe command, the user will see the following User Interface windows and dialogs. 3. The warning dialog window cannot be suppressed. splash screen can be customized. 4.
Chapter 3: Software Installation 5. Clicking the Customized language button enables the CIM to install localized resources and help files various packages. Note: Customized languages must be selected by placing a checking off the required languages. 6. On a clean system, the Installer welcome screens allow the user to select the install method. Selecting Express and then next the UI and CIM will select and install the best set of software for the detected hardware.
ATI Radeon™ HD 3800 Series User Manual 7. During an express install, the only other window the user needs to interact with is the End User License Agreement (EULA). Once this has been approved the install will commence. During an express install, the user must first select the packages to install and potentially select the source location. The install components progress window displays both the overall progress of the entire process and the install of each package (lower progress bar).
Chapter 3: Software Installation Note: The UI does not show all the packages that are installed in the system. Some of the packages are invisible to the UI. The CIM and MS Visual C++ 8 runtime are two of these packages. These packages are required whenever any ATI package is selected for install onto an end users system. The CIM is required as it is the central software suite that manages the install/uninstall and update of the package/packages installed. 8.
ATI Radeon™ HD 3800 Series User Manual 9. Close and reboot dialogs Typically a restart message is displayed. This message is displayed when the following conditions are met. • • During a driver install the OS request a reboot During an application install, if the install package was authored and an install requested for functionality to be enabled. Most Vista software does not require a reboot.
Chapter 3: Software Installation 3.4 Displays Manager The Displays Manager is the central location for configuring your display devices and arranging your desktop. Use the Displays Manager to quickly change your display setup, arrange your desktop in a multi-monitor environment, and enable TV Out. Those new to the Catalyst® Control Center can use the Basic View wizard to help configure the display preferences.
ATI Radeon™ HD 3800 Series User Manual 3.5 Displays Manager Standard View To enable additional displays for connected display devices, you can Right-click the Windows desktop and click ATI CATALYST® Control Center. The ATI CATALYST® Control Center dialog box appears. Use Displays Manager Standard View to set your desktop resolution, arrange your displays, or use the wizard to help you configure your display(s).
Chapter 3: Software Installation Access Display Manager Standard View 1. Click the View button to switch to Standard View. 2. From the menu pane, click Displays Manager to display the settings view. Enable a secondary display device Click the Wizard button and follow the wizard instructions to enable Extended Desktop Mode. Note: A secondary display device can be an LCD monitor, a CRT monitor, a TV, or a VCR. Enable Clone Mode 1. Click Displays Manager button in Standard View. 2.
ATI Radeon™ HD 3800 Series User Manual 3.6 Displays Manager Advanced View Use Displays Manager Advanced View to set your desktop resolution, the display refresh rate, and arrange your displays. To change your display configuration requires dragging and/or clicking or right-clicking a display icon. 3.6.1 Enable Clone Mode If the secondary device is disabled: 1. Click Displays Manager in Advanced View. 2.
Chapter 3: Software Installation 3.6.2 Enable Stretch Main Vertically If the secondary display is disabled: 1. Click Displays Manager in Advanced View. 2. Click and drag the display device icon from Additional Displays to the empty box to the right of the Main box. 3. Click Stretch vertically onto [display device] in the pop-up menu. 4. Click Yes in the Displays Manager Notification dialog. If the secondary display is enabled: 1.
ATI Radeon™ HD 3800 Series User Manual 3.6.4 Swap displays in Extended Mode Use Swap displays to switch your desktops when using multiple monitors. 1. 2. 3. 4. Click Displays Manager in Advanced View. Right-click any Desktop icon. Select Swap displays. Click either Maintain per-display mode settings or Swap displays order only. Note: Swap displays order only swaps displays while maintaining the existing display settings. Maintain per-display mode settings swaps displays and display settings.
Chapter 3: Software Installation 3.6.5 Change desktop size 1. Click Displays Manager in Advanced View. 2. Select a size from the Desktop Area drop-down menu. 3.6.6 Change Color quality 1. Click Displays Manager in Advanced View. 2. Select the desired color setting from the Color Quality drop-down menu. 3.6.7 Change display refresh rate 1. Click Displays Manager in Advanced View. 2. Choose a refresh rate from the Refresh Rate drop-down menu. Note: See your monitor manual for supported refresh rates.
ATI Radeon™ HD 3800 Series User Manual 3.6.8 Force changes to a specific display setting You can force the Catalyst® Control Center to override the display settings required, or not allowed, by a specific application. 1. 2. 3. 4. From the Tree View pane, click Displays Manager. Click the Force button. Use the mouse to cursor over to the display feature to force. Highlight and then click the required setting. 3.6.
Chapter 3: Software Installation Extended Desktop Mode In this mode, the desktop area is spread across both displays. This mode can be set for multiple categories of displays, although display limitations may override the capabilities of the ATI Radeon™ HD 3800. For example, if the second display is a TV monitor, due to the limitations of the monitor itself, the resolution cannot be set above 1024x768 and the refresh rate cannot be set above 60 Hz.
ATI Radeon™ HD 3800 Series User Manual 3.7 Display Options The Display Options gives you additional control to optimize performance of OpenGL® and Direct 3D® applications. Use 3D Refresh Rate Override to set a refresh rate of your choice when a full-screen application or game has a default refresh rate that is lower than optimal. Choose one of the Display Detection Options to prevent screen flicker when detecting a display.
Chapter 3: Software Installation Select a refresh rate override Some applications may have a default refresh rate lower than the optimal setting for your monitor. 3D Refresh Rate Override enables you to set the refresh rate for full-screen applications or games utilizing Microsoft® DirectX® or OpenGL®. You can either set an explicit refresh rate, or make the refresh rate the same as the desktop, or disable this feature allowing the application to set the refresh rate. 1.
ATI Radeon™ HD 3800 Series User Manual Force TV detection Use Force TV detection if your TV is not automatically detected by the CATALYST® Control Center and does not appear in the Displays Manager page. This may be the case if your TV has non-standard inputs. Note: If Force TV detection is required to detect your TV some features that rely on automatic detection, such as extended desktop, will not be supported. 1. Click Display Options in Advanced View. 2. Click Force TV detection.
Chapter 3: Software Installation 3.8 Using the CRT/TV Features (TV-out function optional) 3.8.1 How to use TV-out cables correctly 1. 2. Power off your PC and TV first. Connect the signal cable from the Video output on the VGA card to the video input on your TV. Power on your TV and PC normally after checking all connections. Turn Off Turn Off Caution! Before you turn on your system, you have to be sure the VGA card is setup already and all the cables are connected.
ATI Radeon™ HD 3800 Series User Manual 3.8.2 How to change the TV settings Your graphics accelerator has TV-Out functionality. Using this feature, you can connect a TV to your computer’s video output to view the desktop. If you are not using a TV for your computer’s display, it is recommended that you disable TV display for optimal performance (higher refresh rates). You can re-enable TV display at a later date.
Chapter 3: Software Installation Enable Clone Mode If the secondary device is disabled: 1. Click Displays Manager in Advanced View. 2. Click and drag the display device icon in Additional Displays to the empty box to the right of the Main box. 3. Click Clone Main with TV in the pop-up menu. If the secondary display is enabled: 1.
ATI Radeon™ HD 3800 Series User Manual 3.8.3 TV Properties If your graphics card has support for TV Out use the TV Properties to configure your TV settings. The TV Properties is comprised of: • Image Quality • Color • Adjustments • Formats Use Image Quality to adjust the contrast, saturation, and flicker of your screen. Use Color to adjust Hue, Saturation, and Temperature. Note: This feature is supported by specific high-end ATI graphics cards only.
Chapter 3: Software Installation 3.8.4 TV Adjustments Use Screen Adjustments to establish the attributes, such as maximum resolution and refresh rates, of the connected TV, and to resize and position the output seen on the TV. Find the maximum available resolution and refresh rates for my TV 1. Expand TV Properties in the Advanced View. 2. Click Adjustments. 3. Attributes presents the signal format, if known, the maximum resolution and maximum refresh rate supported by your TV. Enable Video Mode 1.
ATI Radeon™ HD 3800 Series User Manual 3.8.5 To select your TV format by country Use TV Formats to determine how the TV signal is detected. Select TV format determined by country or region 1. Expand TV Properties in Advanced View. 2. Click Format. 3. Click Select by country / region. 4. Select country or region from the Country/Region drop-down menu. 5. Click OK or Apply to save the changes you have made.
Chapter 3: Software Installation 3.8.6 To set your TV output to PAL Select by TV signal format 1. Expand TV Properties in Advanced View. 2. Click Format. 3. Click Select by signal format. 4. Select a TV format from the Signal format drop-down menu. 6. For PAL TV systems, please select “Signal format”, then change the Format to PAL. 7. Click OK or Apply to save the changes you have made.
ATI Radeon™ HD 3800 Series User Manual 3.9 Using the HDTV Features View computer output directly on your High Definition Television (HDTV) or other component input device. Provide a big-screen experience from your computer that is ideal for playing games, giving presentations, watching movies, and browsing the Internet. 3.9.1 1. 2. Installing your ATI HDTV video cable Turn on your component input device, and set it to YPbPr input. Turn on your computer.
Chapter 3: Software Installation 3.9.3 HDTV Support Use HDTV Support when your CRT or DFP device supports one or more HDTV modes that are not initially listed in the Displays Manager due to an incomplete EDID. Selecting one or both of the HDTV modes adds them to the Force button located in the Displays Manager when the associated display is selected. If you have a CRT and DFP device and want both to support HDTV, you must go to both HDTV Support pages and select both Add 720p and Add 1080i check boxes.
ATI Radeon™ HD 3800 Series User Manual 3.9.4 Add an HDTV format The Predefined and Custom HDTV Formats list box should list any standard and optimized HDTV formats supported by the digital panel`s EDID. If the list is empty, then no HDTV formats are natively supported. 1. 2. 3. 4. Expand Digital Panel Properties in Advanced View. Click HDTV Support. Select either 720p or 1080i in HDTV modes supported by this display. Click Apply. 5.
Chapter 3: Software Installation 6. Click Add button. 7. A group of four arrow buttons and a large rectangle is overlaid on the screen. Use these arrows to increase or decrease the width and height of the rectangle until the blue background is just visible. 8. Click Maintain aspect ratio to maintain the ratio between width and height while making adjustments. 9. Click Accept button. 10. Click OK in the HDTV Format warning message box.
ATI Radeon™ HD 3800 Series User Manual 11. Click Apply button to add your new HDTV format to the Predefined and custom HDTV Formats list and the Displays Manager mode list then close this windows. Note: The format to be added must be based on one of the standard timing formats (720p or 1080i). 12. Restart CATALYST® Control Center click Apply Format, Over Scan diminished.
Chapter 3: Software Installation 3.10 Color Desktop Adjust the overall richness of color by using the Gamma control. To adjust the overall brightness use the Brightness control, and the overall contrast use the Contrast control. Adjust Color Gamma 1. Click Color in Advanced View. 2. Click and drag the Control slider to your preferred setting: • To increase the Gamma, move the slider to the right. • To decrease the Gamma, move the slider to the left.
ATI Radeon™ HD 3800 Series User Manual Adjust Color Brightness 1. Click Color in Advanced View. 2. Click and drag the Control slider to your preferred setting: • To increase the Brightness, move the slider to the right. • To decrease the Brightness, move the slider to the left. • Optionally, click the up and down arrow buttons in the adjustment box. Note: Click the Reset button to cancel any adjustments made. Note: The preview image automatically displays the adjustment you have made.
Chapter 3: Software Installation 3.11 ATI Overdrive (optional) Use the ATI Overdrive to maximize the performance of the graphics processing unit (GPU) on your graphics card. An on-chip thermal sensor constantly monitors the temperature of the GPU allowing the maximum clock speed to be maintained while avoiding overheating. If the GPU gets too hot, the ATI Overdrive will automatically decrease the clock speed until a safe temperature is reached.
ATI Radeon™ HD 3800 Series User Manual Unlock ATI Overdrive The first time ATI Overdrive is accessed all the features are unavailable. You must “unlock” ATI Overdrive in order to change any settings. 1. 2. 3. From the menu pane, click ATI Overdrive. Click the Lock button. Click Yes in the ATI Overdrive warning message. Set the recommended speeds for the graphics clock and memory 1. 2. 3. From the menu pane, click ATI Overdrive. Click Run automated clock configuration utility button.
Chapter 3: Software Installation Change the memory clock speed 1. 2. From the menu pane, click ATI Overdrive. Move the Memory Clock slider to the desired setting. Note: The upper limit is the highest speed that can be safely set for your specific graphics card. The lower limit is the hardware default speed. Any changes made to the clock speed is only valid during the existing session. If you log out or reboot the computer the clock speeds are returned to the factory default settings.
ATI Radeon™ HD 3800 Series User Manual 3.12 HDMI Video and Audio (optional) ATI Radeon™ HD 3800 series build in HD audio chip on the cards and the HD audio driver will be installed during the installation of the graphic card driver. According to the Microsoft’s rule the latter installed audio device will become the default audio device. So the HD audio device of ATI Radeon™ HD 3800 series will become the default audio device in the system.
Appendix A: Specifications APPENDIX A SPECIFICATIONS A.
ATI Radeon™ HD 3800 Series User Manual Graphics Accelerator HD3870XTG4 for ATI Radeon™ HD 3870 HD3850PG3 for ATI Radeon™ HD 3850 XHD3870XTG4 for ATI Radeon™ HD 3870 XHD3870XTG3 for ATI Radeon™ HD 3870 XHD3850PG3 for ATI Radeon™ HD 3850 HD385P3 for ATI Radeon™ HD 3850 HD383P3 for ATI Radeon™ HD 3830 XHD3870X2 for ATI Radeon™ HD 3870 XHD3850X2 for ATI Radeon™ HD 3850 HD3870X2 for ATI Radeon™ HD 3870 HD387XT3 for ATI Radeon™ HD 3870 RX385PA3 for ATI Radeon™ HD 3850 Display Memory HD3870XTG4 use 256MB/512MB GD
Appendix A: Specifications A.2 Programming Information The ATI Radeon™ HD 3800 series supports all VGA modes. This is the default configuration of the VGA BIOS. The extended VGA graphics mode is invoked by the normal INT 10 mode call. All the VGA extended modes can be invoked with the VESA defined select extended mode BIOS call. A.3 Resolution Table Resolutions and color depth table.
ATI Radeon™ HD 3800 Series User Manual LCD resolutions and color depth table.
Appendix A: Specifications (This page was intentionally blank.
Table of Contents CHAPTER 5 INTRODUCTION...........................................77 CHAPTER 6 HARDWARE INSTALLATION.........................78 6.1 System Requirements ............................................... 78 6.2 CrossFireX™ Power Supply Requirements................. 80 6.2.1 Additional Power Connection Requirements .... 81 6.3 To uninstall previous graphics drivers and software.. 83 6.4 Dual ATI Radeon™ HD 3800 CrossFireX™ setup....... 84 6.
Chapter 5: Introduction CHAPTER 5 INTRODUCTION New ATI CrossFireX™ multi-GPU technology takes your gaming experience to the next level with more scalability, performance and compatibility. The technology combines the awe-inspiring capabilities of multiple ATI Radeon™ graphics cards and an ATI CrossFireX ready motherboard to meet the hard-core demands of your alternate reality.
Radeon™ HD 3800 CrossFire™ Edition User Manual CHAPTER 6 HARDWARE INSTALLATION 6.1 System Requirements Hardware Operating System Monitor ATI CrossFire™ Requirements • Intel® Pentium® 4 or AMD Athlon®. • 1GB of system memory • Optical drive for installation software (CD-ROM or DVD-ROM drive). • A 550 Watt or better power supply with two 2x3-pin PCIe™ power connectors. For optimal performance, we recommend requires one 2x3-pin and one 2x4-pin PCIe™ power connector.
Chapter 6: Hardware Installation graphics card with a peak dissipation above 150 watts.
Radeon™ HD 3800 CrossFire™ Edition User Manual 6.2 CrossFireX™ Power Supply Requirements ¾ HD3870X2 Power supplies with 500-Watt capacity, 30A current on 12V rail and two 6-pin PCI Express® power connectors is recommended for single ATI Radeon™ HD 3870X2 Series product. ATI Radeon™ HD 3870X2 series CrossFire configuration (dual graphics card system) requires 750-Watt capacity power supply with 38A on 12V rail.
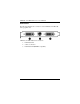
Chapter 6: Hardware Installation 6.2.1 Additional Power Connection Requirements Note: • Use power supply 6-pin cable (note, power supply cable is 6-wire, not 3-wire) 1. The ATI Radeon™ HD 3870X2 series must be connected to the computer’s power supply. 2. Locate the power connections on the ATI Radeon™ HD 3870X2 Series graphics card as shown in the following illustration. 2x3-pin + 2x4-pin (Required for ATI Overdrive) or Legend 1. 2×3-pin + 2×4-pin power connectors. 2.
Radeon™ HD 3800 CrossFire™ Edition User Manual 3. Connect either two 2x3-pin PCIe™ power connectors, or one 2x3-pin and one 2x4-pin PCIe™ power connector to the graphics card. When connecting a 2×3-pin PCIe™ power connector to the 2×4-pin connection, the connector should cover the 6 pins of the 2×4-pin connection that are farthest away from the 2×3-pin connection on the graphics card.
Chapter 6: Hardware Installation 6.3 To uninstall previous graphics drivers and software To ensure the successful installation of your new ATI Radeon™ HD 3800 CrossFireX™ Edition card, you must uninstall the drivers for the existing graphics card before removing it from your computer. To uninstall previous drivers With your current graphics card still in your computer: 1. 2. 3. 4. 5. 6. Close all applications that are currently running.
Radeon™ HD 3800 CrossFire™ Edition User Manual 6.4 Dual ATI Radeon™ HD 3800 card CrossFireX™ setup Only one CrossFireX™ bridge interconnect “flex cable” that connects the two CrossFireX™ cards can enable CrossFireX™. In a multiple card configuration, the two ATI Radeon™ HD 3800 cards will be identical. Either card can operate as the Master or Slave card – this will be set by the driver. Note that in CrossFireX™ mode, only one display is enabled.
Chapter 6: Hardware Installation 6.5 Connecting devices for ATI Radeon™ HD 3800 CrossFire™ The ATI Radeon™ HD 3800 series provides hardware CrossFireX™. The following illustration shows how to connect the ATI CrossFireX™ graphics cards. With CrossFireX™ enabled, the system will support two display device. Other display devices will automatically be disabled in favor of the CrossFireX™ display.
Radeon™ HD 3800 CrossFire™ Edition User Manual 6.6 Graphics cards with different amounts of memory Graphics card with different amounts of memory can by used with CrossFireX™. However, restarting your computer is required. This will cause CrossFireX™ to reduce the amount of memory on the card with the most amount of memory to match the memory size of the graphics card with the least amount of memory. Clicking OK to the memory mismatch error message will restart your computer.
Chapter 7: Software Installation CHAPTER 7 SOFTWARE INSTALLATION 7.1 Installing on Windows XP Caution: The Catalyst® Control Center requires that Microsoft's .NET Framework Version 2.0 be installed. Without .NET Version 2.0 installed the Catalyst® Control Center will not launch properly, and the user will see an error message as a result. http://msdn2.microsoft.com/en-us/netframework/default.aspx z 1. 2. 3. 4. 5. Microsoft .NET Framework Version 2.0 Redistributable Package Start Windows.
Radeon™ HD 3800 CrossFire™ Edition User Manual 7.2 Displays Manager Advanced View Use Display Manager Advanced View to set your desktop resolution, the display refresh rate, and arrange your displays. To change your display configuration requires dragging and/or clicking or right-clicking a display icon. Enable Clone Mode If the secondary device is disabled: 1. Click Displays Manager in Advanced View. 2.
Chapter 7: Software Installation 7.3 Component Video Properties The Component Video Properties aspect of the Catalyst® Control Center adds further support when using the ATI HDTV Component Video Adapter. Component Video Properties is made up of: • Formats • Adjustments To access the Component Video Properties aspect • Select Component Video Properties in Advanced View.
Radeon™ HD 3800 CrossFire™ Edition User Manual Use the scaling values instead of the customized settings when the desktop resolution does not match your DFP resolution.
Chapter 7: Software Installation 7.4 Digital Panel Properties Use the Digital Panel Properties aspect to configure the DVI settings and Image Scaling to improve image quality without impacting performance. Use HDTV Support to add EDID information (containing information about the capabilities of the display) about your connected HDTV display to the Force button in Displays Manager. Note: Catalyst® Control Center loads aspects dynamically based on what device is attached to the graphics card.
Radeon™ HD 3800 CrossFire™ Edition User Manual 7.5 CrossFireX™ The CrossFireX™ aspect requires the following components to be available in order to appear as an option within Catalyst® Control Center: • • • • A CrossFireX™ Ready motherboard with two PCI Express® X16 slots A CrossFireX™ Edition Series graphics card The ATI Radeon™ HD 3800 CrossFireX™ Edition can be paired with any standard ATI Radeon™ HD 3800-based graphics card.
Chapter 7: Software Installation To access CrossFireX™ • Select CrossFireX™ in Advanced View. Enable CrossFireX™ 1. Click CrossFireX™ in Advanced View. 2. Click Enable CrossFireX™. When CrossFireX™ is successfully enabled all display devices, except the one used by CrossFireX™, will be disabled. Note: CrossFireX™ Higher Quality anti-aliasing can be adjusted in the Catalyst® Control Center 3D settings aspect.
Radeon™ HD 3800 CrossFire™ Edition User Manual APPENDIX B CrossFire™ FAQ 1. What combination of products are required to build a working CrossFire™ system? Three components are required: • a CrossFire™ Edition graphics card that works as the Master graphics card. • a CrossFire™ Ready graphics card from the same brand-family that works as the Slave graphics card. • a CrossFire™ Ready motherboard (which contains two PCIe™ X16 slots). 2.
Appendix B: CrossFire™ FAQ 6. What happens when your CrossFire Edition card and and a compatible standard Radeon (CrossFire Ready) graphics card have different clock speeds? Both cards will continue to operate at their individual clock speeds. 7.
Radeon™ HD 3800 CrossFire™ Edition User Manual 10. Are there any software settings required for CrossFire™ to work? Yes, there is a setting in the Catalyst® Control Center that needs to be enabled for CrossFire™ to operate. When all of the hardware and software has been properly set up and installed, the following CrossFire™ aspect appears in Catalyst® Control Center: To access and enable CrossFire™ in Catalyst® Control Center, do the following: • Click CrossFire™ in Advanced View.
Appendix B: CrossFire™ FAQ 12. What happens if you pair a 12-pipeline CrossFire™ Edition graphics card with a CrossFire™ Ready 16-pipeline graphics card? In this scenario both graphics cards will operate as 12-pipeline graphics cards while in CrossFire™ mode. 13. On what basis are different rendering modes chosen? When Catalyst® A.I. is enabled in Catalyst® Control Center, it determines the optimal rendering mode to use, based on the application or game being used.
Radeon™ HD 3800 CrossFire™ Edition User Manual (This page was intentionally blank.