www.novell.com/documentation Integrated Installation Guide Identity Manager 4.0.
Legal Notices Novell, Inc. makes no representations or warranties with respect to the contents or use of this documentation, and specifically disclaims any express or implied warranties of merchantability or fitness for any particular purpose. Further, Novell, Inc. reserves the right to revise this publication and to make changes to its content, at any time, without obligation to notify any person or entity of such revisions or changes. Further, Novell, Inc.
Contents About This Guide 5 1 Integrated Installer Overview 1.1 1.2 1.3 1.4 7 Integrated vs. Standalone Installer. . . . . . . . . . . . . . . . . . . . . . . . . . . . . . . . . . . . . . . . . . . . . . . . . . . . 7 Identity Vault Structure . . . . . . . . . . . . . . . . . . . . . . . . . . . . . . . . . . . . . . . . . . . . . . . . . . . . . . . . . . . . . 8 1.2.1 Security . . . . . . . . . . . . . . . . . . . . . . . . . . . . . . . . . . . . . . . . . . . . . . . . . . . . . . . . . . . . . .
5.3 5.4 5.5 5.6 6 Upgrading Identity Manager 45 7 Troubleshooting Identity Manager 47 8 Uninstalling Identity Manager 53 8.1 8.2 4 Viewing Product Activations for Identity Manager and for Drivers . . . . . . . . . . . . . . . . . . . . . . . . . . . 42 Activating Identity Manager Drivers . . . . . . . . . . . . . . . . . . . . . . . . . . . . . . . . . . . . . . . . . . . . . . . . . . 43 Activating Analyzer. . . . . . . . . . . . . . . . . . . . . . . . . . . . . . . . . . . . . . . . . . . . . .
About This Guide Novell Identity Manager 4.0.1 is a data sharing and synchronization service that enables applications, directories, and databases to share information. It links scattered information and enables you to establish policies that govern automatic updates to designated systems when identity changes occur. Identity Manager provides the foundation for account provisioning, security, single sign-on, user self-service, authentication, authorization, automated workflow, and Web services.
Identity Manager 4.0.
1 Integrated Installer Overview 1 Identity Manager 4.0.1 provides world-class compliance support and reduced costs for identity management and provisioning from the data center environment to the cloud environment. The integrated installer simplifies Identity Manager 4.0.1 deployment for administrators and consultants. It is a simplified installer to help you quickly set up a system, because it avoids the need to separately install each component. Section 1.1, “Integrated vs.
Features Integrated Standalone Supported Platform Checks Internally checks the platform differences. Does not perform a platform check. Handling Inconsistencies Has a consisent user experience across components and platforms. Might experience inconsistencies. Installation and Configuration Phases Separate installation and configuration phases. Differs across various components.
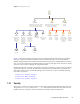
Figure 1-1 Identity Vault Structure t=idv Tree root o=system Split between the system and the data objects. Only admin users should have access to the system subtree. ou=sa System users, including the admin, driver admins, and others ou=servers Separation of the server objects from other system objects, all server and related objects cn=driverset1 Driver sets are placed directly under the system, vault container o=data cn=security Split between the system and the data objects.
1.2.2 Data The data container holds groups, users, role admins, devices, and others. This is the data that makes up your system. The groups, users, and sa containers are organizational units. You can have additional organizational units to structure your data according to your organizational practices. ou=sa The Service Admins (ou=sa) container holds all user application administrator objects and service administrator accounts. 1.2.3 System The system container is an organization.
1.3 Configuring Drivers The following Identity Manager 4.0.1 components can be installed and configured by using the integrated installer: Metadirectory Server (Identity Vault, Metadirectory Engine, and Remote Loader) Roles Based Provisioning Module Identity Reporting Module Event Auditing Service Role Mapping Administrator iManager Designer Analyzer See System Requirements for a list of supported platforms for the Identity Manager components.
Identity Manager 4.0.
2 Identity Manager Components 2 You can install the following components by using the Identity Manager integrated installer. The Identity Manager components do not need to be installed on the same system. Figure 2-1 shows which components are supported. Figure 2-1 Identity Manager Integrated Installer Components iManager Role Mapping Administrator Designer Administration Workstation User Application Server 4.0.1/Reporting Server Analyzer Administration Workstation Metadirectory 4.0.
2.1 Metadirectory Server (Identity Vault, Metadirectory Engine, and Remote Loader) The Metadirectory server processes the events from the drivers. During the installation of the Identity Manager, Identity Vault is automatically installed. 2.1.1 Supported Processors The processors listed here are the ones that are used during the testing of Identity Manager.
Server Operating System Version Notes Red Hat 6.0 or later support packs (32-bit and 64-bit) The Metadirectory server runs in either 32-bit or 64-bit mode. Novell recommends that you apply the latest OS patches via the manufacturer’s automated update facility before you install Identity Manager. SUSE Linux Enterprise Server 10 or later support packs (32-bit and 64-bit) The Metadirectory server runs in either 32-bit or 64-bit mode.
Figure 2-2 Auditing and Reporting Administration Workstation User Application Server 4.0.1/Reporting Server Designer iManager Analyzer Role Mapping Administrator Administration Workstation Metadirectory 4.0.
2.5 iManager, Designer, and Analyzer To install iManager, Designer, Analyzer, and the Role Mapping Administrator, select each of them individually from the corresponding check boxes on the Select Components page of the installation. Figure 2-3 illustrates these components. Figure 2-3 Tools for Identity Manager Administration Workstation User Application Server 4.
Identity Manager 4.0.
3 System Requirements 3 The components of Novell Identity Manager can be installed on multiple systems and platforms by using the integrated installer. Section 3.1, “Supported Platforms,” on page 19 Section 3.2, “Resource Requirements,” on page 20 Section 3.3, “Ports Used by the Identity Manager Services,” on page 20 3.1 Supported Platforms Figure 3-1shows platforms supported by the Novell Identity Manager 4.0.1 integrated installer.
The Identity Manager 4.0.1a does not install iManager 2.7.4 FTF3. To extend support for Microsoft Internet Explorer 9 and Mozilla Firefox 4.0.1 browsers, manually upgrade iManager 2.7.4 to iManager 2.7.4 FTF3. For iManager installation and upgrade requirements, see Installing iManager (http://www.novell.com/documentation/imanager27/imanager_install_274/data/alw39eb.html) section in the iManager 2.7 Installation Guide (http://www.novell.com/documentation/imanager27/ index.html). With Identity Manager 4.0.
Port Used By Service 8081 Role Mapping Administrator 8180 JBoss 8443 iManager with SSL 15432 Postgres Database for Identity Reporting Module System Requirements 21
Identity Manager 4.0.
4 Installing Identity Manager 4 You can install and configure all components at the same time or in different runs by using the integrated installer. If you want to install each component separately, use the individual installers to install the Identity Manager components in the order specified in the “Installing Identity Manager” section in the Identity Manager 4.0.1 Framework Installation Guide. For an explanation of the different components, see the Identity Manager 4.0.1 Overview Guide.
To download Identity Manager and its services: 1 Go to the Novell Downloads Web site (http://download.novell.com). 2 In the Product or Technology menu, select Novell Identity Manager, then click Search. 3 On the Novell Identity Manager Downloads page, click the Download button next to a file you want. Table 4-1 contains a description of each file. 4 Based on your requirements, select an appropriate ISO. Each ISO contains the 32-bit and 64-bit versions of the product.
is outlined in the RBPM (http://www.novell.com/documentation/idm401/install/data/front.html) documentation. For creating a production or staging environment, it is recommended to use individual installers of RBPM with the enterprise application server and database. To switch from the Identity Manager Advanced Edition to the Standard Edition, uninstall the Advanced Edition and then install the Standard Edition.
For a 32-bit RHEL: Install the following library: compat-libstdc++-33-3.2.3-69.el6.i686.rpm NOTE: Ensure that the unzip rpm is installed before installing Identity Manager. This is applicable for all Linux platforms. Section 4.2.1, “Installation,” on page 26 Section 4.2.2, “Configuration,” on page 27 4.2.1 Installation 1 Access the Identity Manager 4.0.1 installation files either by mounting the .iso file or accessing the DVD you created from the .iso file. For more information, see Section 4.
Pre-Installation Summary: Review the Pre-Installation summary page, which contains information about the selected components. To change any of these settings, click Previous. Installation Complete Summary: Review the post-installation summary to verify the installation status of the selected components and the location of the log file for each component. See Table 4-2 on page 35 for information about the location of the log files.
ndscheck [-h ] [-a ] [[-w ] The logevent.cfg file is modified with the logging server details on both Windows and Linux platforms when either the Roles Based Provisioning Module or the Identity Reporting Module is configured through integrated installer. If you are configuring only Metadirectory server, manually add the logging server details to the logevent.cfg file.
HTTP secure port: Either leave the default value of 8030 for the HTTP secure port or change the value of the port. Instance path: If your server is Linux/UNIX, you can run multiple instances of eDirectory on one server. Specify the path of this eDirectory instance on this server. The default path is /var/opt/ novell/eDirectory. DIB path: Specify the path for your eDirectory database (DIB).
Roles Based Provisioning Module (RBPM) > Advanced Select Advanced if you want to customize the configuration of the RBPM. Userapplication address: Specify the DNS name or IP address of the server that hosts the User Application. Userapplication user: Specify name for the administrative user for the User Application. (Conditional) Security Admin name: Specify the name for the security administrator for the User Application. This role gives members the full range of capabilities within the Security domain.
LDAP port: If you have selected secure LDAP for communication, specify the LDAP secure port. Otherwise specify the clear text port. Token expiration value (in minutes): Specify the number of minutes to retain the token for authentication. Reporting unit: Select Day, Week, or Month. Report retention value: Specify how long a report is retained. If the reporting unit is set to Day, and the report retention value is 1, the reports are maintained for 1 day before they are deleted.
Adding to an Existing Tree The fields that appear depend on the components you selected to configure in the previous page. 1 Use the following information to configure the Identity Manager components if you selected to add this server to an existing tree.
Instance path: If your server is Linux/UNIX, you can run multiple instances of eDirectory on one server. Specify the path of this eDirectory instance on this server. The default path is /var/opt/ novell/eDirectory/data. DIB path: Specify the path for your eDirectory database (DIB). The default location of the DIB is: Linux/UNIX: /var/opt/novell/eDirectory/data/DIB Windows: c:\Novell\Identity Manager\NDS\DIBfiles\ NOTE: DIB files must always reside inside the \NDS folder.
(Conditional) Security admin dn: Specify the DN for the security administrator in LDAP format. This role gives members the full range of capabilities within the Security domain. The Security administrator can perform all possible actions for all objects within the Security domain. This field is required only for the Identity Manager Standard Edition. (Conditional) Security admin password: Specify the password for the security administrator.
dn: cn=DirXML-PasswordPolicy,cn=Password Policies,cn=Security changetype: add nsimPwdRuleEnforcement: FALSE nspmSpecialAsLastCharacter: TRUE nspmSpecialAsFirstCharacter: TRUE nspmSpecialCharactersAllowed: TRUE nspmNumericAsLastCharacter: TRUE nspmNumericAsFirstCharacter: TRUE nspmNumericCharactersAllowed: TRUE nspmMaximumLength: 64 nspmConfigurationOptions: 596 passwordUniqueRequired: FALSE passwordMinimumLength: 1 passwordAllowChange: TRUE objectClass: nspmPasswordPolicy dn: cn=driverset1,o=system changety
4.4 Silent Installation and Configuration Section 4.4.1, “Silent Installation,” on page 36 Section 4.4.2, “Silent Configuration,” on page 36 4.4.1 Silent Installation In order to run a silent installation of the Identity Manager components, you must create a properties file with the parameters necessary to complete the installation. There is a sample file included on the Identity Manager media: Linux: ./install/propfiles/install.properties Solaris: ./install/propfiles/install.
Solaris: ./configure.bin -i silent -f .properties To execute the binary file, enter ./configure.bin -i silent -f .properties. Windows: \configure.exe -i silent -f .properties The sample properties files available in the install\propfiles location can be used only when all the components are configured in one run. To see the mandatory parameters, run the following command: .
3 (Conditional) If eDirectory is running, the patch installer stops it. Click OK to continue the installation. or If the patch installer fails to stop eDirectory, a warning message is displayed. You can manually stop eDirectory and click OK to continue or click Cancel to stop the installation. 4 From the patch installer page that displays on the screen, select the desired components for installation, then click Install.
Windows: install.bat -i silent -f patchUpgradeSilent.Properties The sample patchUpgradeSilent.
The following conditions apply when an Identity Manager installer is launched: If the operating system is in a language supported by the Identity Manager installer, the language picker for the Identity Manager installer defaults to that language. If the operating system is in a language not supported by the Identity Manager installer, the language picker for the Identity Manager installer defaults to English.
5 Activating Novell Identity Manager Products 5 The information in this section explains how activation works for the Identity Manager components. The Identity Manager components must be activated within 90 days of installation, or they will shut down. At any time during the 90 days, or afterward, you can choose to activate Identity Manager products. You can activate the Identity Manager components by completing the following tasks: Section 5.
Carefully copy the contents, and make sure that no extra lines or spaces are included. You should begin copying from the first dash (-) of the credential (----BEGIN PRODUCT ACTIVATION CREDENTIAL) through the last dash (-) of the credential (END PRODUCT ACTIVATION CREDENTIAL-----). WARNING: If Standard Edition activation is applied to an existing non-activated Advanced Edition system, it stops the Identity Manager Metadirectory server and drivers. 3 Open iManager.
5.4 Activating Identity Manager Drivers Your Identity Manager purchase includes activations for service drivers and several common drivers.
Identity Manager 4.0.
6 Upgrading Identity Manager 6 You cannot upgrade Identity Manager components through the integrated installer. Use the individual product installers for upgrading to Identity Manager 4.0.1. Upgrading from the Identity Manager 4.0.1 Standard Edition to the Advanced Edition has a different upgrade procedure, which involves only configuration changes. You do not need to run the Identitiy Manager installer for this upgrade.
Identity Manager 4.0.
7 Troubleshooting Identity Manager 7 Keep in mind the following information when you install Identity Manager by using the integrated installer: “Installation issues” on page 47 “Passing mandatory parameters during configuration” on page 48 “Configuration fails if the hosts file contains 127.0.0.2 entry” on page 48 “Installer throws java.io.
"/home/siva/build/products/Reporting/IDMReport.bin" DIA_USER_JRE_HOME="/opt/nov ell/idm/jre" -i silent -f "/tmp/idmreporting_configure.properties" execute command exitValue = 1 log file location :/tmp/idmreporting_configure.properties log file location :/opt/novell/idm/rbpm/IDMReporting// RPT_Install.log The above snippet from the ii_install.log file indicates that the command has failed, because the exitValue is 1 (non-zero).
Issues with invoking installer in the GUI mode Possible Cause: An error message displays when integrated installer is invoked in the GUI mode if the required RPMs are not present in the system. The integrated installer automatically switches to the console mode, which is not supported. Action: Install the required RPMs before invoking the Identity Manager installer. See Identity Manager 4.0.1 Readme (http://www.novell.com/documentation/ idm401/readme/data/idm401_readme.
Integrated installer might hang during the Identity Manager uninstallation on Windows Possible Cause: The installer tries to stop all the dependent services before uninstalling Identity Manager. Sometimes installer might not be able to stop the DHost service because some services depend on DHost. Action: Do the following steps to check whether the installer hanged during the Identity Vault uninstallation: 1 Goto the Control Panel, open the Novell eDirectory Services, then click the Startup button.
Action: Execute the individual component uninstallers as follows: Linux/Solaris: Run the following command to uninstall the individual components: Metadirectory: Uninstall the Identity Manager framework: /root/idm/Uninstall_Identity_Manager/ Uninstall_Identity_Manager Uninstall the Identity Vault: /opt/novell/eDirectory/sbin/nds-uninstall JBoss: Run the following command: $IA_RBPM_POSTGRESQL_INSTALL_PATH$/ JBossPostgreSQL_Uninstaller/Uninstall_JBossPostgreSQL Roles Based Provisioning Module: Run
Identity Manager 4.0.
8 Uninstalling Identity Manager 8 The uninstall script uninstalls all Identity Manager components that were installed with the integrated installer. If you want to uninstall a single component, see “Uninstalling Identity Manager” in the Identity Manager 4.0.1 Framework Installation Guide. 8.1 GUI Uninstallation Ensure that the JAVA_HOME and PATH environment variables point to Java before the integrated uninstaller is invoked.
Windows: \install\propfiles\uninstall.properties Start the silent uninstallation by using the correct program for your platform: Linux: /opt/novell/idm/Uninstall_Identity Manager Components/Uninstall Identity Manager Components.bin -i silent -f .properties Solaris: /opt/novell/idm/Uninstall_Identity Manager Components/Uninstall Identity Manager Components.bin -i silent -f .