
User Guide


13 & 14TRACK (Track Buttons)- These buttons are used
to select the track to be played. Forward skip &
Back skip.
15. TIME (Time Button)- The TIME button switches
between
Elapsed playing time, Remaining
time in a selection,Total remaining time of
the disc.
16. PITCH SLIDER- The pitch can be changed up to
+/-12% by pressing the PITCH button so the
PITCH LED is lit, then moving the sliding fader.
The pitch will not be changed if the PITCH LED is
off.
17. BPM BUTTON- Switches the mode of the display
between showing the BPM and the percentage
change in pitch. Use COUNTER button.
18. COUNTER BUTTON- Tap this button with the
beat of the music to determine the current Beats
Per Minute (BPM).
19. REAL TIME CUE -This allows you to set the cue
point without stopping the play back This button
also set the beginning of a loop
20. CUE- Pressing the CUE button during play pro
vides a return to the position at which play was
started. If PAUSE is used before CUE or CUE
point was set, that will become the cue point.
Alternately pressing the PLAY button and the
CUE button allows the CD to be played from the
same position any number of times. The CUE
LED will light up from the time the Cue button is
pressed until the CD has reset to the position at
which play was started. Steady lighting of this
LED indicates the ready condition.
21. OUT / EXIT- Used to set the ending when looping
music. The player will start to loop continuous
until you press this button again to exit. This is
not a seamless function.
22. START/PAUSE (Play/Pause Button)- Each press
of the Play/Pause Button causes the operation to
change from play to pause or from pause to play.
American DJ® AUDIO • DCD-PRO300™ INSTRUCTIONS MANUAL • PAGE 7
23. RELOOP BUTTON- If a loop has been made
and you have hit the exit button, press this but
ton to enter the loop again. to exit loop press
OUT/EXIT button
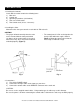
B. LCD
26. PLAY Indicators ( ) - The PLAY
indicators light during playback.
27. PAUSE Indicators ( ) - The PAUSE
indicators light during pause or cue mode.
28. A-B Indicators - These light when player
performs repeat A-B playback.
29. PROGRAM Indicator - This lights when program
mode is set or played.
30. REPEAT Indicators - (REPEAT 1, REPEAT
ALL) These light during repeat one or all
playback.
28,31,32 TRACK, MINUTE, SECOND
These displays indicate information on the
current track and time.
33. PITCH OR BPM DISPLAY- Show either beat per
minute or percent of pitch adjustment.
34. BPM INDICATOR - lights up when BPM Button is
engaged
35. PITCH INDICATOR- light to show percent of pitch
is displayed.
36. ELAPSED, TOTAL REMAIN Indicators -
These indicate that the time shown on the display
is the ELAPSED, TOTAL REMAINING or single
song remaining time.
37. LOOP , RELOOP - displayed when loop is
engaged loop flashes when playing loop.
D. Main Unit Rear Panel
LINE OUT 1 and 2 - The audio signals from each
player are output from these jacks.
REMOTE - Connect this connector to the control unit
using the included control cords.
DIGITAL - connect to Minidisc or CDR device.
Voltage Selector - (multi-voltage models only) On
multi-voltage models, use this to select the power
voltage. Always disconnect the power plug before
changing the voltage.
E. Control Unit Rear Panel (figure 4)
Connect to main unit - Connect this connector
to the REMOTE connector on the main unit
using the included control cords.
Control - Connect this connector to the control out
from mixer control out. Available on future mixers.
GENERAL FEATURES (Cont.)
25
24
29 30
26
27
28
31 32
33
36
35
34
37