Encore 2000 Featuring: User Guide and Reference Manual 9/11
CONTENTS IMPORTANT INFORMATION..................................................................................................................3 ELECTRICAL PRECAUTIONS................................................................................................................4 SAFETY INSTRUCTIONS.......................................................................................................................5 UNPACKING................................................................................
IMPORTANT INFORMATION IMPORTANT SAFETY ITEMS FOR U.S.A. & CANADA MODEL ONLY NOTE: This CD player uses a semiconductor laser. It is recommended for use in a room at the following temperature: 41˚F - 95˚F / 5˚C - 35˚C WARNING: TO PREVENT FIRE OR SHOCK HAZARD, DO NOT EXPOSE THIS CD PLAYER TO WATER OR MOISTURE CAUTION: 1. Handle the power supply cord carefully. Do not damage or deform; it may cause electric shock or malfunction when used. Hold plug attachment when removing from wall outlet.
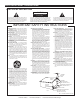
ELECTRICAL SAFETY PRECAUTIONS ELECTRICAL PRECAUTIONS CAUTION RISK OF ELECTRIC SHOCK DO NOT OPEN The lightning flash with arrowhead symbol, within an equilateral triangle, is intended to alert the user to the presence of uninsulated "dangerous voltage" within the product's enclosure that may be of sufficient magnitude to constitute a risk of electric shock to persons. CAUTION: TO REDUCE THE RISK OF ELECTRIC SHOCK, DO NOT REMOVE THE COVER (OR BACK).
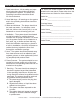
SAFETY INSTRUCTIONS I. Read Instructions - All the safety and oper- ating instructions should be read before you operate the system. The safety and operating instructions should be saved for future reference. The serial and model number for this unit is located on the rear panel. Please write down the numbers here and retain for future reference. 2. Heed Warnings - All warnings on the system and in the operating instructions should be adhered to. Serial No._____________________________ 3.
UNPACKING Every Encore 2000 System has been thoroughly tested and has been shipped in perfect operating condition. Carefully check the shipping carton for damage that may have occurred during shipping. If the carton appears to be damaged, carefully inspect your system for any damage and be sure all equipment necessary to operate the system has arrived intact. In the event damage has been found or parts are missing, please contact our toll free customer support number for further instructions.
MAIN FEATURES • Plays Mp3's, CD's, and CD-R Discs • Auto cue • Sleep Mode (c) • Selectable Single or Continuous Play • 1/75th second frame search • Real time cue (“Cue on the Fly”) • Pitch display • RCA coaxial output • Fader “Q” Start Control (a) • 20 Sec.
SET-UP Checking the Contents Be sure your Encore 2000 was shipped with the following: 1) Encore 2000 Professional CD player/mixer 2) Operating instructions (this booklet) 3) Warranty card 4) Power Cord 5) PC & Mac Asio Software CAUTION: • To avoid severe damage to the unit, be sure the power is off when making connections to the unit. System Power Up Sequence: 1. Turn ON the Encore 2000. 2. Next turn ON your speakers.
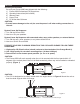
GENERAL FUNCTIONS AND CONTROLS 19 17 15 13 CD PLAYER 20 2 18 4 16 6 14 8 10 12 1 Figure 3 3 5 7 9 11 A. PLAYER CONTROLS (FIGURE 3) 1. EJECT BUTTON - Pressing this will open/close the CD tray. The eject function can only happen when the unit is in pause or cue mode, this is to prevent accidentally ejecting the disc when in play mode. 2. FOLDER BUTTON - This button is used to toggle between folders and tracks. Press this button to show the folder that is playing in the LCD.
GENERAL FUNCTIONS AND CONTROLS (Cont.) CD PLAYER between 4%, will allow the least amount of pitch manipulation and 100% will allow the most amount of pitch manipulation. Note: 100% Pitch Adjustment works with regular CDs only, not Mp3 CDs. NOTE: Pressing this button and turning the JOG WHEEL (11) allows you to view the File Name, Title, Artist, & Genre. 7. PITCH PERCENTAGE SELECTOR - Press this button to select pitch range percentages of 4%, 8%, 16%, & 100%.
GENERAL FUNCTIONS AND CONTROLS (Cont.) CD PLAYER BUTTON will instantly reactivate the SEAMLESS LOOP mode. To exit the loop, press the OUT BUTTON (12). LOOP will appear in the LCD DISPLAY (20) when the RELOOP function is available. 13. PLAY/PAUSE BUTTON - Each press of the PLAY/PAUSE BUTTON causes the operation to change from play to pause or from pause to play. While in play mode the blue play LED will glow, and while in pause mode the blue play LED will flash. 14.
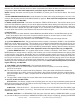
GENERAL FUNCTIONS AND CONTROLS (Cont.) 33 32 31 MIXER 21 22 23 Figure 4 24 30 25 26 27 28 29 B. MIXER CONTROLS (FIGURE 4) 21. SOURCE SELECTOR SWITCH - These switches are used to select the input source assigned to each channel. Each channel may only be assigned one input source at a time. NOTE: When using deck output mode, switching to deck will route the deck source to the mix. 22. AUX INPUT - This Aux input is for the use of a Mp3 player. Input volume will be controlled by the channel two fader.
GENERAL FUNCTIONS AND CONTROLS (Cont.) MIXER for a maximum midrange gain of +12dB or maximum decrease of -30dB. Turning the knob in a counter-clockwise direction will decrease the amount of midrange applied to a channel signal, turning the knob in a clockwise direction will increase the amount of midrange applied to a channel signal. BASS CONTROL - This knob is used to adjust the low frequency levels of a channel allowing for a maximum bass gain of +12dB or maximum signal decrease of -30dB.
GENERAL FUNCTIONS AND CONTROLS (Cont.) 34 46 FRONT & REAR PANEL Figure 5 35 45 44 43 36 42 41 40 39 38 37 Figure 6 C. FRONT PANEL (FIGURE 5) 34. TRANSPORT TRAY 1 - This tray is used to load and unload a compact disc. The tray is opened and closed by pressing the Deck 1 OPEN/CLOSE BUTTON (1). Never attempt to force the transport tray open or closed when the power is turned off. If the CD tray is left open for more than a minute it will close automatically. 35.
GENERAL FUNCTIONS AND CONTROLS (Cont.) FRONT & REAR PANEL TO THESE JACKS! CD players, Tape Decks and other line level instruments may be connected to these jacks. The red colored RCA jack represents the right channel input and the white represents the left channel input. Input volume will be controlled by channel one fader. The channel SOURCE SELECTOR SWITCH (21) must be in the "Line 1" position, to monitor any source connected to these jacks. 39.
GENERAL FUNCTIONS AND CONTROLS (Cont.) 47 48 49 CD PLAYER LCD 50 Figure 7 51 63 62 52 61 60 53 54 55 56 E. LCD DISPLAY PANEL (FIGURE 7) 59 58 57 47. CUE INDICATOR - This indicator will glow when the unit is in CUE or PAUSE mode and will flash every time a new CUE POINT is set. 48. FOLDER INDICATOR - This indicator details the current selected folder. 49. TIME BAR INDICATOR - This bar gives a visual approximation of a track's or disc's remaining time.
INTERNAL MENU Hold TIME BUTTON (3) for 3 seconds to enter the internal menu. Use the TRACK BUTTONS (18) or turn the JOG WHEEL (11) to scroll through the different menus and press the +10 BUTTON (18) to enter the corresponding submenu. Press the TRACK BUTTONS (18) or turn the JOG WHEEL (11) to change the submenus and press TIME BUTTON to memorize your settings in any operating mode and exit the menu. 1.
BASIC OPERATIONS 1. LOADING/EJECTING DISCS & OR USB DEVICE The Encore 2000 can only play 3 inch and regular 5 inch CDs. When loading a CD into the player always hold the disc by it edge). Load the disc label side up and never touch the signal surface (the glossy side). To remove a disc from the player press the OPEN/CLOSE BUTTON (1). CAUTION: • NEVER attempt to load any other objects besides 3" and 5" CDs. • NEVER attempt to load more than one disc at a time.
BASIC OPERATIONS (CONT.) 2. SELECTING TRACKS Select a desired track by using the TRACK BUTTONS (18). Tapping the TRACK BUTTONS (18) once will select either the next higher or lower track. You can hold down the TRACK BUTTONS (18) to change tracks continuously at a faster speed. If you are using the TRACK BUTTONS (18) to select a new track during playback (a track is already in play mode) the new track you selected will immediately begin playback as soon as the search operation is completed.
BASIC OPERATIONS (CONT.) 7. FRAME SEARCH This feature allows you to scroll through a track frame by frame, allowing you to find and set a starting cue or loop point. To use the scroll function you must first be in Pause Mode (see section 4) or Cue Mode (see section 8). Once you are in Pause or Cue mode, turn the JOG WHEEL (11) to scroll through the track (Figure 13).
BASIC OPERATIONS (CONT.) 3) You may also use the SEARCH BUTTONS (17) to set a cue point. While a disc is in PAUSE or CUE mode, use the SEARCH BUTTONS (17) to scan through a track to find your desired starting point. Once you have found your desired position press the PLAY BUTTON (13) to set your cue point. Pressing the CUE BUTTON (15) will now return you to this exact point. Figure 16 9.
BASIC OPERATIONS (CONT.) EXITING A LOOP - To exit a SEAMLESS LOOP, press the OUT BUTTON (12). Music playback will resume normal play. The IN BUTTON (12) and OUT BUTTON (12) LEDs will remain lit to remind you that a loop is in memory. Figure 20 REPLAY LOOP - The RELOOP function allows you to return to your stored loop at any time. The IN BUTTON (12) and OUT BUTTON (12) LEDs will indicate a loop is stored in memory, and may be played at any time. To replay the loop, press the RELOOP BUTTON (12).
PITCH ADJUSTMENTS PITCH ADJUSTMENTS: You can activate the PITCH SLIDER (5) by pressing the PITCH ON/OFF BUTTON (6). When the button LED is lit, the PITCH SLIDER (5) is active and the pitch can be adjusted. When the button LED is not lit PITCH SLIDER (5) is not active. The different pitch adjustments allow a track's or a loop's playback speed to be manipulated. This speed manipulation is commonly used to beat match between two or more music sources such as a turntable or another CD player.
PITCH ADJUSTMENTS Adjusting the PITCH SLIDER'S RANGE: You may change the PITCH SLIDER'S (5) operating range at any time. To change the operating range be sure the pitch function is turned on, see figure 24. The pitch percentage can be changed between +/-4%, +/-8%, +/-16%, & 100%. 4% will allow the least amount of pitch manipulation and 100% will allow the most amount of pitch manipulation.
PITCH ADJUSTMENTS 3. JOG WHEEL (11): The JOG WHEEL will temporarily bend the pitch if a track is in playback mode. Rotating the wheel in a clockwise direction will increase your track pitch and rotating the wheel in a counter-clockwise direction will slow your track pitch. The speed you rotate the JOG WHEEL will determine pitch bend percentage (%).
MIDI MODE To use the Encore 2000 MIDI controls make sure that the USB cable is properly connected to your computer. PC user's install the ASIO drivers before initial operation. To enable MIDI press and hold the SOURCE SELECT BUTTON (14) for 3 seconds. Depending on the software you are using the MIDI may have to be mapped.
MIDI TABLE CUE LEVEL CUEMIX CROSSFADER RELAY -- VR VR VR SW/LED -- 32 33 34 14/14 -- 71 72 73 53/--- Mix CH Mix CH Mix CH Mix CH CC-ABSOLUTE (VR) Control Change messages are sent with status 0xBn, where n is the channel, for the specified CC controller. Thus the controller MIDI ID is indicated with the channel along with the CC number. The value from 0x00 to 0x7F, directly related to the location of the controller.
DVS SET UP Encore 2000 DVS Set Up: The Encore 2000 can be used with DVS software and an audio interface using the software's time code CD's to control the music loaded onto the software's decks. Load the time code CD's to the CD player tray of the Encore 2000. Set the Encore 2000 OUTPUT MODE SWITCH (43) to Deck route mode, then route the DECK 1 and DECK 2 OUTPUTS (41 & 42) to the software's Audio Interface inputs.
ACCESSING MP3 FOLDERS ACCESS MP3 FOLDERS : Use this function to access the different folders (files) located on your Mp3 disc. 1) Press the FOLDER BUTTON (2) so that the FOLDER LED lights up. The artist and song title should appear in the CHARACTER DISPLAY (58) and the Folder number will appear in the FOLDER INDICATOR (48). Figure 30 2) Now, press the TRACK BUTTONS (18) to scroll forward or backwards through the folders. Figure 31 ©American Audio® - www.AmericanAudio.
MIXER SET-UP CASSETTE DECK This image details a typical DJ Set Up consisting of a microphone, Mp3 player, CD players, and a tape deck. Note: Turntables cannot be connected to the ENCORE 2000. ©American Audio® - www.AmericanAudio.
MIXER SET-UP American Audio V4001™ Speaker Cables Typical Balanced Output Set-up This image details a typical stereo output layout. Note the use of the Balanced XLR Jacks on both the mixer and the amplifier. Always use the balanced output jacks whenever possible. The balanced output jacks should always be used for cable runs in excess of 15 feet. Using the balanced jacks will ensure a clean signal through out the entire audio system. ©American Audio® - www.AmericanAudio.
CROSSFADER REPLACEMENT The crossfader is “Hot Swapable” which means it may be replaced at any time, even when power is applied. Only replace with American Audio Part Feather Fader Plus. Replacing with any other model fader may seriously damage your mixer. Please, always use insulated tools. Replacing the Crossfader: 1. 2. 3. 4. 5. Using a Phillips screw driver, unscrew the six stainless steel retainer screws that hold the mixer face plate in place. Gently remove the crossfader knob.
WARRANTY WARRANTY INFORMATION: The ENCORE 2000 carries a ONE year (365 days) limited war- ranty. This warranty covers parts and labor. Please fill out the enclosed warranty card to validate your purchase and warranty. All returned service items whether under warranty or not, must be freight pre-paid and accompany a return authorization (R.A.) number. If the unit is under warranty, you must provide a copy of your proof of purchase invoice.
SPECIFICATIONS GENERAL Type: Disc type: Pitch Range: Pitch Accuracy: Dimensions: Installation: Weight: Power supply: Power consumption: Environmental conditions: Accessories: Model: American Audio Encore 2000 - Professional DUAL CD Player/MP3 Player/2-Channel Mixer/MIDI Controller Tray loading, digital compact disc/USB audio player. Standard size compact discs only (5 in/12 cm and 3in/8cm) Applicable File Extenstions for Mp3s: mp3, MP3, mP3, and Mp3 Within +/- 4%, +/- 8%, +/- 16% (+/-100% for CDDA) +/-0.
SPECIFICATIONS MIC: More than 100dB Channel Equalizer: (Deck/Mixer SW To Mixer) BASS: +12 +/-2dB at 70Hz, Below -32dB at 70Hz MID: +12 +/-2dB at 1KHz, Below -32dB at 1KHz TREBLE: +12 +/-2dB at 13KHz, Below -32dB at 13KHz Fader Maximum Attenuation (Maximum Gain, EQ Flat, w/20KHz LPF, A-Weighted, Deck/Mixer SW To Mixer) CHANNEL FADER: More than 100dB at 1KHz CROSSFADER: More than 100dB at 1KHz CHANNEL BALANCE: CD PLAYER SECTION Within 3dB
SPECIFICATIONS USB SLAVE PLAYER SECTION: (Signal Format: MP3, 128KBPS, EQ Flat, INput Gain/Master/Fader Maximum, Deck/Mixer SW To Mixer, MIDI Set-Up, Mix-Mixer) Output Level +14dBV (5.02V) +/-2dB (TCD782 TRK2) Frequency Response 17 - 16KHz, +/-2dB (TCD781 TRK1,4,16) T.H.D. + NOISE Less than 0.
©American Audio® World Headquarters: 6122 S. Eastern Ave. Los Angeles, CA 90040 USA Tel: 323-582-3322 Fax: 323-582-3311 Web: www.AmericanAudio.us E-mail: info@americanaudio.us American DJ Europe Junostraat 2 6468 EW Kerkrade Netherlands service@adjgroup.eu / www.americandj.