Media Operator Professional USB & SD Card Player "EASY, FAST, & RELIABLE" Featuring: User Guide and Reference Manual 5/08 6122 S. Eastern Ave Los Angeles Ca. 90040 www.americanaudio.
CONTENTS FEATURES...........................................................................................................................................2 Safety precautions........................................................................................................................3 Electrical precautions................................................................................................................4 Safety instructions...........................................................
Important safety precautions IMPORTANT SAFETY ITEMS FOR U.S.A. & CANADA MODEL ONLY WARNING: TO PREVENT FIRE OR SHOCK HAZARD, DO NOT EXPOSE THIS SD PLAYER TO WATER OR MOISTURE CAUTION: 1. Handle the power supply cord carefully. Do not damage or deform; it may cause electric shock or malfunction when used. Hold plug attachment when removing from wall outlet. Do not pull on the cord. 2. To avoid electric shock, do not open the top cover when the unit is plugged in.
ELECTRICAL SAFETY PRECAUTIONS ELECTRICAL PRECAUTIONS CAUTION RISK OF ELECTRIC SHOCK DO NOT OPEN The lightning flash with arrowhead symbol, within an equilateral triangle, is intended to alert the user to the presence of uninsulated "dangerous voltage" within the product's enclosure that may be of sufficient magnitude to constitute a risk of electric shock to persons. CAUTION: TO REDUCE THE RISK OF ELECTRIC SHOCK, DO NOT REMOVE THE COVER (OR BACK).
SAFETY INSTRUCTIONS I. Read Instructions - All the safety and oper ating instructions should be read before the before the Media Player is operated. The safety and operating instructions should be saved for future reference. 2. Heed Warnings - All warnings on the Media Player and in the operating instructions should be adhered to. 3. Water and Moisture - The player should not be used near water - for example, near a bath tub, kitchen sink, laundry tub, in a wet basement or near a swimming pool, etc.
Unpacking Every Media Operator™ has been thoroughly tested and has been shipped in perfect operating condition. Carefully check the shipping carton for damage that may have occurred during shipping. If the carton appears to be damaged, carefully inspect your media player for any damage and be sure all equipment necessary to operate the media player has arrived intact. In the event damage has been found or parts are missing, please contact our toll free customer support number for further instructions.
important Sd card and USB information VERY IMPORTANT SD CARD AND USB INFORMATION: When using an SD Card, USB stick, USB Card Reader, or compatible External Hard Drive*: • Make sure your SD Card, USB Stick, or Hard Drive* has only MP3 files on it. There cannot be any other type of files on your media device, NO WAV files, photo files, etc... • The Media Operator™ is compatible with all SD and SDHC Cards (SDHC up to 32GB only) • The Media Operator™ can read Mp3 format files only.
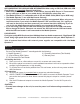
GENERAL Functions and controls Figure 1 1 2 23 22 3 4 5 21 20 26 6 7 19 18 17 16 15 25 8 9 10 14 13 12 11 24 Figure 2 A. Media PLayer (Figure 1) 1. SOURCE SELECT BUTTON - Press this button to toggle between the USB port or SD Card slot. The related LED will be lit when the playback source is selected. The USB port LED glows red, and the SD Card slot will glow green. The button can only be used when the fixture is pause mode. 2.
GENERAL Functions and controls (Cont.) LCD. Turn the knob to scroll backward and forward through tracks and folders. Pushing and turning this knob will allow you to skip 10 tracks ahead or back, per "click" of the knob. Push this knob to display the artist, bitrate, title name, genre, and file name of the current song playing. 7. REPEAT BUTTON - When the REPEAT function is active only the tracks within the folder that is playing will repeat.
GENERAL Functions and controls (Cont.) BPM’s (Beats per minute) while it is playing. This will allow you to match the beats between two playing song's or any other music source. Remember, this is a momentary function. When you remove your finger from this button, the BPM’s will automatically return to normal. Holding down this button will increase the pitch to whatever the PITCH PERCENTAGE SELECTOR (13) is set to. 13.
GENERAL Functions and controls (Cont.) 24. AUDIO OUT R & L - The Master Output includes a pair XLR Balanced Jacks (25) as well as a pair of RCA Unbalanced Jacks. The RCA jacks send a low current unbalanced output signal. Use these jacks to send standard audio to a mixer or receiver. The red colored jack represents the right channel output and white jack represents the left channels output. 25.
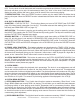
GENERAL Functions and controls (Cont.) 27 28 29 30 42 31 41 32 40 39 33 34 35 38 D. LCD DISPLAY PANEL (FIGURE 3) 27. CUE Indicator - This indicator will glow when the unit is in CUE mode and will flash every time a new CUE POINT is set. 28. FOLDER INDICATOR - This will indicate which folder you are in. 29. Time bar indicator - This bar gives a visual approximation of a track's remaining time. This bar will begin to flash when a track is ending. 30.
BASIC OPERATIONS 1. Loading/EJECTING AN SD CArd or USB When loading an SD Card into the player load with the SD Card label facing up and the contacts facing down. To remove the card from the player gently press the card "in" until it "pops' out. When connecting a USB stick, USB card reader, or external hard drive make sure you are correctly lined up with the USB port and gently insert the USB connection. To disconnect a USB drive, stop playback and "pull out" the USB connection.
BASIC OPERATIONS (Cont.) 3. STARTING PLAYBACK - Figure 9 Insert an SD card or connect an USB drive as described on page 13 (LOADING/EJECTING AN SD CARD OR USB). Pressing the PLAY/PAUSE BUTTON (14) with an SD Card loaded or USB drive connected will immediately start playback. The PLAY (42) indicator will glow as soon as playback begins. The point at which playback starts (cue point) will automatically be stored in the memory as the cue point.
BASIC OPERATIONS (Cont.) Figure 11 7. Frame search This feature allows you to scroll through a track frame by frame, allowing you to find and set a starting cue or loop point. To use the scroll function you must first be in Pause Mode (see section 4) or Cue Mode (see section 8). Once you are in Pause or Cue mode, press the search BUTTONS (19) to scroll through the track (Figure 11). When you use the search BUTTONS (19) the monitor function allows you to here what you are scrolling through.
BASIC OPERATIONS (Cont.) 9. Creating and playing a Seamless Loop A seamless loop is a sound loop that plays continuously without sound interruption. You can use this loop to create dramatic effect in your mixing. This loop has no time limit and you could actually loop the entire length of a card. You create a seamless loop between two continuous points of a track. 1) Press PLAY/PAUSE BUTTON (14) to acti- vate playback mode. Figure 14 2) Press the IN BUTTON (8).
BASIC OPERATIONS (Cont.) 10. Exiting a loop - To exit a SEAMLESS LOOP, press the OUT BUTTON (8). The IN BUTTON and OUT BUTTON LEDs will remain on, but will stop flashing. Music playback will resume normal play. The button LEDs will remain on to remind you that a loop is stored in memory. Figure 17 11. Replay Loop - The RELOOP (8) function allows you to return to your stored loop at any time. The IN BUTTON and OUT BUTTON LEDs will indicate a loop is stored in memory, and may be played at any time.
BASIC OPERATIONS (Cont.) 13. Advance Track Search You can find the desired track you would like to play during the playback/pause. 1. Press the ADV. TRACK button (18) to enter advance track search mode. The TRACK indicator (41) will flash in the LCD. Turn the TRACK KNOB (6) to search for your desired track within the current folder. NOTE: If your desired track is in another folder you must first locate/ access that folder before activating the adv. track search. Figure 20 2.
preset menu 14. PRESET MENU: The Media Operator has a PRESET MENU where you can access AUTO MUTE, AUTO TALK OVER, RESET ALL, or you can "display" the firmware verision. Press and hold the FOLDER KNOB (5) for 2 secs. to enter PRESET mode. Turn the FOLDER KNOB (5) to scroll through the PRESET MENU. Figure 24 AUTO MUTE: When this function is activated the MIC input will be muted when the MIC input level is below -60dB. Enter PRESET MENU, and then turn the FOLDER KNOB (5) until AUTO MENU is displayed.
preset menu (cont.) FIRMWARE VERSION: Enter PRESET MENU, and then turn the FOLDER KNOB (5) until VXX.XX is displayed. "X's" are the version number. Once you have seen the version number turn the FOLDER KNOB (5) counter clockwise so the PRESET is displayed and press the FOLDER KNOB (5). You can also wait for at least 5 seconds and the fixture will automatically exit PRESET MENU.
pitch adjustments Pitch adjustments: The different pitch adjustments allow a track's or a loop's playback speed to be manipulated. This speed manipulations is commonly used to beat match between two or more music sources. The playback speed may be increased or decreased by a factor of +/-16. The next section details the different pitch manipulation schemes. 1. Pitch KNOB (11): Figure 30 Activating the Pitch knob (11): To activate the pitch KNOB (11) you must turn on the pitch adjustment function.
PITCH ADJUSTMENTS (Cont.) Figure 33 Using the Pitch Percentage Selector (13): You may choose a pitch operating range at any time. To change the operating range be sure the pitch function is turned on, see figure 31. The pitch percentage can be changed between +/-4%, +/-8%, and +/-16%. 4% will allow the least amount of pitch manipulation and 16% will allow the most amount of pitch manipulation.
ADDING MUSIC TO YOUR MEDIA DEVICE When adding music to your SD Card, USB Stick or Exteran Hard Drive the files must be in Mp3 format. Make a folder for each artist, this will make it easier for you to find your desired songs. The file format is Mp3 only. Loading music into your SD Card, USB Stick, or External Hard Drive: 1. Insert your desired device into your computer. If there is no SD Card slot available, use an SD Card reader and insert the reader into the USB connection on your computer. 2.
Warranty WARRANTY INFORMATION: The Media Operator™ carries a ONE year (365 days) limited warranty. This warranty covers parts and labor. Please fill out the enclosed warranty card to validate your purchase and warranty. All returned service items whether under warranty or not, must be freight pre-paid and accompany a return authorization (R.A.) number. If the unit is under warranty, you must provide a copy of your proof of purchase invoice.
SPECIFICATIONS GENERAL Model: American Audio® Media Operator™ - Professional SD Player, USB Stick, or External Hard Drive player Type: SD Card and USB audio player. Pitch Range: Within +/- 4%, +/- 8%, +/- 16%, Pitch Bend: +/- 4%, +/- 8%, +/- 16%, Pitch Accuracy: +/-0.15% Dimensions: 482(W) x 139(H) x 43(D) mm 18.9"(W) x 5.47(H) x 1.69"(D) Installation: Place on flat surface or mount in flat case Weight: 3.74 Lbs. / 1.7 Kgs Power supply: DC 6V 1.
©American Audio® World Headquarters: 6122 S. Eastern Ave., Los Angeles, CA 90040 USA Tel: 323-582-3322 Fax: 323-582-3311 Web: www.americanaudio.us E-mail: info@americanaudio.