Q-MX2 BPM USER INSTRUCTIONS
Q-MX2 BPM Featuring: Fader “Q” Start Professional products designed for the working DJ.
Index • Safety Precautions....................................................................................................p.4 • Operating Introduction.............................................................................................p.4 • Functions (Front Panel).............................................................................................p.5 • Inputs & Outputs (Rear Panel)................................................................................p.8 • Set-Up................
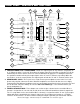
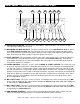
FRONT PANEL - CONTROLS AND FUNCTIONS 11 12 13 14 15 10 9 16 8 17 7 18 6 19 20 5 21 4 22 3 23 2 1 2 1. FEATHER FADER PLUS™ CROSSFADER - Blends the output signals of any channels assigned to "X" or "Y." When the fader is in the full "X" position, the output signal of any channels assigned to "X" will be controlled by the master volume level. The same fundamentals will apply for "Y.
FRONT PANEL - CONTROLS AND FUNCTIONS CONT. This is an effect used heavily by scratchers and performer DJ's. The mixer simulates this effect when you hold down the X and Y fader buttons. The speed of the transform is preset and will only effect any channel assigned to the fader assign button being depressed. 4. CHANNEL FADER - These faders are used to control the output signal of any source assigned to its particular channel. 5. SPLIT CUE - This button will activate the "Split Cue" function.
FRONT PANEL - CONTROLS AND FUNCTIONS CONT. Turn the knob counter-clockwise to decrease a value or clockwise to increase a value. 14. LED LEVEL INDICATORS - The dual LED's indicators along the top of unit are used to detail either the master output level or a combination of the master output level and the cue PFL level. The position of the LED Level Indicator Function Switch (15) will determine the LED Level Indicator's display mode.
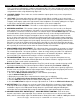
REAR PANEL - CONTROLS AND FUNCTIONS CONT. 24 25 26 31 32 33 34 35 27 36 28 37 29 30 38 39 40 41 22. AC VOLTAGE SELECTOR - Select between 115V/50Hz or 230V/60Hz. Make sure that the selector is set to the proper voltage you are using. 23. BALANCED XLR MAIN OUTPUTS - The Master Output includes a pair XLR Balanced Jacks as well as a pair RCA Unbalanced Jacks (30). The 3-pin XLR jacks send a high current balanced output signal.
REAR PANEL - CONTROLS AND FUNCTIONS CONT. 29. AC CONNECTION - This connection is used for your detachable AC power cord. Be sure to only plug your unit in to the recommended power supply. 30. RCA MAIN OUTPUTS - The Master Output includes a pair XLR Balanced Jacks (23) as well as a pair RCA Unbalanced Jacks. The RCA jacks send a low current unbalanced output signal. These jacks should only be used for shorter cable runs to signal processors or looping to another mixer.
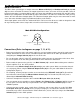
SET-UP INSTRUCTIONS INPUTS/OUTPUTS The MX-1 allows you two types of output connectors Balanced XLR (25) and Unbalanced RCA (32, 33, and 34). Use these connection to connect the output signal from a mixer, cross-over or EQ to your MX-1 mixer. A balanced connection is recommended for cable runs longer that 10ft. When constructing your own XLR cables follow the pin configuration describe below for proper connections. For cable runs shorter than 10Ft. you may choose the RCA unbalanced output option.
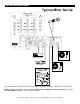
SET-UP INSTRUCTIONS Typical Mixer Set-Up CASSETTE DECK T U R N TA B L E CD PLAYER T U R N TA B L E This image details a typical DJ Set Up consisting of a microphone, turntables, CD players, and a tape deck. Note: Turntables can only be connected to the Phono Line Level RCA Jacks (36, 38, and 41). Be sure the Line Level Switches (39) are in the "PHONO" position. ©American DJ Supply® - www.americandj.
SET-UP INSTRUCTIONS Typical Stereo Set-Up Figure 9 LOUDSPEAKER LOUDSPEAKER Typical Balanced Output Set-up This image details a typical stereo output layout. Note the use of the Balanced XLR Jacks on both the mixer and the amplifier. Always use the balanced output jacks whenever possible. The balanced output jacks should always be used for cable runs in excess of 10 feet. Using the balanced jacks will ensure a clean signal through out the entire audio system. ©American DJ Supply® - www.americandj.
OPERATING INSTRUCTIONS Operating Determinations When installing this mixer, please make sure that the device is not exposed to extreme heat, moisture or dust! There should not be any cables lying around. Doing so endangers you as well as others. Do not operate the mixer in extremely hot (more than 30° / 100°F) or extremely cold (less than 5°C / 40°F) surroundings. Keep away from direct sunlight and heaters. Operate the mixer only after becoming familiar with its functions.
TECHNICAL SPECIFICATIONS Technical Specifications - Model Q-MX2 BPM Model: Power supply: Dimensions: Weight: Crossfader: Power Consumption: Headphone impedance: Q-MX2 BPM, 3 Channel Mixer AC 115/230V, 50/60Hz switchable 11" W x 12.25" D x 3" H 8 lbs. / 3.5 kg Optical detecting fader start control - Low grounding impedance crossfader 5W typical, 7W w/ full headphone output 16 Ohms Input Sensitivity (Level/Impedence): Line: -14 dBV (200mV) / 12K Ohm +/- 3dB Microphone: -59 dBV (1.