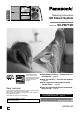
Operating Instructions SD Stereo System Model No. SC-PM71SD As an ENERGY STAR® n High speed recording — Performance and Partner, Panasonic has convenience! ⇒ page 24 determined that this product meets the ENERGY STAR® n More fun with SD — Connect and expand! guidelines for energy ⇒ page 36 efficiency. Dear customer Thank you for purchasing this product. For optimum performance and safety, please read these instructions carefully.
CAUTION! THIS PRODUCT UTILIZES A LASER. USE OF CONTROLS OR ADJUSTMENTS OR PERFORMANCE OF PROCEDURES OTHER THAN THOSE SPECIFIED HEREIN MAY RESULT IN HAZARDOUS RADIATION EXPOSURE. DO NOT OPEN COVERS AND DO NOT REPAIR YOURSELF. REFER SERVICING TO QUALIFIED PERSONNEL. WARNING: TO REDUCE THE RISK OF FIRE, ELECTRIC SHOCK OR PRODUCT DAMAGE, DO NOT EXPOSE THIS APPARATUS TO RAIN, MOISTURE, DRIPPING OR SPLASHING AND THAT NO OBJECTS FILLED WITH LIQUIDS, SUCH AS VASES, SHALL BE PLACED ON THE APPARATUS.
Table of contents Getting started Editing Accessories . . . . . . . . . . . . . . . . . . . . . . . . . . . . . . . Listening caution. . . . . . . . . . . . . . . . . . . . . . . . . . . IMPORTANT SAFETY INSTRUCTIONS . . . . . . . . . Disc/Card information. . . . . . . . . . . . . . . . . . . . . . . Inserting/Removing the discs and cards . . . . . . . Setup . . . . . . . . . . . . . . . . . . . . . . . . . . . . . . . . . . . . 4 4 5 6 8 9 The remote control . . . . . . . . . . . . . . . . . . . . . .
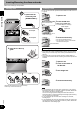
Getting started Listening caution System SC-PM71SD Main unit SA-PM71SD Speakers SB-PM71 Accessories Please check and identify the supplied accessories. Use numbers indicated in parentheses when asking for replacement parts. (As of February 2005) To order accessories, refer to “Accessory Purchases” on page 40.
IMPORTANT SAFETY INSTRUCTIONS 1) Read these instructions. 2) Keep these instructions. 3) Heed all warnings. 4) Follow all instructions. 5) Do not use this apparatus near water. 6) Clean only with dry cloth. 7) Do not block any ventilation openings. Install in accordance with the manufacturer’s instructions. 8) Do not install near any heat sources such as radiators, heat registers, stoves, or other apparatus (including amplifiers) that produce heat.
Disc/Card information Discs and cards usable on this unit Getting started Type Indication in these operating instructions Logo Remarks • This unit can play CD-R/RW (audio recording disc) recorded with the formats on the left. Close the session or finalize1 the disc after recording. • HighMAT discs WMA and MP3 files only. CD CD-R CD-RW — SD Memory Card • Includes miniSD Cards. A miniSD adaptor needs to be inserted before using these cards. • You cannot use multimedia cards.
Disc and card handling Do not touch the recorded surface or the terminal surface. n If there is dirt or condensation on the disc Wipe with a damp cloth and then wipe dry. n To protect your data • Switch the write-protect switch a of the SD Memory Card to “LOCK”. Unlock when you want to record or edit the card again. • Performing the following actions during operation can damage your SD Memory Card and corrupt the data it contains.
Inserting/Removing the discs and cards Adhere to the following to avoid problems. Inserting discs Inserting a card You can use SD cards with capacities between 8MB and 1GB on this unit (⇒ page 6) 1 Open/close the 1 Open the lid. Getting started CD lid only with [OPEN/CLOSE ;]. Press on the center of the card until it clicks into place. 2 Insert the SD card. • When using a miniSD card A miniSD adapter is necessary. K A D A P T E R miniSD adapter LOC miniSD card Do not pull.
Setup The remote control R6/LR6, AA • Insert so the poles (+ and –) match those in the remote control. • Do not use rechargeable type batteries. Getting started n Do not: • mix old and new batteries. • use different types at the same time. • heat or expose to flame. • take apart or short circuit. • attempt to recharge alkaline or manganese batteries. • use batteries if the covering has been peeled off.
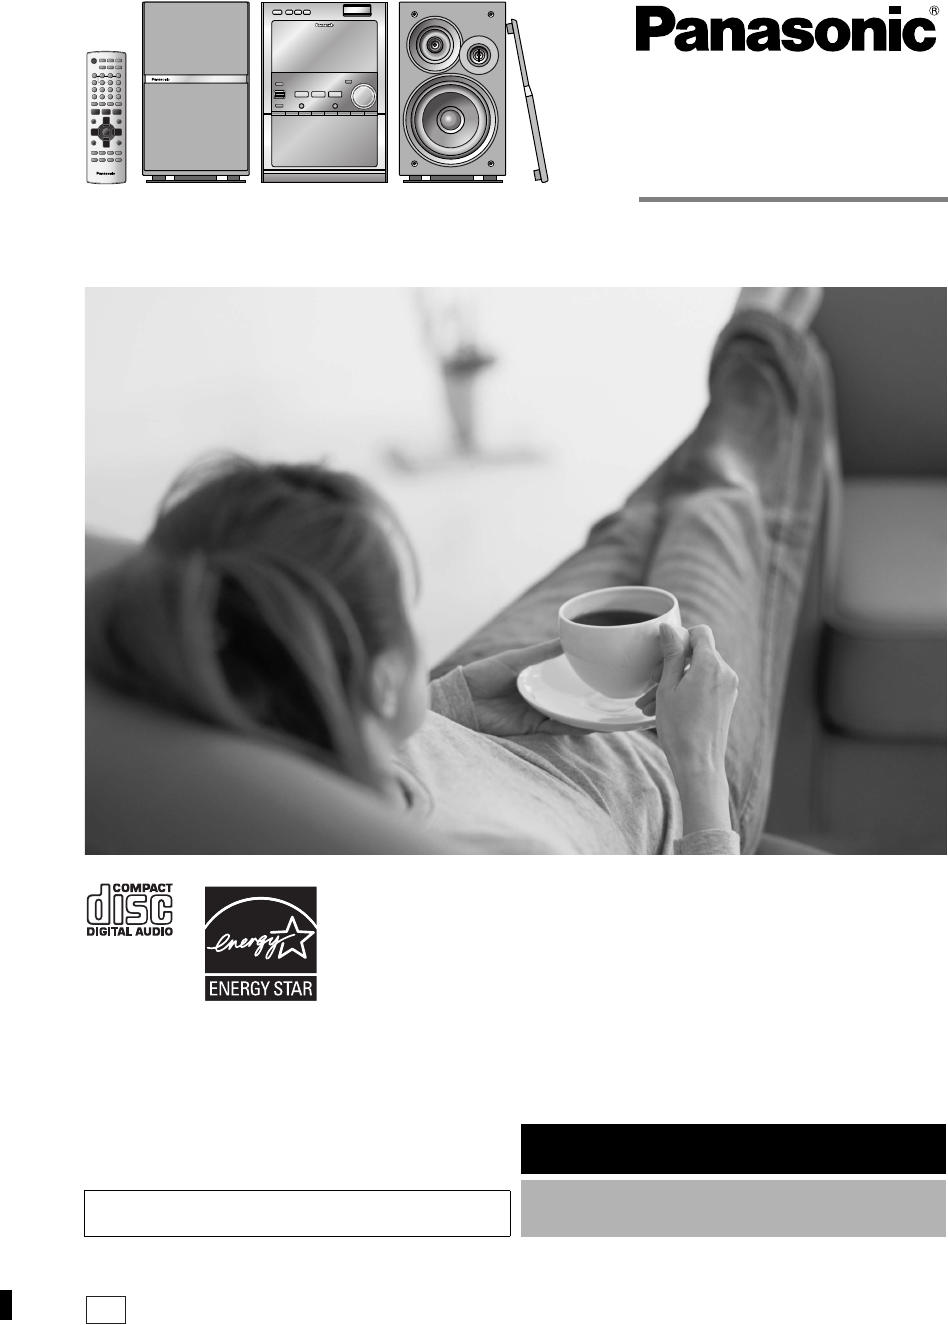
Setup Connections Getting started Conserving power The unit consumes power (approx. 0.3 W) even when it is turned off with [POWER ^/I]. To save power when the unit is not to be used for a long time, unplug it from the household AC outlet. You will need to reset some memory items after plugging in the unit again. AM loop antenna Stand the antenna up on its base. Keep loose antenna cord away from other wires and cords.
FM indoor antenna Getting started Speakers • If the speaker cords have vinyl tips, twist the vinyl tip and pull off. Adhesive tape Fix the other end of the antenna where reception is best. • Confirm the colors of the tags on the ends of the cords. Red Black White Blue • For White tags, connect to grey terminals. For Blue, Black and Red tags, connect so tag colors match the terminal colors.
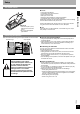
Control guide Main unit OPEN ; (⇒ page 19) Press to open the cassette lid. Getting started POWER 8 (standby/on switch) Press to switch the unit from on to standby mode or vice versa. In standby mode, the unit is still consuming a small amount of power. AC IN (AC supply indicator) This indicator lights when the unit is connected to the AC power supply. Cassette lid (⇒ page 19) PHONES (Headphone jack) Reduce the volume level and connect the headphones. Headphones plug type: 3.5mm (1/8”) stereo.
Remote control CLOCK/ (⇒ page 32) TIMER (⇒ page 33) ^ (⇒ page 33) z PLAY/REC (⇒ page 33) PROGRAM (⇒ page 17) DISPLAY (⇒ page 15, 33) –DIMMER (⇒ page 33) PLAY MODE (⇒ page 15) –REPEAT (⇒ page 17) Getting started SLEEP (⇒ page 32) –AUTO OFF (⇒ page 32) DISC (⇒ page 15) TITLE IN (⇒ page 31) Numbered buttons (⇒ page 16) CHARA (⇒ page 30) EDIT MODE (⇒ page 26, 28) DEL (⇒ page 30) , ALBUM/GROUP (⇒ page 16, 18) u 2/REW, i 1/FF (⇒ page 15) q TAPE (⇒ page 19) q/h SD (⇒ page 15) q/h CD (⇒ page 15) g STO
Basic play q/h SD Playing back STOP g LIST SELECT e, r OPEN/CLOSE ; q/h CD VOLUME UP/DOWN CD CHECK CHANGE ; 1q–5q CD lid Playing discs 1 Select a disc tray. • The unit turns on automatically. • When a CD is already loaded, the unit comes on automatically and starts play (One touch play). 2 Open the CD lid. 3 Insert disc. (⇒ page 8) 1 Label must face upward. Disc tray Tray number 4 Close the CD lid. 5 Start play. RQT8046 • It may take some time for play to start but this is normal.
Remote control Selecting a disc Main unit Within 10 seconds Playing SD cards This unit can only play music data (AAC/MP3/WMA) recorded in the SD standard audio format. Other SD audio formats cannot be played. 1 Insert the SD card. (⇒ page 8) All disc play (during stop) Playing back 2 Start play. • When a SD card is already loaded, the unit comes on automatically and starts play (One touch play). Select “ALL DISC”.
Basic play Other ways of playing discs/cards Preparation Press [q/h CD] or [q/h SD] and then [g STOP]. Selecting a track LIST/ENTER q/h SD Playing back q/h CD LIST SELECT e, r RETURN STOP g Press the numbered button(s) to select and play the track. Example To select 12: [ 10] è [1] è [2] To select 123: [ 10] è [ 10] è [1] è [2] è [3] Note You cannot use this feature with program play and random play modes. Selecting an album 1 During stop Press [PLAY MODE, –REPEAT] to select “1 ALBUM”.
Program play (up to 24 items) 1 During stop CD/WMA/MP3 only Select a disc. 1 2 1 During stop Press [PLAY MODE, –REPEAT] to select the mode. Every time you press the button: Press [DISC]. Within 10 seconds: Press [1] - [5] to select the disc. Playing back 2 Press [PROGRAM]. Random play 3 Press the numbered button(s) to select the track. • Example To select 12: [ 10] è [1] è [2] To select 123: [ 10] è [ 10] è [1] è [2] è [3] • Repeat steps 2 and 3 to program other tracks.
Basic play Playing back LIST/ENTER LIST SELECT e, r STOP g RETURN Playing HighMAT discs “HighMAT” appears to show that you can use these features. Remote control 1 During stop Press [LIST/ENTER]. The CD selection screen appears. 2 Press [e] or [r] to select the disc and press [LIST/ENTER]. 3 Press [e] or [r] to select the method of play and press [LIST/ENTER].
Cassette tapes OPEN ; Cassette lid LIST SELECT e, r Playing back q TAPE VOLUME UP/DOWN STOP g 1 Press to open and insert a cassette. Side to be played back facing up. Insert the cassette with the exposed tape facing you. • Make sure that the cassette is fully inserted and close the cassette lid by hand. • The cassette tape indicator lights on the display. 2 Start play. • To play the other side of the tape, turn the tape over and restart play.
Sound field and sound quality Playing back H.BASS indicator H.BASS H.BASS You can enjoy more powerful bass on wide range speakers. Press [H.BASS]. Every time you press the button: H.BASS 1: Add powerful bass (factory preset) H.BASS 2: Further increases the power of the bass • The H.BASS indicator lights on. Note • You cannot change H.BASS during recording. • The effect may be less discernible with some sound sources. Re-master — Enjoying more natural sound Discs recorded at 32 kHz, 44.
SURROUND Changing sound field and quality You can add natural width and depth to the stereo sound. Press [SURROUND]. Preset EQ Press [SOUND]. Every time you press the button: Every time you press the button: SURROUND 1: Natural effect SURROUND OFF: Cancel (factory preset) This does not work or has less effect with some discs. Turn off if it causes distortion. Do not use in combination with surround effects on other equipment. You cannot change SURROUND during recording.
The radio Manual tuning 1 Select “FM” or “AM”. 2 Select “MANUAL”. MANUAL PRESET Playing back 3 Select the frequency of the desired station. 4 Adjust the volume. • Press and hold [u 2/REW] or [i 1/FF] until the frequency starts scrolling to start automatic tuning. Tuning stops when a station is found. • “STEREO” is displayed when a stereo FM broadcast is being received. n If noise is excessive in FM Press and hold [PLAY MODE, –REPEAT] to display “MONO”.
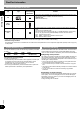
Recording sources and media To: CD Normal speed Cassette tape High speed* Normal speed A disc in play position ⇒ page 24 ⇒ page 25 All discs in trays ⇒ page 24 ⇒ page 25 5CD auto recording - ⇒ page 25 - Program recording ⇒ page 25 - ⇒ page 25 All tracks - - ⇒ page 27 Program recording - - ⇒ page 27 Tape ⇒ page 26 - - Radio ⇒ page 26 - ⇒ page 27 AUX ⇒ page 35 - ⇒ page 35 SD card Recording SD card From: *Please read “High-speed recording” below.
Recording CDs */h SD REC MODE * CD q SD HI-SPEED AUTO REC q/h CD TAPE q STOP g OPEN/CLOSE ; 1q–5q CD lid Recording Preparation Insert the SD card (⇒ page 8) or the cassette tape (⇒ page 19). • Securely close the lid of the SD card slot. You cannot record if the lid is open. Recording to SD (Normal recording/High-speed recording) 1 Select the disc tray. The unit turns on automatically. 2 Open the CD lid and insert the disc. Press [OPEN/CLOSE ;] again to close the CD lid.
5CD auto recording (CD è SD) Recording to cassette tape (High-speed recording only) (Normal recording only) This function high-speed records all loaded CDs in succession from the first tray onto a SD card with one-touch. • All tracks on one CD are recorded as one playlist. • All titles on the CDs (⇒ page 31) are copied to the SD. Preparation Wind up the leader tape so recording can begin immediately. 1 Select the disc tray. 1 Insert the CD and select the recording mode.
Recording from cassette tape/the radio to SD Preparation 1 Insert the SD card. (⇒ page 8) • Securely close the lid of the SD card slot. You cannot record if the lid is open. 2 Press [REC MODE] to select the recording mode. Recording from cassette tape (Normal recording only) 1 Insert the cassette tape. (⇒ page 19) 2 Select “TAPE” as the source. Recording 3 Select the recording method.
Recording from SD/the radio to cassette tape Preparation Insert the SD card (⇒ page 8) or the cassette tape. (⇒ page 19) Recording from SD (Normal recording only) 1 Select “SD” as the source. 2 + While pressing [*/h REC], press [TAPE] to start recording. Recording Recording from the radio (Normal recording only) 1 Tune to the station (⇒ page 22). 2 While pressing [*/h REC], + press [TAPE] to start recording.
Editing SDs Preparation 1 Insert the SD card. (⇒ page 8) • Securely close the lid of the SD card slot. You cannot edit if the lid is open. 2 Press [q/h SD] and then [g STOP] to select “SD” as the source. Erasing tracks — TRACK ERASE/ALL ERASE TRACK ERASE 1 During stop or play Select “TRACK ERASE?”. Every time you press the button: 2 Press [LIST/ENTER]. 3 Press [u 2/REW, i 1/FF] to select the track to erase and press [LIST/ENTER]. • Repeat this step to select other tracks (up to 24 tracks).
Formatting a card — CARD FORMAT Formatting erases all the contents of the card and not only the tracks recorded using this unit. Once erased, the contents of the card are lost and cannot be restored. Make certain before proceeding. • When a card is formatted using this unit, it may not be possible to use it on other equipment. 1 During stop Select “CARD FORMAT?”. To play a playlist (⇒ page 16, Title search) Playlists You can arrange recorded tracks in the order you want to play them.
Entering titles You can enter titles for discs, tracks, artists and playlists. Note The maximum number of characters per title: 32 Preparation Show Enter Name screen. (⇒ page 31) Entering characters 1 Press [CHARA] to select upper-case, lower-case, or numeric characters. 2 Press the numbered button to select the character. The characters change each time you press a button.
Preparation 1 Insert the CD. (⇒ page 8) 2 Press [q/h CD] and then [g STOP] to select “CD” as the source. 3 To select a CD Press [DISC], then press the numbered button to select the CD and press [g STOP]. 1 Press [TITLE IN]. 2 Press [u 2/REW, i 1/FF] to select the title 3 type (Disc title/Artist name/Track title), track number, etc. and press [LIST/ENTER]. Enter the characters (⇒ page 30) and press [LIST/ENTER]. Repeat steps 2 and 3 as necessary. 4 Press [TITLE IN]. The title name is entered.
Convenient functions Setting the time 1 Press [CLOCK/TIMER] to select "CLOCK". Every time you press the button: Original display 2 Within 10 seconds: Press [u 2/REW, i 1/FF] to set the day and press [LIST/ENTER]. Every time you press the button: 3 Press [u 2/REW, i 1/FF] to set the time and press [LIST/ENTER]. • Press and hold to change the time faster. The time is set and the original display is restored. To display the clock When the unit is on, press [CLOCK/TIMER].
The play/record timer Changing the timer settings (when the unit is on) Preparation 1 Switch on the unit and set the clock. (⇒ Setting the time, page 32) 2 For the play timer Prepare the desired source (CD, SD, tape, radio, or external), and set the volume. For the record timer – To record to SD: Check the card’s write-protect switch (⇒ To protect your data, page 7) and insert the card (⇒ page 8).
Using other equipment Before connection • Disconnect the AC power supply cord. • Turn off all equipment and read the appropriate operating instructions. • The equipment connections described are examples only. Using an external unit Other antenna connections You can playback the sound from a video cassette recorder, tape deck, laser disc player, etc., through this unit’s speakers. • Peripheral cables and equipment are sold separately unless otherwise indicated.
Recording from an external unit Preparation 1 Connect the external unit (⇒ page 34). 2 Turn on the power. 3 Insert the SD card (⇒ page 8) or the cassette tape (⇒ page 19). 4 If recording to SD card, press [REC MODE] to select XP, SP or LP mode. • With satellite and cable sources, tune to the desired broadcasting station. Recording to cards (Normal recording only) 1 Press [TUNER/AUX] to select “AUX”. 2 Press [EDIT MODE] to select a recording method.
Even more fun with SD You can record music to SD card on this unit and then play it on a SD audio player or save it to computer. You can also write music saved on your computer to SD card and play it on this unit or other equipment like a SD audio player. • You can use SD cards with capacities between 8MB and 1GB on this unit. (⇒ page 6) Listening on portable equipment SD-Jukebox You can enjoy playback on an AAC compatible SD audio player, etc.
Personal computer IBM PC/AT compatible personal computer OS Windows® 2000 Professional SP2, 3, 4 Windows® XP Home Edition/Professional, or SP1, 2 CPU Intel® Pentium® III 500 MHz or higher RAM 256 MB or more Display High Color (16 bit) or more Desktop resolution of 800 x 600 pixels or more (1024 x 768 pixels or more recommended) Free hard disk space 100 MB or more Necessary software DirectX® 8.
Troubleshooting guide Before requesting service, make the following checks. If you are in doubt about some of the check points, or if the remedies indicated in the chart do not solve the problem, refer to the “Customer Services Directory” on page 40. Reference pages are shown in parentheses. Playing back No sound. Sound is unfixed, reversed or comes from one speaker only. Humming heard during play. Poor quality sound. Discs with WMA/MP3 data are not read correctly. The display is wrong or play won’t start.
Unit displays “EMERGENCY STOP” “F ” “H ” ( stands for a number.) “MEMORY FULL ERASE TITLE” “NO PLAY” “NO REMAIN” “NO TRACK” “NO WMA/MP3” “NOT MP3 ERROR” “PGM FULL” “PLAYBACK CARD” “READ ERROR” “REMOTE MODE ” is either 1 or 2) ( “SELECT OVER” “SCMS CAN’T COPY” “TAPE PROTECTED” “TITLE FULL” “TOC ERROR” “TOC READING” “TRACK FULL” “TRACK PROTECTED” “--:--” You cannot edit or enter titles on SD during play. There is no space on the SD card. Erase unneeded tracks (⇒ page 28) or record with another card.
Limited Warranty Panasonic Consumer Electronics Company, Division of Panasonic Corporation of North America One Panasonic Way Secaucus, New Jersey 07094 Panasonic Puerto Rico, Inc. Ave. 65 de Infantería, Km. 9.5 San Gabriel Industrial Park, Carolina, Puerto Rico 00985 Panasonic/Technics Audio Products Limited Warranty Limited Warranty Coverage If your product does not work properly because of a defect in materials or workmanship, Panasonic Consumer Electronics Company or Panasonic Puerto Rico, Inc.
Product Service 1. Damage requiring service—The unit should be serviced by qualified service personnel if: (a) The AC power supply cord or the plug has been damaged; or (b) Objects or liquids have gotten into the unit; or (c) The unit has been exposed to rain; or (d) The unit does not operate normally or exhibits a marked change in performance; or (e) The unit has been dropped or the cabinet damaged. 2. Servicing—Do not attempt to service the unit beyond that described in these operating instructions.
Specifications n AMPLIFIER SECTION n SD SECTION FTC output power both channels driven 10 % total harmonic distortion 60 Hz to 3 kHz (Low channel) 35 W per channel (6 Ω) 3 kHz to 16 kHz (High channel) 35 W per channel (6 Ω) Total Bi-Amp power 70 W per channel RMS output power both channels driven 10 % total harmonic distortion 1 kHz (Low channel) 40 W per channel (6 Ω) 8 kHz (High channel) 40 W per channel (6 Ω) Total Bi-Amp power 80 W per channel Output impedance HEADPHONE 16 Ω to 32 Ω Sampling frequency
• SD logo is a trademark. • Microsoft, Microsoft logo, Windows, Windows logo, Windows NT, Windows Media and DirectX are either trademarks or registered trademarks of Microsoft Corporation in the United States and other countries. • WMA is a compression format developed by Microsoft Corporation. It achieves the same sound quality as MP3 with a file size that is smaller than that of MP3. • MPEG Layer-3 audio decoding technology licensed from Fraunhofer IIS and Thomson multimedia. • Licensed AAC Patents (U.S.
Index A R All disc play . . . . . . . . . . . . . . . . . . . . . . . . . . . . . . . . 15 ALL ERASE . . . . . . . . . . . . . . . . . . . . . . . . . . . . . . . . 28 Auto-off function . . . . . . . . . . . . . . . . . . . . . . . . . . . . 32 Random play . . . . . . . . . . . . . . . . . . . . . . . . . . . . . . . 17 Record timer. . . . . . . . . . . . . . . . . . . . . . . . . . . . . . . . 33 Recording method . . . . . . . . . . . . . . . . . . . . . . . . 26, 35 Recording mode . . . . . . . . . . .