TT-Record Turntable Mp3 Recorder "Fast, Easy, and Reliable" USER INSTRUCTIONS 1/08 6122 S. Eastern Ave. Los Angeles Ca. 90040 www.AmericanAudio.
©American Audio® - www.americanaudio.
CONTENTS ELECTRICAL SAFETY PRECAUTIONS..................................................................................................4 Installation guidlines....................................................................................................................5 PRODUCT INFORMaTION......................................................................................................................6 CUSTOMER SUPPORT ..............................................................................
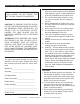
ELECTRICAL SAFETY PRECAUTIONS I. WARNING: TO PREVENT FIRE OR ELECTRIC SHOCK HAZARD, DO NOT EXPOSE THIS UNIT TO RAIN, LIQUIDS, OR MOISTURE CAUTION: TO PREVENT ELECTRIC SHOCK DO NOT USE THIS (POLARIZED) PLUG WITH AN EXTENSION CORD, RECEPTACLE, OR OTHER TYPE OF ELECTRICAL OUTLET UNLESS THE WIDE BLADES CAN BE CAREFULLY INSERTED INTO A MATCHING WIDE SLOT.
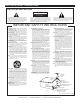
ELECTRICAL SAFETY PRECAUTIONS ELECTRICAL PRECAUTIONS CAUTION RISK OF ELECTRIC SHOCK DO NOT OPEN The lightning flash with arrowhead symbol, within an equilateral triangle, is intended to alert the user to the presence of uninsulated "dangerous voltage" within the product's enclosure that may be of sufficient magnitude to constitute a risk of electric shock to persons. CAUTION: TO REDUCE THE RISK OF ELECTRIC SHOCK, DO NOT REMOVE THE COVER (OR BACK).
PRODUCT INFORMATION Please carefully read and understand the instructions in this manual thoroughly before attempting to operate this unit. These instructions contain important safety information regarding the use and maintenance of this unit. Take special care to follow all warning symbols and labels both on the unit and printed in this manual. Also, Please keep this manual with the unit, for future reference.
Quick-Start Turntable Quick-Start: 1. Changing Platter Speed Use the RPM selectors (5 & 6) to change the platter speeds. 2. Start/Stopping Platter Use the Start/Stop Button (7) to start and stop playback. 3. Pitch Control 1. The pitch adjustment is a fine adjustment to the platter's RPMs. 2. The pitch adjustment is variable and may be adjusted between -10% and +10% of the platter selected speed. 3. The pitch is changed by sliding the Pitch Slider (3) in an up and down motion. Product Service: 1.
Assembly This unit has been thoroughly tested and has been shipped in perfect operating condition. Carefully check the shipping carton for damage that may have occurred during shipping. If the carton appears to be damaged, carefully inspect your unit for any damage. Be sure all accessories needed to operate the unit has arrived intact. In the event damage has been found or parts are missing, please contact our toll free customer support number for further instructions.
SET-UP NOTES: • • • • Do not connect the AC power plug before assembly has been completed. Before turning the power on, make sure once again all the connections and power voltage set- tings are correct. Always turn off the power when connecting or disconnecting. Read this manual carefully before using the unit. Be sure to store the manual in a safe place for future reference. Attach a stylus cartridge to the Headshell (10) before assembling the turntable unit.
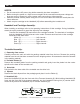
SET-UP 6. Counterweight (16): Locate and remove the tonearm Counterweight (16) from the packaging. Slide Counterweight (16) onto the rear of the Tonearm (12). Turn it lightly and it will screw onto the rear shaft of the tonearm. Anti-Skate: The anti-skate adjustment prevents the Tonearm Assembly (2) from skipping across the record from the centrifugal force that is caused spinning rotation of the Platter (1). The Anti-Skating (15) control knob should be set to the same value as the stylus pressure.
SET-UP Turntable Installation: 1. Do not place the unit in a location where it will be exposed to direct sunlight or near any type of heating appliance. 2. Do not place the unit in a location where there is high humidity or a lot of dust. 3. Cartridge may pick up slight sound pressure or vibrations of near by speakers. For best results, do not install this unit too close to speakers. 4. Install this unit on a horizontal surface that is stable and vibration free. 5.
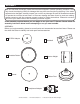
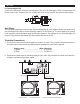
Controls and Functions Main Unit 1 9 8 2 3 4 7 6 5 1. Platter - This platter connects directly to the center spindle (8). The platter and center spindle (8) holds a vinyl record perfectly center. The platter also spins the record at a consistent speed. 2. Tone Arm Assembly - This assembly will be explained in tonearm section on the page 14. 3.
Controls and Functions 6. 33-rpm Speed Selector Button - Engaging this button will rotate the platter at 33 revolutions per a minute (RPMs). A function LED will glow when this function is activated. 7. START/STOP Button - This over sized push button controls platter motion. When the unit is turned on the platter will not automatically begin to spin.
Controls and Functions Tonearm Assembly 10 11 12 13 14 15 16 10. Stylus Headshell - The included headshell is used to connect your sty- lus with the tone arm. 11. Headshell Locking Nut - After attaching the headshell to the tonearm, this locking nut will securely hold the headshell to the tonearm. 12. Tone Arm - The tonearm is the mechanism that holds the headshell and stylus allowing it to glide across a record. 13.
trouble shooting Trouble Shooting: Listed below are common problems you may encounter, and solutions. The turntable has no power: 1. Check the power cord, is it connected? The sound is distorted or on one side only: 1. Make sure that the cartridge is properly wired. Refer to the Cartridge Assembly section on page 9. 2. Check if the stylus is worn out. 3. Make sure that the cartridge is making a proper connection.
Warranty 1-YEAR LIMITED WARRANTY A. American Audio® hereby warrants, to the original purchaser, American Audio® products to be free of manufacturing defects in material and workmanship for a period of 1 Year (365 days) from the date of purchase. This warranty shall be valid only if the product is purchased within the United States of America, including possessions and territories.
SPECIFICATIONS GENERAL Model: System: Dimensions: Installation: Weight: Power supply: Power consumption: Environmental conditions: Accessories: TURNTABLE SECTION Type: Motor: Driving Method: Turntable Platter: Speeds: Wow and Flutter: S/N Ratio: Pitch Controls: Starting Time: Braking Time: Time for Speed Change: USB Function: TONEARM SECTION Type: Effective Arm Length: Overhang: Tracking Error Angle: Applicable Cartridge Weight
©American Audio® American DJ® Group of Companies World Headquarters: 6122 S. Eastern Ave. Los Angeles, CA 90040 USA Tel: 323-582-2650 Fax: 323-582-2610 Web: www.americanaudio.us E-mail: info@americanaudio.