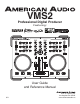
VMS2 Professional Digital Producer Featuring: User Guide and Reference Manual 6/11 6122 S. Eastern Ave Los Angeles Ca. 90040 www.americanaudio.
CONTENTS Safety precautions........................................................................................................................3 Electrical precautions................................................................................................................4 Safety instructions.......................................................................................................................5 Unpacking..............................................................................
Important safety precautions IMPORTANT SAFETY ITEMS FOR U.S.A. & CANADA MODEL ONLY WARNING: TO PREVENT FIRE OR SHOCK HAZARD, DO NOT EXPOSE THIS Media Controller TO WATER OR MOISTURE CAUTION: 1. Handle the power supply cord carefully. Do not damage or deform; it may cause electric shock or malfunction when used. Hold plug attachment when removing from wall outlet. Do not pull on the cord. 2. To avoid electric shock, do not open the top cover when the unit is plugged in.
ELECTRICAL SAFETY PRECAUTIONS ELECTRICAL PRECAUTIONS CAUTION RISK OF ELECTRIC SHOCK DO NOT OPEN The lightning flash with arrowhead symbol, within an equilateral triangle, is intended to alert the user to the presence of uninsulated "dangerous voltage" within the product's enclosure that may be of sufficient magnitude to constitute a risk of electric shock to persons. CAUTION: TO REDUCE THE RISK OF ELECTRIC SHOCK, DO NOT REMOVE THE COVER (OR BACK).
SAFETY INSTRUCTIONS I. Read Instructions - All the safety and operating instructions should be read before the Player is operated. The safety and operating instructions should be saved for future reference. 2. Heed Warnings - All warnings on the Player and in the operating instructions should be adhered to. 3. Water and Moisture - The player should not be used near water - for example, near a bath tub, kitchen sink, laundry tub, in a wet basement or near a swimming pool, etc. 4.
Unpacking Every VMS2™ has been thoroughly tested and has been shipped in perfect operating condition. Carefully check the shipping carton for damage that may have occurred during shipping. If the carton appears to be damaged, carefully inspect your player for any damage and be sure all equipment necessary to operate the player has arrived intact. In the event damage has been found or parts are missing, please contact our toll free customer support number for further instructions.
Main features • • • • • • • • • • 3 Cue Points Per Side MIDI Control via USB Built-In 4 In 4 Out Seamless Loop (uninterrupted loop playback) Full EQ on 2 MIDILOG Channels Crossfader Assign, Curve, & Reverse Pitch Lock Pitch Bend 82 MIDI Controls USB/Analog Source Selects on Each MIDILOG Channel • • • • • • • • 2-Channel Mixer w/ Volume Faders Stereo Master and Booth Outputs Mic Master Volume Control Track & Deck Selectors Durable Touch Sensitive High-Res J
software & asio Driver installation Insert the disc into your computer cd drive and "click" on the CD icon. Depending the typ of computer you are operating, choose the Exe file for PC or the DMG file for MAC. Choose your desired language and "click" OK. Read the following information and "click" Next. Follow the screen prompts to install the software. The ASIO Driver installation will open during the Virtual DJ installation. PC users, follow the screen prompts for proper installation.
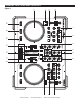
GENERAL Functions and controls Figure 1 20 19 18 17 16 1 15 2 14 3 13 4 5 12 6 11 10 7 8 9 ©American Audio® - www.americanaudio.
GENERAL Functions and controls (Cont.) A. PLayer - front (Figure 1) 1. Sync Button - Use this button to set this deck to master and auto sync and the other deck's tempo to master. 2. bank Buttons - These buttons are used to store three (3) cue points. 3. CUE BUTTON - These buttons are used to activate a channels “CUE” mode. The CUE LED will glow when a channels cue mode is activated. The Cue function sends a channels incoming signal to the headphones. The cue level is adjusted by the Cue Level Knob.
GENERAL Functions and controls (Cont.) IN BUTTON - “cue ON THE FLY” - This function allows you to set a CUE POINT without music interruption (“on the fly”). This button also sets the starting point of a seamless loop. Out Button - This button is used to set the ending point of a loop. A loop is started by pressing the IN BUTTON, pressing the OUT BUTTON set the loop ending point. The loop will continue to play until the OUT BUTTON is pressed once again.
GENERAL Functions and controls (Cont.) you turn the jog wheel continuously. B. The jog wheel also controls the scratch effect, when the scratch effect is active. C. The jog wheel can also serve as frame search. Note: The inside of the wheel is touch sensitive and the outside edge of the wheel is not. Example: You can scratch by touching the inside or center of the wheel, and pitch bend when you touch the outside edge of the wheel. 18.
front panel - GENERAL Functions and controls 21 22 23 24 25 24 26 27 28 29 FRONT PANEL MIC SECTION (21-23) - the VMS2 is equipped with 1 microphone input, easy to use, no ASIO routing required. The microphone channel has an independent on/off switch, gain control, and tone control. 21. MIC ON/OFF - Turns the corresponding microphone on/off. When you Mic is on the button will be backlit by a red LED. 22. MIC GAIN CONTROL - Increase or decrease the microphone signal level. 23.
Rear panel - GENERAL Functions and controls 30 39 38 31 32 33 34 35 37 35 34 36 37 REAR PANEL 30. POWER SWITCH - This switch will turn the VMS2 on/off. When the unit is powered On, the power indicator LED will glow. Attention: Make sure that NOTHING is touch or resting on the jog wheels when you power on the VMS2. 31. XLR BALANCED OUTPUTS - The VMS2 has RCA (unbalanced) and XLR (balanced) connections to connect to amplifiers or connect directly to powered speakers.
Rear panel - GENERAL Functions and controls 39. POWER SUPPLY - The power supply is not required, but the headphones may be underpowered, and there is an increased chance of audio distortion. ©American Audio® - www.americanaudio.
Audio interface mode Audio Interface Mode: 4 Out Mode: The VMS2 can act like a 4x4 audio interface. Your USB audio is routed through the VMS2's MIDILOG Ch. #1 and #2 inputs. If you wish to route the inputs via USB for software play through or Time Code Control, set your desired VMS2 Channel to the USB setting and the channels' LINE/PHONO SELECTOR SWITCH (37) to the correct setting.
midi latency modes There are two MIDI Latency modes; Normal mode and Turbo mode. Normal mode has MIDI Latency of 10 milliseconds, this is the default mode. Turbo mode has a MIDI latency of 1 millisecond. To set the VMS2 to "Turbo mode: Before powering on press and hold the CUE, PLAY, and PAUSE buttons on the LEFT side. Hold the buttons until CHANNEL VOLUME LEVEL INDICATORS (13) light up with the code version. See page 11 CHANNEL VOLUME LEVEL INDICATORS for information on the code version.
eq modes Post EQ is for users who prefer using the EQ from their software. To toggle the post EQ mode on and off; before powering up the VMS2, press and hold the FORWARD SEARCH BUTTON (8) on control deck 2 and then power "ON" the unit. Release the button, your computer may reinstall the VMS2 as a new device, please allow 10-20 seconds for the change to take place. Confirm the EQ change by checking the ASIO Driver configuration. The first number in the sequence will be a "1" in this mode.
firmware update The included version of Virtual DJ includes a Firmware update utility. It is necessary to install this. To update your VMS2: 1. Please check your computer audio setting and ensure that the VMS2 is not set as a default playback, playback recording, or MIDI device. This will interfere with the update and software applications. 2. Click the start menu > All Programs > Virtual DJ > FIRMWARE Update. 3. Select the VMS2 or USB Audio Device (Windows XP).
firmware update 4. Wait untill the bar is filled in completely and "Upgrade Complete" is displayed. 5. Unplug the USB and shut down the VMS2. You may receive some Error windows like you see below. Select proper device in device select window. Please check your computer audio setting and ensure that the VMS2 is not set as a default playback, playback recording, or MIDI device. This will interfere with the update and software applications.
computer Connection 1. Connecting the VMS2 to your PC Connect the VMS2 to your PC by using the USB ports located on the rear of the VMS2 and your PC. Connect the supplied USB cable to the USB port on the rear of the VMS2, and the other end connects to the USB port on your computer. NOTE: Before connecting your VMS2 to your computer or laptop, we highly recommend that you install the provided software.
Set up ©American Audio® - www.americanaudio.
Cleaning Due to fog residue, smoke, and dust, cleaning the mixer should be carried out periodically to residue build up. 1. Use normal glass cleaner and a soft cloth to wipe down the outside casing. 2. Use a cleaner specially designed for electronics to spray in and around the knobs and switch. This will reduce small particle built up that can effect the proper operation of the mixer. 3. Cleaning should be carried out every 30-60 days to prevent heavy built up. 4.
Warranty WARRANTY INFORMATION: The VMS2™ carries a ONE year (365 days) limited warranty. This warranty covers parts and labor. Please fill out the enclosed warranty card to validate your purchase and warranty. All returned service items whether under warranty or not, must be freight pre-paid and accompany a return authorization (R.A.) number. If the unit is under warranty, you must provide a copy of your proof of purchase invoice. Please contact American Audio® customer support at (800) 3226337 for a R.A.
SPECIFICATIONS GENERAL Model: American Audio® VMS2™ - PC Media Controller Dimensions: 399(L) x 300(W) x 40(H) mm 15.7"(L) x 12(W) x 1.5"(H) Place on flat surface or mount in flat case 10.9 Lbs. / 4.93 Kgs DC 6V Single Voltage: AC 100V, 50/60Hz (Japan) AC 110V, 60Hz (Colombia) AC 120V, 60Hz (U.S.A. and Canada) AC 127V, 60Hz (Mexico) AC 220V, 50Hz (Chile and Argentina) AC 220V, 60Hz (Philippines and Korea) AC 230V, 50Hz (Europe, New Zealand, South Africa, and Singapore) AC 240V, 50Hz (Australia and U.K.
©American Audio® World Headquarters: 6122 S. Eastern Ave., Los Angeles, CA 90040 USA Tel: 323-582-3322 Fax: 323-582-3311 Web: www.americanaudio.us E-mail: info@americanaudio.us American DJ Europe Junostraat 2 6468 EW Kerkrade Netherlands service@americandj.eu / www.americandj.