
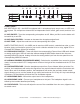
User guide


“CUE ON THE FLY” - This function allows you to set a CUE POINT without music inter-
ruption (“on the fly”). This button also sets the starting point of a seamless loop.
This button is used to set the ending point of a loop. A loop is started by pressing
thepressing the set the loop ending point. The loop will continue to play
until the is pressed once again.
If a SEAMLESS LOOP has been made, but the player is not actively in
SEAMLESS LOOP mode (a loop is not playing), pressing the will instantly reacti-
vate the SEAMLESS LOOP mode. To exit loop, press the
This search button allows you to quickly scan backwards through a track.
This search button allows you to quickly scan forwards through a track.
Pushing this button activates VINYL mode.
These buttons are used to load the selected song to the assigned deck in the
software.
These faders are used to control the output signal of any source assigned to
its particular player.
This fader is used to blend the output signals of channels A and B together.
When the fader is in the full left position (channel A), the output signal of channel A will be controlled
by the master volume level. The same fundamentals will apply for channel B. Sliding the fader from
one position to another will vary the output signals of channels A and B respectively. When the cross-
fader is set in the center position, the output signals of both the channels A and channels B will be
even.
The LED indicators that run along each channels
EQ section are used to measure incoming signal levels. Use these indicator to visually maintain an
average signal output of +4dB. A consistent average output level of +4dB will produce a clean output
signal. When no CUE sources are selected, these indicate the volume level on the MASTER OUTPUT.
When one or more CUE sources are selected, these indicate the volume level on all of the CUE sources
combined. At power-on, these indicate the VMS2 rmware version. If the left side lights up 1 LED, and
the right side lights up 3 LEDs, the rmare version is 1.3.
Press this button to what ever music source is playing.
Press this button to your desired music source.
Pressing the button during playback immediately pauses playback and returns the
track to the last set cue point. The red CUE LED will glow when the unit is in cue mode. The LED will
also flash every time a new CUE POINT is set. The CUE button can be held down to momentarily
play the track. When you release the CUE button it instantly returns to the CUE POINT. You can also
tap the CUE button to create a BOP EFFECT.
This wheel has three functions;
Make sure that is touch or resting on the jog wheels when you power on the
VMS2.
The wheel works as a pitch bend during Playback. Turning the wheel clockwise can increase the
pitch percentage up to 100%, and turning the wheel in the counter-clockwise direction can de-
crease the pitch percentage down to -100%. The pitch bend will be determined on how long
GENERAL FUNCTIONS AND CONTROLS (Cont.)
©American Audio® - www.americanaudio.us - VMS2™ Instruction Manual Page 11