
Installation Guide

WALL PANEL/LINER INSTALLATION
TIME REQUIRED
3-4 HR
9
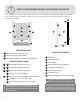
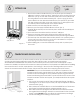
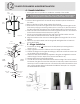
A - Inspecting Wall Panels/Liners
Inspecting panels at this point will give you confidence that the wall panels are straight and square from the
factory. When installing wall panels, you may need to make adjustments to the panels to accommodate for
unevenness of your existing walls. During the inspection process and/or dry-fitting process, if you have any
concerns about the alignment or fit of the wall panels, please call us and we will gladly assist you with your install.
1.
Find a large flat area to layout and inspect all panels.
2.
Align all panels and liners to check for straightness. Make sure grout lines are straight and square to each
other.
3.
Sistine Stone wall panels are made to be flexible and may have a slight bow. This condition is normal and wall
panels will flatten out when properly installed. If wall panels have been stored improperly or have become
excessivly bowed, they can be corrected before installation. (See troubleshooting section on last page for details)
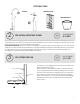
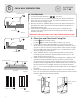
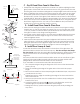
B - Dry-fit Wall Panels/Liners
1.
2.
3.
Place your first bottom back panel WB2 into position. (dia.12) Rest onto the
pan floor; use spacers between the floor and the panel to make the top of
the panel level.
Place the back liner L2 into position. Make sure the grout lines are aligned,
use spacers to make the top level. Inspect the spacing between the wall
panels and the side threshold plumb line.
Place the top panel WT2 into position, push the two panels together. Make
sure the grout lines are aligned, use spacers to make the top of the panel
level. Inspect the spacing between the wall panels and the side threshold
plumb line.
Depending on your cement board alignment, some sanding of the wall
panel edges may be required for a tight fit.
5.
6.
See installation video at www.americanbathfactory.com. Now you can check for
levelness and grout line alignment and spacing between walls and plumb line.
diagram 12
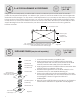
diagram 13
7
WB2
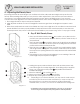
Holding the upper panels and liner in place with another persons help,
check the length and overlap alignment. Some fitting may be required.
Place one of the bottom side panels WB1 into position and check for
levelness and length.
7. Place the side liner L1 into position. (dia. 13)
8. Place one of the top side panels
WT1
into position.
9. Repeat steps 6 through 8 for other side of shower.
10. Depending on your faucet selection, you may need to mark and cut
out holes for your faucet and other accessories (i.e. shampoo shelf) to fit
through before you can place the panel into position. Remember
"measure twice, cut once", you can cut our walls with most cutting tools.
L1
L2
WT2
WB2
WB1
4.