
Installation Guide


Rectangle Bench Installation ue
OTNT efore you install the bench, please inspect each piece for any
damage that may hae occurred during shipping he underside of the bench may
hae an unfinished surface but does not affect the structure of the bench t this time
you can drill ilot holes should you wish to attach the bench to to your studs.
ae sure the bench pieces and the location where you will install it is clean from
any dirt or oils ailure to do so can cause a poor bond and cause the bench to brea
free from the walls
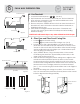
ry fit the bench in place he legs should be at a minimum of apart ar
around the legs, bench top and the pilot holes should you choose to screw the
bench top to your walls with a soft pencil to help guide you for placement or
added adhesion you can sand any edge or surface on the bench that will touch the
shower with grit sandpaper ipe away any dust to ensure all surfaces are clean
and dry
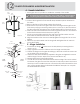
pply a bead of silicone in a ig ag pattern along the bottom of the bench legs
and any edge or side that will adhere to the wall igure ollow the manufacturers
instructions for applying the silicone
lace the bench legs into place and apply pressure holding in position while
sueeing out any ecess silicone and wipe away any ecess et, apply silicone to
the edges of the bench top igure and to the top of each bench leg lace into
position, again applying pressure to sueee out ecess silicone ipe clean and allow
to dry o assist the bench top to adhering to the legs you can add some eenly
dispersed weight to the bench top to hold it down until it fully dries For additional
security, you may screw the bench seat to your studs.
fter the bench is securely bonded, finish by applying grout and/or silicone around
the bench, shower walls and floor
llow at least hours for the silicone and grout to dry
/
bead of silicone normally cures in hours he cure time could ary depending on the moisture in the
air ac of humidity will mae the curing process slower t might tae up to hours for silicone to cure under
cooler or dryer conditions or full cure strength allow days
Bench Troubleshooting
Use 100% RTV ilicone ONLY
DO NOT use LIQUID NAILS as the adhesie
DO NOT N TN TON T NT TNN TON TNN N or other hrh he tht
tt the trutur terty of e e toe e of thee he etroy the urfe of the toe o your rrty
istine tone is a hard non-porous surface that preents dirt from accumulating and resists stains egular cleaning with a sponge and
warm, soapy water will remoe most build-up of dust or grime or tougher jobs, use can use an ammonia based cleaner or comet to
remoe tougher dirt and residue. For stubborn stains, you may use the aforementioned cleansers with a non-abrasive Scotch rite pad.
“Lightly” scrub the stained area in a circular motion to avoid discoloration lways mae sure to rinse well
ery month you should inspect all joints for cracs or other signs of separation eapply cauling to any joint showing signs of wear or
cracing ailure to inspect the bench and repair any cauling joints will oid the warranty
Scratches & Blemishes Can be removed by wet-sanding the bench surface. Make sure both the surface and sandpaper are wet, and
lightly sand until scratches and blemishes are removed.
Bench breaks free from Wall his could be due to a rea was not clean as silicone will not get a good adhesion to a dirty or greasy
surface. b Too much silicone may have been used, if excessive silicone is applied silicone will become dry on the outside but will remain
wet on the inside, never drying. c Not enough time allowed for silicone to become activated and tacky. lease mae sure to fully read
the instructions on how to apply your silicone and if any curing or priming is necessary o resole, you can clean the bench and surface
and re-install in place or please contact ustomer erice for further instructions
ure
ure
re tee
Th ou for your urhe of the er th tory ete hoer eh
his guide was written to help you with the installation ue to ariances in local building codes and reuirements, the installation instructions proided are only suggestions and
it is adised that you contact a ualified contractor for application specific adice and comply with local building codes he bench can support static loads of up to lbs
when properly installed and used o aoid potential injuries, DO NOT use bench if weight eceeds lbs his bench is intended for use for sitting purposes only by -person
DO NOT use the bench to stand on, step up, neel or use for any other application other than sitting mproper use and/or installation may cause damage and bodily harm
iscontinue use of the bench if there are any isual signs of fatigue or wear becomes eident egular inspections should be made to confirm that the bench is still in good
condition f the bench starts to show signs of wear discontinue use and call our ustomer erice epartment for further instructions
egs must be at
least apart
13