
Installation Guide


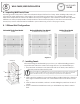


Table Of Contents

WALL PANEL/LINER INSTALLATION
TIME REQUIRED
3-4 HR
8
A - Inspecting Wall Panels/Liners
Inspecting panels at this point to make sure wall panels shipped OK from the factory. When installing wall panels, you
may need to make adjustments to the panels to accommodate for unevenness of your existing walls or panels.
Sistine Stone wall panels are made to be flexible and may have a slight bow. This condition is normal and wall panels
will flatten out when properly installed. If wall panels have been stored improperly or have become excessively
bowed, they can be corrected before installation. (See troubleshooting section on last page for details)
B - 3 Different Wall Configurations
Horizontal Double Liner Model
4" Middle Liner & 2" Top Liner
Horizontal Single Liner Model
6" Liner
diagram 12
6
Example:
C - Installing Panels
After determining the Wall Model type you have, you will start installing panels in
sequential order. Follow the order in the image above of your Wall Model type.
1. The panels are numbered on the back start with the #1 back panel. Next # 2
right side panel and then the #3 panel.
L3
L1
4
1
3
2. After panel #3 is installed, the accent liners will be installed. Start with L1 liner from
left to right on horizontal models or on vertical liners start from the bottom to the
top.
3. After the liners are installed, continue in order installing #4 panel then the rest of
panels.
4. If have a Horizontal double liner model, you will install the cap liners in order to
finish.
Vertical Liner Model
6" Vertical Liner
46 5
213
46 5
213
9
65
21
10
12 11
8 7
4 3
Each panel will have 100% Silicone (recommended) applied on the back of each panel,
it is best to make small 3" circles; this creates little suction cups that hold the panels in
place until silicone is dry. Use a rag to firmly push panels onto the wall board.