
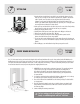
Installation Guide


10
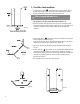
diagram 20
C - Fixed Glass Panel Installation
1. Carefully lift the glass panels and set them into the side and pan channels. Make sure
the glass panels are stable. (diagram 20) The glass channels in the shower pan and wall
thresholds will hold the glass in place while dry-fitting the panels and door.
2. The gap between the glass panels and the door should be 1/4”
3. Measure the positioning of the glass panels to ensure they are in the correct position. Make
sure the glass is level across the top and also the vertical edges are square and straight to each
other. Measure diagonally to check for straightness. Make any necessary adjustments.
(diagram 26)
Glass is tempered and cannot be cut
diagram 21
4. Locate the header pieces and lay them out in the correct orientation on the shower pan
threshold. (diagram 21) there will be 3 pieces.
If your shower is not a square then one piece will be longer than the other. Place the long piece
on the longer side and the short pieces on the short sides. (diagram 24)
5. Make sure the glass panels are still positioned correctly inside channels. Adjust the panels if
necessary.
6. Dry fit the header side pieces and make sure the ends meet with the wall threshold caps
(not installed) and the glass panels fit in the channels correctly. (diagram 25) Depending
on how square the walls are, you may need to sand the edges of the side pieces to make them
fit properly. Leave a small gap between the center and side pieces to make a grout joint
that matches your preference.
7. After everything is lined up correctly, remove the header pieces.
diagram 22
G2
G10
G2
G2
G2
G10
G10
G1
diagram 23