
Installation Guide

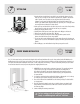


G - Silicone Side Panels in-place
1. The glass panels and header pieces are secured with silicone.
2. Apply a 1/4” thick bead of silicone into the bottom and side wall channels.
3. Re-install the glass panel in the same way you did before.
4. Refer back to all of the previous steps and diagrams to make sure the glass
panels are in the proper position.
12
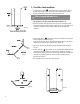
diagram 27
diagram 29
1/4” gap
3/8”
door to pan
threshold
clearance
shower pan
top of shower pan threshold
glass panels
to bottom
of door
to inside
of shower
H - Install Glass Door & Header
1. Apply a 1/4” thick bead into the channel of the header center piece.
2. Have someone help set door into position, don’t forget to install the washer onto hinge pin
3. Set header into position, don’t forget to install washer on hinge pin. Check alignment and
spacing.
4. Locate the header side pieces and apply a 1/4” bead of silicone to the top of the glass
channels. Place them into position and push them all the way down onto the glass panels.
Be sure to align them to the header center section. (diagram 28)
5. Allow the silicone to dry. Make sure the glass remains in the proper position. Leave the door in
the closed position and use braces to support the glass until the silicone dries. Refer to the
manufacturer’s instructions for silicone drying time.
I - Door Seal Installation
We have provided door seals for water sensitive areas such as wood floors. If glass panels and door
are installed correctly with the proper spacing, outside water spillage will be minimal and the side
seals won’t be necessary. The door sweeps (diagram 29) is what keeps the door closed.
Adjust the door seal until the required tension is achieved. If you would like to use these side seals,
follow the steps below.
1. Locate the plastic H shaped and bulb seal. One goes on the glass panel on the door strike side
the other goes on the door on the hinge side. Measure and cut the seals to length.
2. Starting from the top, push the H seal onto the glass, slowly working your way down.
3. Place bulb seal (rounded seal) on the hinged side edge of the stationary glass panel. The seal
seats from the top of the threshold to the bottom of the top hinge. Remove tape and press
firmly in place starting from the bottom end just above the threshold until the whole length is
securely in place. (diagram 29a)
4. When you grout the rest of the shower, be sure to grout the extra hinge hole in the pan and the
extra hinge hole in the stone header. Also, grout between the glass and the pan, the glass and
the wall thresholds, and the glass and the stone header. As well as between the joints between
the stone header center section and side pieces.
diagram 28
caps
door sweep
G2 G1 G2
P1
G10
G5
G5
diagram 29a