
Installation Guide


8
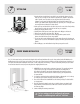
SILICONE RECOMMENDATIONS
We recommend using GE Silicone II Window and Door 100% Silicone throughout this installation as well as for your wall panel silicone.
During our tests we have found that using this silicone gives the best results. Use this silicone whenever the installation guide refers to the use of “silicone”.
Depending on the size and threshold type of your shower, you will need from 10 - 20, 9.8 oz. tubes of silicone to complete your shower installation.
DO NOT USE any Mastic, Mortar based Thin Sets or “Liquid Nails”. These will not cure properly between the two non-porous surfaces of the shower.
The use of a Water Barrier will also adversly affect the bond between the wall panels and the cement board.
Warranty coverage only extends to the brand and type of silicone we recommend and applied
per the manufacturer’s directions and recommendations.
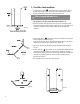
Recommendations for applying GE Silicone II Window and Door 100% Silicone to Wall Panels
1. Apply a 1/4” thick continuous bead of silicone along the perimeter if the wall panel, 1/2” in from the edge.
2. Use a circle pattern to cover the rest of the backside of the wall panels, leaving 3”- 4” between each 1/4” bead.(diagram 14)
3. Also apply silicone to the cement board. Apply in the same manner as steps 1 & 2.
It is very important to ensure complete coverage of silicone to achieve the best bond. The steps listed above are only recommendations and are meant to
supplement the specific manufacturer’s directions.You may need to brace the wall panels in place while the silicone dries. Refer to the manufacturer’s
recommendations for coverage of the silicone to determine the proper amount you will need for the project based on your shower size.
Depending on the size and threshold type of your shower, you will need from 10 - 20, 9.8 oz. tubes of silicone to complete your shower installation.
Tips for bracing Wall Panels
If you use the recommended silicone, and apply it correctly, the wall panels will stick to the walls without any bracing required. If the studs or cement board
surfaces are not perfectly even or square, the edges of the wall panels may not stay flush. If this happens, we recommend using a brace to hold the wall panels in
place until the silicone dries. Your bathroom layout and shower style will determine the method you use to brace the wall panels.
1. Always protect the wall panel tiles and shower pan floor from damage. Make sure the braces will not scratch the wall tiles. Use a piece of plywood or
a 2 x 4 to distribute the force across the largest surface area.
2. Brace the wall panels using a horizontal brace from one wall to the opposite wall.(diagram 15) Measure and cut a 2 x 4 or use an expandable curtain rod
or telescoping painter’s pole. Cut the 2 x 4 larger, so it has to be pushed into position or use shims to apply pressure on the wall panels.
3. Brace the wall panel from the shower pan threshold to the wall panel. Measure and cut a 2 x 4 to fit between the shower pan threshold and the wall panel.
Apply weight downward on the wall panel side or place a 2 x 4 vertically between the ceiling and the top of the brace. Push down on the angle brace and
Measure and cut a 2 x 4 screw it to the vertical 2 x 4 that is pushing on the ceiling. (diagram 16)
4. Leave the braces in place until the silicone has completely dried. Refer to silicone manufacturer recommendations for drying time.
diagram 16 diagram 17
Preliminary Information for Wall Installation
diagram 15