
Installation Guide


11
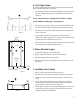
diagram 24
D - Dry Fit Door/Header
The door can pivot with the hinges on the left or right side depending on your preference. We will
illustrate an installation with the hinges on the right side.
1. Have one person place the door in its open position by allowing the bottom hinge pin to slide
into the hole in the pan threshold. Make sure the bottom hinge has the spacer on the pin.
(diagram 24)
Be sure to keep the door in a vertical position. If the door is not kept
vertical, damage to the hinge, glass, or pan may occur.
2. Next, have the other person place the header center section into position. Align the hole in the
header center section with the hinge pin and align the glass channels with the glass panels.
3. Push the header center section all the way down onto the glass panels and then position the
door in its closed position.
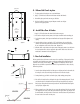
4. Check for clearance between the door and glass panels and top and bottom of door.
(diagram 25) There should be minimum of 3/16” between the door and panels. If you need
to, push the panels into the wall thresholds to increase your gap.
5. With a pencil, mark your side glass panel positions when adjusted correctly, this will give you a
reference point when permanently glueing in place with silicone.
G10
E - Silicone Side Panels in-place
1. The glass panels and header pieces are secured with silicone.
2. Apply a 1/4” thick bead of silicone into the bottom and side wall channels.
3. Re-install the glass panel in the same way you did before.
4. Refer back to all of the previous steps and diagrams to make sure the glass panels are in the
proper position.
diagram 25
1/4” gap
3/8”
door to pan
threshold
clearance
shower pan
top of shower pan threshold
glass panels
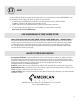
F - Install Glass Door & Header
1. Apply a 1/4” thick bead into the channel of the header center piece.
2. Have someone help set door into position, don’t forget to install the washer onto hinge pin
3. Set header into position, don’t forget to install washer on hinge pin. Check alignment and
spacing.
4. Locate the header side pieces and apply a 1/4” bead of silicone to the top of the glass
channels. Place them into position and push them all the way down onto the glass panels.
Be sure to align them to the header center section. (diagram 26)
5. Allow the silicone to dry. Make sure the glass remains in the proper position. Leave the door in
the closed position and use braces to support the glass until the silicone dries. Refer to the
manufacturer’s instructions for silicone drying time.
diagram 26
caps
G2 G1 G2
P1
G10