
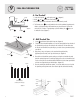
Installation Guide


6
PAN & WALL THRESHOLD TRIM
TIME REQUIRED
1/2 - 1 HR
9
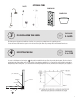
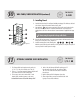
B - Wall Threshold Trim
1. Locate panel channel side thresholds & top trim. (diagram 8)
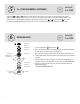
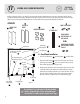
2. To help with the side threshold installation, use a level and draw a plumb line from the inside of
the pan threshold up to the top of the shower. Do this on both sides. This line will be where
the side rails and the wall tiles meet, this will give you a visual reference point when dry-fitting
your wall tiles.
3. Apply silicone, using a circle pattern, to the cement board along the plumb line,
approximately 4 inches wide, to the edge of the shower pan. (diagram 9)
4. Place the first side threshold into position, making sure to align the side rail with the vertical
plumb line previously drawn on the cement board. Apply pressure to the side threshold to bond
it to the cement board. The side threshold will flush with the inside of the shower pan threshold
and have a small gap where the pan threshold slopes. (diagram 10)
5. Place the remaining side thresholds into position, 3 to each side. Make sure to use a level and
the plumb line previously drawn on the cement board to align the side thresholds vertically.
W6
diagram 7
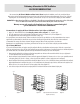
metal pan
P1
floor trim
P4
pan rails
P2
diagram 9
cement
board
plumb line
silicone
circles
diagram 6
floor trim
metal pan
pan rails
silicone
P2
P1
P4
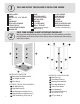
A - Pan Threshold
1. Locate the left pan rail and the right pan rail (diagram 6)
2. Dry fit and onto the front of the metal pan
3. Remove and place silicone on bottom of rails and in bottom channels, re-install.
4. The floor trim pieces are usually installed at the end of the installation. Depending on the
thickness of your bathroom floor, will determine how you place the floor trim. The floor trim
can be placed 3/4” high or 1” high depending on your floor thickness, the pieces can
be trimmed if needed. (diagram 7)
P2
P2
P1
P4
P4
P3
P3
P3
side thresholds (6)
(includes top trim and plugs)
W6
top trim top trim
P3
diagram 8
door side
plug