
Installation Guide


10
SLIDING GLASS DOOR INSTALLATION
12
TIME REQUIRED
1/2 - 1 HR
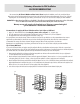
Our glass is tempered to make for a very strong door, the tempering gives maximum strength from impact on the surface, unfortunately this make the glass
very vulnerable to breakage from impacts to the bottom and top edges of the glass panel. Do not rest the top or bottom of glass panels on hard floor or objects,
always keep corner pads on glass while handling. Place foam or a soft material under the glass panel when unpacking and setting aside
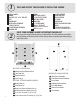
CONTENTS
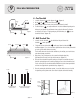
SLIDING GLASS DOOR
FIXED GLASS PANEL
DOOR SLIDE BRACKET
SILICONE
diagram 17
sliding glass door
sliding glass door
door handle
door handle
wheels
RIGHT DOOR
LEFT DOOR
door
bumper
fixed glass
panel
door
slide
bracket
door
slide
bracket
cement
board
wall threshold
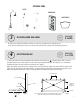
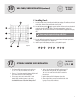
DOOR BUMPER
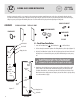
A - Fixed Panel Installation
1. Locate the Fixed Glass Panel , Door Slide Bracket , and Clear Silicone.
2. You have already determined the position of the Sliding Glass Door, left or right. (diagram 18)
3. Dry fit the Fixed Glass Panel in place. Place the fixed glass pane linto the channel of the wall
threshold, there is no channel for the pan top rail, silicone will hold the glass to the pan top
rail.
4. Now that you have dry-fitted your panel, remove panel and silicone in place.Place a small
bead of Silicone in the channel of the wall threshold and pan top rail. Silicone where the
Fixed Glass Panels will rest, don’t silicone past where the Fixed Panel ends. Push the Fixed
Glass Panels into their resting position and clamp in place until the silicone is dry. Wipe off any
excess silicone with tissue paper.
Be careful not to rest the edges of the door on hard
surfaces. Tempered glass is very strong and impact
resistant but its weakest point is impact on the edges.
door
bumper
door
bumper
door
bumper
fixed glass
panel
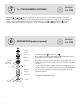
SHOWER DOOR WHEELS
DOOR HANDLE
G3
G1
G2
G12
G11
G13
G2
G11