
Installation Guide


3
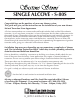
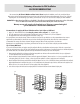
OPTIONAL ITEMS
3
PRE-INSTALLATION TEAR DOWN
FAUCETS
SHAMPOO BOX
SHOWER BENCH
TIME REQUIRED
8-16 HRS
This shower system is designed to be installed on a bare floor. It is necessary for any existing shower to be completely removed.
Tear out and remove all old material to expose the 2 x 4 wall studs. Clean up the shower area, removing all dust and old material from the area.
4
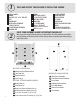
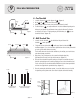
DRY-FITTING THE PAN
TIME REQUIRED
½ to 1 HR
It is easier to check alignment of studs and pan without the drain installed into the pan. Place the pan in the planned position. Check to see that the
spacing between the pan and 2 x 4 studs are flush. Some shims may be required to plumb walls with the pan. By screwing in the 1/2” cement board the
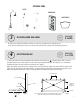
metal flange will pull fast to the studs, and will secure the metal pan in place. (diagram 1)
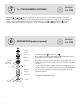
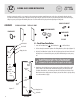
With the pan in position, check to make sure the 2” drain pipe is in the center of the pan drain hole. (diagram 2) Use the drain collar #5 by itself; remove the
rubber seal, nut and gaskets from the drain assembly. (diagram 3, next page) Push the drain collar #5 into the drain hole between the pan and the 2” pipe.
With the drain collar pushed flush to the pan surface, the 2” drain pipe should not extend past the inside threads of the drain collar #5.
diagram 2
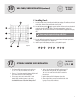
11” for shampoo shelf
minimum gap
required for
shampoo shelf
11”
triple studs
3/4” overhang when using triple studs, no overhang when using double studs
(double studs required, triple studs recommended for extra-strength)
1/2” cement board
2 x 4 stud
metal flange
pan
diagram 1
floor of pan
silicone bead
P1
P1