
Owner manual

American Bicycle Security Company
P.O. Box 7359
Ventura, CA 93006
Ph: (800) 245-3723 or (805) 933-3688
Fax: (805) 933-1865
www.ameribike.com
Email: turtle@ameribike.com
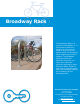
Rolling Rack
*Tools Needed for Installation
Tape Measure
Marker or Pencil
Masonry Drill Bit
Drill (Hammer drill recommended)
Hammer
Wrench 9/16”
Level
Recommended Base materials:
Solid concrete is the best base material for
installation. Ask your American Bicycle Security
representative which anchor is appropriate for your
application to ensure the proper anchors are
shipped with your rack. Be sure nothing is
underneath the base material that could be
damaged by drilling.
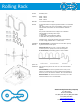
Installation:
3/8” anchors are shipped with the rack. Place the
rack in the desired location. Use a marker or pencil
to outline the holes of the flange onto the base
material. Drill the holes in accordance with the
specifications shipped with the anchors. Make sure
the holes are at least 6” away from any cracks in
the base material.
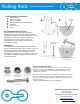
Tamper Resistant Hardware
The concrete spike is a permanent anchor. The top of the wedge
anchor can also be pounded sideways after installation so that it
cannot be removed. Other tamper resistant fasteners are also
available for purchase.
When using the special tamper resistant nuts, always set and first
tighten the anchors. Once the rack is installed, replace two nuts
from the bracket (opposite sides from each other) with the tamper
resistant fastener.
DO NOT OVERTIGHTEN the tamper resistant nut.
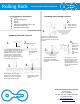
Mark holes
Drill hole
3” Deep
Use washers to
level rack
(Anchors will vary according to
install surface)
Surface Mounted Installation
2.
3.
4.
1.