
Owner manual

American Bicycle Security Company
P.O. Box 7359
Ventura, CA 93006
Ph: (800) 245-3723 or (805) 933-3688
Fax: (805) 933-1865
www.ameribike.com
Email: turtle@ameribike.com
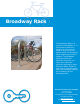
Rolling Rack
*Tools Needed for Installation
Level
Cement mixing tub
Shovel
Trowel
Hole coring machine with 4” bit
Access to water hose
Materials to build brace
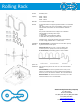
Installing into Existing Concrete
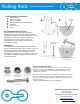
Installing into New Concrete
Core holes no less than 3”
diameter (4”recommended)
& no less than 10” deep into
surface
Place rack into
holes, making
sure it is level
Fill holes with epoxy
grout. 32” of the bike
rack should remain above
surface.
Make sure
rack is level
& held in
place until
the grout
has
completely
set.
*An easy way to brace
the rack while the grout
sets is to bolt two 1x4”
boards together at one
end and clamp them onto
the legs of the rack like a
clothes pin.
1.
2.
3.
4.
Place corrosion resistant sleeve (min.
3" inside diameter) in sand pour bed
in exact location where rack will be
installed. Make sure top of sleeve is
at same level as desired finished
concrete surface. Fill sleeve with
sand to keep it in place and prevent
it from filling with concrete.
Pour concrete
& allow to
cure.
After curing, dig out sand
from sleeves & insert racks,
making sure they are level &
at the appropriate height.
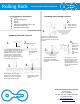
Place racks in holes,
making sure it is
level.
1.
2.
3.
4.
Rail Mounted Installation
Installation Steps:
In-Ground Mounted Installation