Owner’s Manual Portable Air Conditioner Model No: ACW500 It is important that you read these instructions before using your new purchase and we strongly recommend that you keep them in a safe place for future reference.
Table of Contents Thank You! ………………………………………………………………………1 Safety Instructions …………………………………………………………… 1-2 Specifications ……………………………………………………………………3 Parts ……………………………………………………………………………4 Positioning ………………………………………………………………………5 Control Panel ……………………………………………………………………6 Screen ……………………………………………………………………………7 Remote Control …………………………………………………………………7 Operation ………………………………………………………………………8 End of Season Storage …………………………………………………………9 Cleaning ……………………………………………………………………… 10 Carbon Filter Installation …………………………
Thank You! Thank you for purchasing an ACW Portable Air Conditioner. ACW is a leading brand in indoor air treatment. We would like you to enjoy the many benefits this unit offers, so please read this manual carefully and take full advantage of the many advanced features that your American Comfort Worldwide Air Conditioner offers you. ACW has specialized in complete indoor environment control, manufacturing world-class air conditioners with innovative technology.
Safety Instructions Do not use your air conditioner: If the power cable wires are frayed or cut When small children may be left unattended On a slope or uneven surface Close to a heat source This products is not made for DIY repair If there is a risk of liquid falling on the unit Inside unit exposed to the weather outdoors In a permanent very humid environment Do Not Connect the unit to extension cord.
Specifications Model ACW500C ACW500CH Cooling Capacity 13,000 BTU/h 13,000 BTU/h Heating Capacity N/A 12,000 BTU/h Cooling/Heating Power Consumption / Current 1230W / 11 A 1230W / 11 A Moisture Removal in Cooling mode 66 pints/day 66 pints/day Power Supply 110-120V/60Hz 110-120V/60Hz Refrigerant R410 R410 Compressor Rotary Rotary Fan Speed 3 Speeds 3 Speeds Thermostat 60º - 90º F 60º - 90º F Ambient Temperature Range for Operation 64.4ºF - 104ºF 41ºF - 80.
Parts Front Side Back Side Air Inlet Control Panel Screen Upper Filter frame Exhaust Pipe Power Cord Location Handle Exhaust Connector Lower Filter Frame Castor Plug cap Check packing accessories and read your user’s manual to learn how to use them.
Positioning This unit can easily be moved from one room to another. In doing, so keep this in mind: • The air conditioner must stand upright on an even surface. • Do not position near bath, sink, or other permanent, wet or damp area. • Keep unit at least 18" from wall, curtains, draperies, or heat sources to insure adequate air circulation.
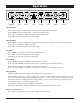
Control Panel TiO2/Ion Timer Sleep Up Down Fan Mode Power 1. POWER Press this key to turn on/off machine. After machine turns on, default value is cooling mode with low fan speed. 2. MODE After machine turns on, for cooling only model, press this key to select cooling, fan mode; for cooling & heating model, press this key to select cooling, fan and heating mode. 3. FAN After machine turns on, press this key to select fan speed (high, medium and low). 4.
Screen 1. Temperature Display 2. Cooling Mode Indicator 3. Fan Mode Indicator 4. Sleeping Mode Indicator 5. Timer Mode Indicator 6. Receiver 7. Light Display 8. Water Full Indicator 9. Low Fan Speed 10. Medium Fan Speed 11. High Fan Speed 12. Heating Mode Indicator (only for heating model) 13. Ion Indicator (only for Ion model) 14.
Operation TiO2/Ion Timer Sleep Up Down Fan Mode Power Cooling Mode · · · · After machine turns on, default value is cooling mode with 72ºF and low fan speed. Press “MODE” to select cooling mode, cooling mode indictor turns on . Press “UP” or “DOWN” to adjust temperature (from 60ºF to 90ºF). Press “FAN” to select fan speed (low, medium, high) Heating Mode · Press “MODE” to select heating mode, heating mode indicator turns on (only for cooling and heating model).
Emptying the Water Container In case of the WATER FULL (W.F.) LED alert, the unit is required to be drained. At the end of AC Season, this unit should be drained prior to storage. In both situations, we recommend that you take the following steps. Switch off the unit and remove the plug from the outlet. • Position a flat container or dish on the floor under the drain hole.
Cleaning Always unplug the unit from the power supply (wall outlet) before beginning the cleaning. Housing Use a soft, damp cloth to wipe the body clean. Never use strong chemicals, oil-based products, detergents, chemically treated cloths or other cleaning solutions. These could possibly damage the housing. Filter · Clean the filters every two weeks, if filters are blocked by dust, machine efficiency will be reduced .
Carbon Filter Installation (optional) 1. Remove the side filter frame from the unit. 2. Remove the back filter frame from the unit. 3. Separate the filter fixer from the back filter frame. 4. Remove the active carbon filter from its plastic bag. 5. Insert the active carbon filter into the filter frame. 6. Fix the filter by re-assembling the fixer onto the filter frame. 7. Re-fit the back filter frame inside the unit. 8. Re-fit the side filter frame inside the unit.
Troubleshooting Never try to repair or dismantle the air condition yourself. Incompetent repairs result in loss of warranty and can endanger the user and the property. Problem Cause Solution No power supply. Make sure the The air green light on the plug is lit. conditioner does Is the power light flashing? not function.* Is the water full LED lit? The unit is in direct sunlight. Connect to a functioning outlet and switch on. See below for Plug and Reset button application.
13
One Year Limited Warranty American Comfort Worldwide LLC (“ACW”) warrants this ACW portable air conditioner to the original retail purchaser (“Purchaser”) purchasing only in the 48 Contiguous States, for one year from the date of purchase, against defects in material and workmanship under normal use and service. Should your ACW Portable air conditioner prove defective within one year from the date of purchase, please follow our return procedure to return the defective unit.
Le Manuel du Propriétaire Le Climatiseur Portatif ACW200 C’est important quevous lisiez ces instructions avant d’utiliser votre nouvel achat. Nous recommandons fortement que vous les gardez dans un endroit sûr pour la référence future.
La Table des Matières Merci! ……………………………………………………………………………1 Les Instructions de sûreté …………………………………………………… 1-2 Les Spécifications …………………………………………………………… 3 Les Parties …………………………………………………………………… 4 Le Placement ……………………………………………………………………5 Le Tableau de commande avant …………………………………………………6 Affichage …………………………………………………………………………7 La télécommande ………………………………………………………………7 L’Opération ………………………………………………………………………8 Le Vider du Récipient d’Eau ……………………………………………………9 Le Nettoyage ………………………………………………………………… 10 L’I
Merci! Merci pour votre achat d’un ACW le Climatiseur Portatif. ACW est une marque qui mène dans le traitement d’air intérieur. Nous aimerions que vous ayez apprécié les beaucoup d’avantages de cette unité. S’il vous plait lisez soigneusement ce manuel et prenez l’avantage plein des beaucoup de caractéristiques avancées. ACW s’est spécialisé dans le contrôle d’environnement intérieur complet, fabriquant des appareils de chauffage de niveau international, les climatiseurs, avec la technologie innovatrice.
Sûreté N’utilisez pas votre climatiseur : Si les fils de cordon d’alimentation sont éraillés ou coupent. Quand les petits enfants pourraient être partis indépendant. Sur une pente ou une surface inégale Près d’une source de chaleur Ce produit n’est pas fait pour la réparation par DIY. S’il y a un risque du renverser de liquide sur l’unité. Si l’unité est exposée au temps dehors. Dans un environnement très humide.
Les Spécifications Modèle ACW500C ACW500CH La Capacité de Refroidissement 13,000 BTU/h 13,000 BTU/h Capacité de chauffage N/A 12,000 BTU/h La Consommation Électrique du 1230W / 11 A Refroidissement / Courant Déshumidification en Modalité Refroidisse66 Pintes / 24h ment 1230W / 11 A 66 Pintes / 24h La Source Électrique 110-120V/60Hz 110-120V/60Hz Réfrigérant R410A R410A Le Compresseur Rotatif Rotatif La vitesse du ventilateur 3 vitesses 3 vitesses Le Thermostat 60º - 90º F 60º - 90º
Les Parties La Prise d’air Le Tableau de commande avant Châssis supérieur du filtre Affichage Le Tuyau d’Echappement Emplacement du cordon électrique La Poignée Raccord d’échappement Châssis inférieur du filtre Les roues tournant Capuchon Vérifiez les accessoires d’emballage et lisez votre notice d’utilisation afin de vous familiariser avec leur utilisation.
Le Placement Cette unité peut être facilement déplacée d’une pièce à un autre. Mais vous rappelez ceci : • Le climatiseur doit être debout placé sur une même surface. • Ne disposez pas l’approche d’un baquet de bain, l’évier, ou un secteur qui est toujours mouillé ou humide. • Placez l’unité au moins 18" du mur, les rideaux, les draperies, afin d’assurer de la circulation d’air suffisante.
Le Tableau de commande avant TiO2/Ion Minuterie Veille Plus Moins Ventilateur Mode Marche/Arrêt 1. MARCHE/ARRET Appuyez sur la touche pour mettre en marche l’appareil. Après la mise en marche de l’appareil, le mode par défaut est climatisation avec ventilateur à vitesse lente. 2.
Affichage 1. Affichage Température 2. Voyant Lumineux Mode Climatisation 3. Voyant Lumineux Mode Ventilateur 4. Voyant Lumineux Mode Veille 5. Voyant Lumineux Mode Minuterie 6. Récepteur 7. Eclairage D’Affichage 8. Voyant Lumineux Réservoir Plein 9. Vitesse Lente Du Ventilateur 10. Vitesse Moyenne Du Ventilateur 11. Vitesse Rapide Du Ventilateur 12. Voyant Lumineux Mode Chauffage (pour modèle de chauffage seulement) 13. Voyant Lumineux Ion (pour modèle Ion seulement) 14.
L’Opération TiO2/Ion Timer Sleep Up Down Fan Mode Power Mode Climatisation · Après la mise en marche de l’appareil, la valeur par défaut est mode climatisation avec 72ºF et ventilateur à vitesse lente. · Appuyez sur “MODE” pour sélectionner le mode climatisation, le voyant lumineux du mode climatisation s’allume. · Appuyez sur “PLUS” ou “MOINS” pour modifier la température (de 60ºF to 90ºF).
Le Vider du Récipient d’Eau L'avertissement allume, WATER FULL (W.F.), clignotera pour signaler que le récipient doit être vidé. À la fin de la saison de climatisation, cet appareil doit être purgé avant stockage. Dans les deux situations, nous vous recommandons de suivre les étapes suivantes. À la fin de la saison de climatisation, cet appareil doit être purgé avant stockage. Eteignez l’unité et enlevez le bouchon de la sortie • Placer un plat ou un récipient qui est plat par terre sous le trou du drain.
Le Nettoyage Débranchez toujours l’unité de l’alimentation (la sortie dans le mur) avant de commencer le nettoyage. La Couverture Utilisez un tissu doux et humide pour essuyer le corps nettoie. N’utilisez jamais de produits chimiques forts, les produits de pétrole-basé, les détergents, les tissus chimiquement traités ou les autres solutions de nettoyage. Ces probablement pourrait endommager la surface.
L’Installation du Filtre de Carbone 1. Remove the side filter frame from the unit. 2. Remove the back filter frame from the unit. 3. Separate the filter fixer from the back filter frame. 4. Remove the active carbon filter from its plastic bag. 5. Insert the active carbon filter into the filter frame. 6. Fix the filter by re-assembling the fixer onto the filter frame. 7. Re-fit the back filter frame inside the unit. 8. Re-fit the side filter frame inside the unit.
Le Dépannage N’essayez jamais vous réparer ou essayer de démonter le climatiseur. Les réparations incompétentes ont pour résultat la perte de la garantie et ils peuvent risquer l’utilisateur et la propriété. Le Problème La Cause La Solution Le climatiseur Le climatiseur n’est pas allumé. ne fonctionne pas.* Assurez que la GREEN LIGHT sur le bouchon est allumée. Le climatiseur ne semble pas exécuter.
13
Garantie Limitée d’Un An American Comfort Worldwide LLC (« ACW ») garantit ce climatiseur portable ACW à l’acheteur initial (ci-après l’« Acheteur ») s’il a été acheté dans un des 48 États limitrophes, pendant un an à compter de la date d’achat, contre tous défauts matériels et de fabrication dans des conditions normales d’utilisation et de fonctionnement.