
Assembly Instruction Manual


DIAGNOSTIX
™
972
• Assembly Instructions
• Schematics
• Parts List
MAINTENANCE
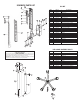
1. With base on its side connect upright outer
sleeve to base using large (6mm) allen nut
and lock washer as shown. Tighten with
large (6mm) allen key provided. Note:
Tighten hex nut securely by applying as
much force to allen key as possible.
2. Turn base upright and slide stainless steel
inner tube inside outer sleeve with open
end up.
3. Loosen (3mm) allen nut on collar of cuff
storage basket with small (3mm) allen key
provided. Place cuff storage basket atop
stainless steel inner tube making sure the
tube goes completely inside collar and
tighten allen nut with key.
4. Attach the main unit to the cuff storage
basket and secure with large (6mm) allen
nut and washers as shown.
5. Adjust height of mercury unit by
loosening adjusting screw and
raising or lowering inner tube until mercury
column is at desired height. Tighten
adjusting screw by hand.
6. Carefully remove red connector cap
covering reservoir connector at rear of
unit. Attach the coiled tubing to reservoir
connector on the back of main unit. (Note
the coiled tubing may be difficult to
connect - moisten with soapy water if
necessary). Connect coiled tubing to
inflation system. Refer to booklet entitled
DIAGNOSTIX 972
™
MERCURIAL BLOOD
PRESSURE INSTRUMENT for
instructions on operating the unit.
To Lock Mercury Within the Reservoir: Tilt the entire unit back
45° towards the reservoir to permit mercury to flow out of
cartridge tube and into reservoir. When cartridge tube is
completely emptied of ALL mercury (and while it is still tilted
45°), move locking lever to the right “OFF”. Mercury should be
locked within the reservoir during maintenance or transport. To
release mercury, move lever to “ON” position. If necessary, tilt
unit towards tube to allow mercury to flow out of reservoir.
Lift on the spring loaded EZ-Tube
™
mechanism
located at the top of the instrument. Tilt
instrument forward to free tube. If necessary
use a small flathead screwdriver to help
dislodge the top of the tube. To replace tube,
lift EZ-Tube
™
mechanism and insert base of
tube into main unit, being sure graduation
marks face out. Next, position top of tube and
release EZ-Tube
™
mechanism.
®
To Register Your Product, visit us at www.adctoday.com and follow the links
HOW TO ASSEMBLE
1
2
3
4
Included Tools
Tighten hardware as securely as
possible. (Note: To prevent
loosening, hardware must be
tightened securely and
periodically checked).
Slide inner tube inside outer tube.
Attach main unit to cuff
storage basket.
Insert pole to bottom of cuff
basket and tighten allen bolt on
side of the cuff storage basket
with small allen key.
6mm 3mm
ADC
55 Commerce Drive
Hauppauge, NY 11788
ADC (UK) Ltd.
Unit 6, PO14 1TH
United Kingdom
tel: 631-273-9600, 1-800-232-2670
fax: 631-273-9659
www.adctoday.com
email: info@adctoday.com
EC REP
IB p/n 9357A-00 - rev 5 Printed in U.S.A.
©2012 ADC