
Ground Anchor 3 x 63 x 0.14in (for 2" SGA) Installation
Installation Instruction Manual
For
ICC ES AC 443
Pre-Installation
• Know your soil composition: If you don’t take time to determine your soil composition
you must use the minimum allowable loads for the particular screw you are using when
planning your structure. Determine as cohesive (high clay) vs. non-cohesive (low clay or
high sand) to determine load capacity as listed in the relevant section of the ICC-ES
report. By code a complete Geotech report and engineer certification is required.
• Safety equipment/PPE: Use adequate safety equipment while mechanically installing
ground screws, i.e., steel toe shoes, safety glasses, gloves, hard hat, etc.
• Dial 811 call before you dig to ensure a clear path from utilities for the screw to
penetrate into the subsurface.
• Be sure of above ground clearance of obstructions and nonessential personnel.
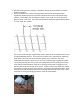
• Locate your desired screw positions with flags.
• Pilot holes to improve accuracy are helpful for very hard soil, but not necessary. If you
choose to do so, predrill with a 1/3 diameter by 1/3 deep wood bit, or drive a rod or
stake into the ground as plumb as possible. You will still need to use a level during
installation to maintain plumb. Adjustments to level can still be achieved through the
initial 2/3
depth of installation.
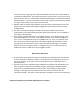
Installation
• The product may be used as a foundation system to support various constructions,
provided that it is installed according to the manufacturer's current instructions and
within the scope
of ICC ES AC443. Wood and metal framing preferred.
• Follow safe handling instructions laid out by the mechanized driver manufacturer
• Confirm that the adapter connecting the drive shaft of the mechanical driver to the
screw that is being installed lines up and seats properly.
• If using a Model 3 (open top with 3 welded nuts) ground screw, install the bolts so
they are flush with the inside of the ground screw before installation to help
maintain the integrity of the nut during installation.
• If using a screw with a pre welded flange, make sure that the flange face and adapter
face match and are bolted tight prior to attempting the install.